This tutorial explains how to add an extra row to Chrome Bookmarks bar. After following this tutorial, you can easily organize Chrome bookmarks in 2 rows. In fact, you can even add more than 2 rows of Bookmarks in Chrome! So, if you have tons of bookmarks and would like to see a lot of them in Chrome bookmarks bar, I am going to show you exactly how.
Recently I started a mission to clean up my Chrome bookmarks. I started by deleting broken bookmarks and removing duplicate bookmarks. Then I spent time in going through the remaining bookmarks by opening Chrome bookmarks randomly. After that also, I had a lot of bookmarks, and I found that I wanted to see more of them in Bookmarks toolbar. So, I started on my “quest” to find some solution to show Chrome bookmarks in multiple rows. And I was able to find some solutions. One of them is perfect, while other is not as graceful. Let me share with you what I was able to unearth in my journey towards solving one of the most complex problems for mankind: “How to add a second row to Bookmarks Bar in Chrome?” ;)
The solutions that I found all involve extensions. There are 2 extensions that I especially like and I will share here. There are some other extensions as well which claim to do this, but fail miserably.
Add 2 or More Bookmarks Bars to Chrome with Roomy Bookmarks Toolbar Chrome Extension:
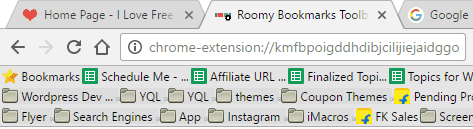
Roomy Bookmarks Toolbar Chrome extension is as good as it gets if you want to show multiple rows in Bookmarks bar. This extension lets you add 2 or more rows to Bookmarks Bar of Chrome. Not only that, it comes with some other cool features as well that make it quite better than the Bookmarks bar of Chrome. I used this extension to add 3 rows of bookmarks. You can see the result in the screenshot above. Looks almost cool, isn’t it?
Do note that it will not replace Chrome’s Bookmark bar, but instead add its own toolbar. So, it is better to hide Chrome’s Bookmarks bar in case you are using this plugin (you can hide it by going to 3 bar icon on top right > Bookmarks > then Uncheck “Show Bookmarks Bar”).
Now, the extension by default does not give this type of look. We will need to tweak a couple of settings to make it exactly resemble the Bookmarks Bar of Chrome.
Once you have installed the extension, you will see its icon in Chrome. Right click on the icon and click on “Options” to open its Settings page. Below is how the Settings page looks like.
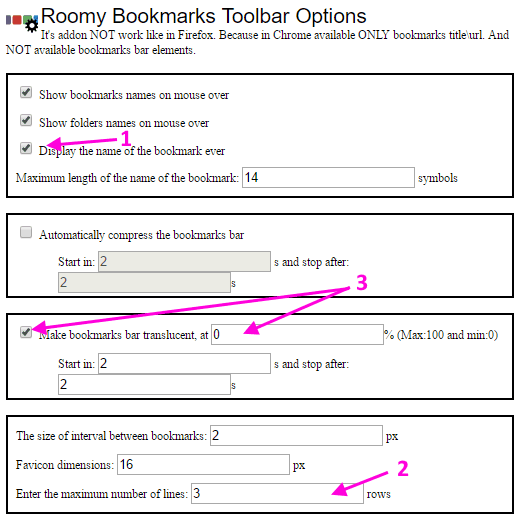
In the screenshot above, I have highlighted the main options that I recommend changing:
- By default, this extension starts showing only icons of the bookmarks, and not the corresponding names. If that works for you, great. In that case, you can actually have a lot of bookmarks in the Bookmarks bar. In that mode, this extension shows the bookmark name when you mouse over the icon. However, I personally don’t like that as it is a bit confusing for me. So, I prefer to see bookmark names also, along with icons, in the same manner as Chrome shows on its Bookmarks Bar. For that, select the setting that I have highlighted as number 1. It reads “Display the name of the Bookmark ever”. Once you do that, you will be able to see bookmark names as well, along with the icons.
- Next setting is what we are here for. You can specify how many rows of bookmarks you want to see. I have added 3 rows here, and you can see how that looks in the first screenshot of this article. You can add as many as you want. This setting is what lets you add multiple rows of Bookmarks to Chrome.
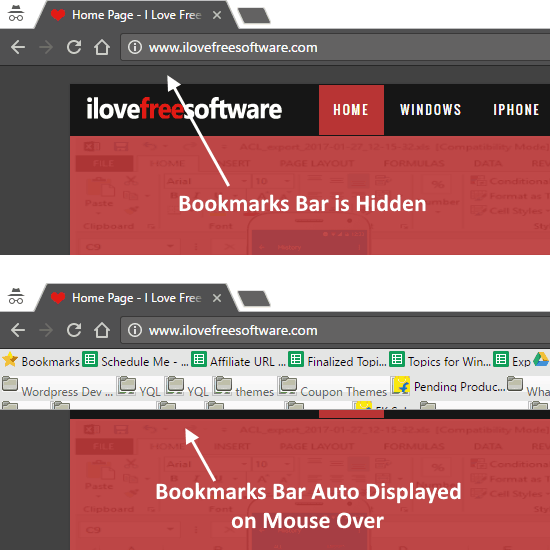
- Once you have 2 or more Bookmarks Bars, they will start occupying a lot of screen space. Now, this extension has a fantastic feature to auto hide Bookmarks Bar. This means that by default the Bookmarks Bar will not be visible, but if you take your mouse over the Bookmarks Bar area, it will become visible. It is not apparent from the settings that how can that be done, but I will let you know steps for that. In the screenshot above, I have highlighted two settings as number 3. Both have to be done. Select the check box corresponding to “Make Bookmarks Bar Translucent”, and then set its value as 0. Now, this will give auto hide bookmark bar effect like this:
So, this is how you can easily add multiple Bookmarks bars and also auto-hide them. This extension is as good as it gets if you are trying to get multiple rows in Bookmarks Bar of Chrome. I especially like the fact that we can auto hide Bookmarks bar. However, Auto Hide feature becomes a nuisance sometimes, especially if you need to interact with top part of a website. The Bookmarks bar will appear immediately, stopping you from accessing the top. I wasn’t able to find any way to easily temporarily disable Bookmarks bar from appearing; I had to again go in Settings to disable that.
Extra Bookmarks Bar for Chrome:
This extension (Extra Bookmarks Bar) is not the best possible extension out there, but it is pretty unique in what it does. It adds an extra Bookmark bar to Chrome, but it adds that at the bottom of Chrome.
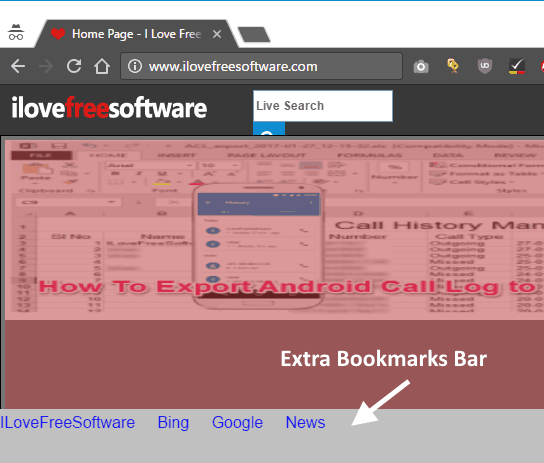
So, you end up having normal Chrome Bookmarks bar at the top, and this new Bookmarks bar at the bottom. Also, you can completely customize which links you want to show in this Bookmarks bar in the footer. You can add the text that should be displayed, as well as the corresponding links. The options page of this extension looks like below:
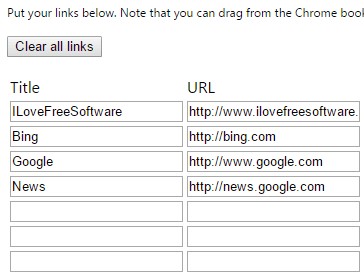
Here you can add Link text as well as the URL.
The only thing that I don’t like is that the footer bar doesn’t look very nice. I really wish it would have been designed a bit better. Also, there should be an option to show icons along with the text. Nevertheless, I still decided to add it here as it is quite different than most of the other bookmark bar extensions out there.
Other Methods to Fill More Bookmarks in Single Bookmarks Bar of Chrome:
In case none of the above methods are as per your liking, then your only option is to try to fit more Bookmarks in the single Bookmark bar. You can adopt following strategies for the same:
- Remove names from all the bookmarks to keep icons only. For this, you can right click on a Bookmark, Edit, and then delete its name. This will only show the icon of the bookmark. If you want to do it for all your bookmarks, then you can use this extension to do this in one go. Do note that once you use this extension, all the names of your existing Bookmarks would be gone, and this process can’t be reversed. Might be worthwhile to keep backup of Chrome bookmarks before you hit icon of this extension.
- Another option you can go for is to organize your bookmarks better. Instead of showing all the Bookmarks in the Bookmarks bar, you can organize them in folders, and then just show the folders on Bookmarks Bar. This will add one additional click to get to any bookmark, but it will make your bookmarks bar a lot more organized.
My Verdict:
When I started looking for a solution to show 2 bookmarks Bar in Chrome, I thought there could be a simple Chrome setting that could make that happen. Not only was I surprised to see that is not the case, I was more surprised to see that there isn’t any good extension that could override this behavior of Chrome. Roomy Bookmarks Toolbar is the one that gets me closest to what I was looking for. I especially like its auto hide feature, but don’t appreciate the fact that it can become hindrance sometimes. Extra Bookmarks Toolbar is unique in that it provides an additional bookmarks bar but at the bottom. I really wish it was designed a bit better.
Do you know of some other solution to show multiple Bookmarks Bars in Chrome? Let me know in comments below.