A Self-signed Certificate is a public key certificate that is not issued by a Certification Authority (CA) – neither private nor public. The certificate is signed with its own private key, instead of requesting it from a public or a private CA. Self-signed certificates are very easy to create, do not cost any money, and useful in test environments since developers aren’t dependent on others for the issuance of certificates.
In this article we will be exploring 3 Free Self-Signed Certificate Creator Software for Windows that you can use to create Self-Signed certificates easily and quickly and use them wherever the need be. So, let’s get started.
1. Sordum’s Self-Signed creator
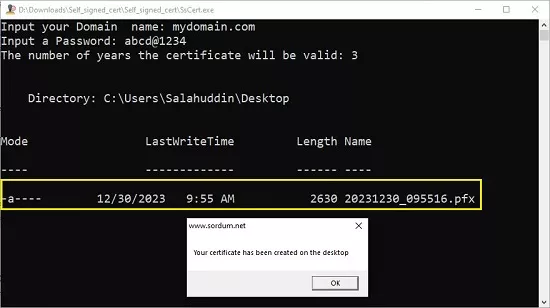
This is a free portable software for Windows that enables you to create self-signed certificates easily and quickly. All that you are required to do is input the domain name, specify the password and validity of the certificate in years and a self-signed certificate will be created on your desktop. Click on the link that we have provided below to download this utility.
Simply unzip the downloaded archive and launch the application. Since it’s a portable software no installation is required. Now, specify the Domain Name for which you wish to create the certificate and input the password and the validity of the certificate in years. A self-signed certificate with the above specifications will immediately be created on the desktop in the PFX file format. You can now go ahead and use it wherever required.
To download Sordum’s Self-Signed creator, click on this link and scroll down to the bottom of the page.
2. Docentric Self-Signed Certificate Tool
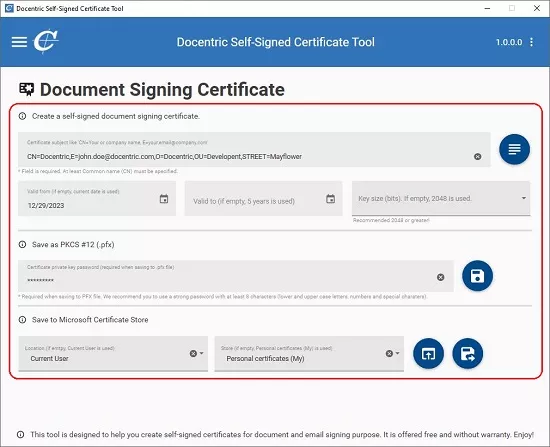
Let’s move on to the next utility from Docentric that allows you to create self-signed certificates for various purposes such as Document signing, Email signing, Client Access, Code signing and more. The tool boasts of a very simply GUI that allows you to specify the Certificate Subject (common name, email, organization name etc) and its Validity. Additionally, you can directly save the certificate to the specified Location and Store instead of manually carrying out this process as in the case of the above tool. Click on the link that we have provided below to download this tool.
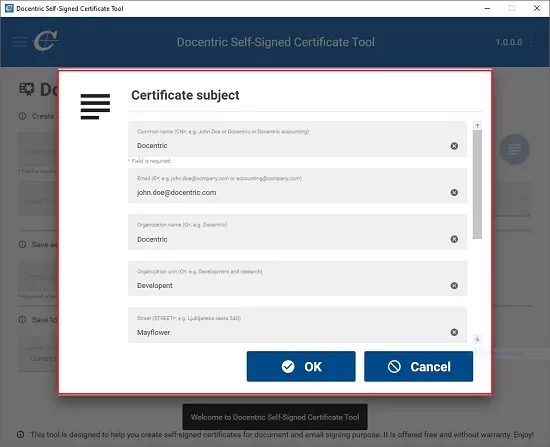
Launch the application and click on the 3-lines icon at the top left to choose the purpose for which you wish to create the self-signed certificate. Type the certificate subject in the prescribed format (‘CN=your or company name, E=your email address, O=organization name, OU=organizational unit…). You can click on the button to the right of this field and use the ‘Certificate Subject’ form to easily input the details in case of any difficulty.
Next, click on the respective ‘Calendar’ buttons to define the Valid from / to dates, choose the key size in bits (default: 2048 bits) and type the certificate private key password which is required when you are saving the certificate to a PFX file. Finally, use the drop-down lists at the bottom of the window to choose the Location and Store where you wish to store the self-signed certificate and then click on the ‘Save’ icon to the right. Your certificate will be created instantly and automatically save to the selected store.
Click here to download Docentric Self-Signed Certificate Tool
3. SSL Certificate Maker
This tool for generating self-signed certificates is suitable for private networks, home labs, and similar environments where self-signed SSL certificates are needed. It enables you to establish trust for your own certificate authority within your operating system. You can also use this application to create your own CA as we have explained below. Just click on the link that we have provided below to download SSL Certificate Maker from a GitHub repository.
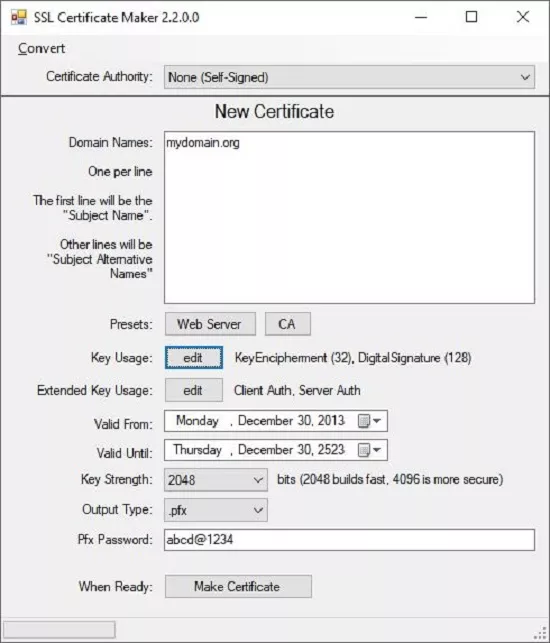
Lauch the application and type the parameters of the certificate subject (one per line) in the text box at the top. If you wish to create a certificate for a new web server, click on the corresponding button. Alternatively, if you wish to create a CA with this utility, click the CA preset button. Now, click on the respective ‘Edit’ buttons and choose the purpose for which you wish to use the self-signed certificate such as certificate signing, code signing, email protection and more.
Next, specify the Valid from / until dates for the certificate using the calendar and choose the key strength (in bits) using the drop-down menu. Finally, choose the output file format (PFX / CER), input the PFX password and click on the ‘Make certificate’ button. You will find that the self-signed certificate will be instantly created and stored in the CERT sub-folder. You can then go ahead and import the certificate where required.
Click here to download SSL Certificate Maker.
Closing Comments:
You can use any of the above free tools to create self-signed certificates for yourself easily and quickly. My personal choice will be the one by Docentric due to its neat and easy-to-use GUI and also because it automatically creates and saves the self-signed certificate in the selected location and store.
You must remember self-signed certificates provide no trust value as they are not vetted by any trusted process (CA). They can pose a serious risk if compromised since they cannot be revoked by a CA.