One Touch Expenser is a free expense recorder app for Android that allows you to log your income and expenses all at one place. This app offers a clean interface themed in a Google NOW like style, making the app look and feel much more native to the Android ecosystem. The app is designed beautifully keeping simplicity in mind, and it allows you to add expenses at the touch of a button. You also have an option to take screenshot of your expenses, set reminders, or simply touch the one touch button to be reminded that you have to add some transaction to the app (the transaction can be either income or expenses). The app allows for a lot of functionality at a pretty low app size. It runs smoothly without any lags, hangs or crashes. One touch expenser behaves in a somewhat similar manner as the 10 free expense management apps that we had discussed earlier, the difference being that this app provides slightly more eye candy than the other apps.
One Touch Expenser is developed for Android by Quix Inc. and is available for free via the Google Play Store.
How to use this free expense recorder app for Android?
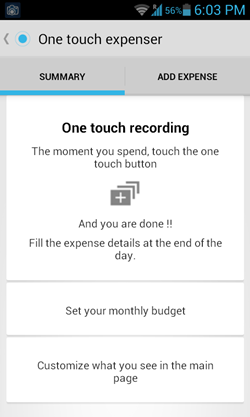
When you launch this app for the first time, the following window will appear on your screen.
In the first time launch screen, you will see nothing special in the Summary pane, apart from the ways of using the app and setting it up. Just tap on Set your monthly budget and you will be taken to a page where you can configure and set up the budget for your expenses, and configure the target income goal as well. Once you are done with that, you will be taken back to the above screen, and now you can customize what all you want to see in the main page by clicking on Customize what you see in the main page button at the bottom (see above screenshot). Once you are done setting up these options, you can begin adding expenses to this app.
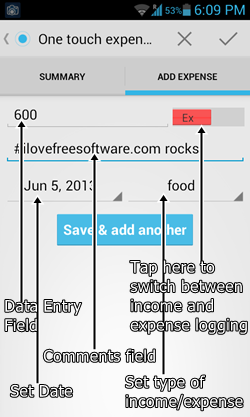
To add an expense, simply click on the ADD EXPENSE tab. Once you click on the add expense tab, you will be taken to a window which looks like the following screenshot.
Just enter the money that you have spent in the text field at the top. There is also an optional comments field where you can type something. You can set the date, and the commodity on which you made the expense as well in this window. To simply change between income and expense logging, tap on the slider next to the data entry field, and it will change from Expense entry (red colour slider with Ex written on it) to Income entry (Green Colour slider with In written on it) mode. If you want to just save this entry, click on the check mark button at the top-right, or click on the cross button to discard this entry. However, if you want to add another entry after saving this, you can simply click on Save & add another button.
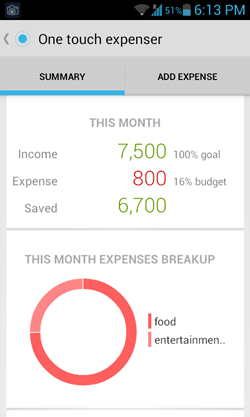
When you are done entering data, you will be taken back to the app’s Summary page. This time, the app’s summary page will look a little different. Instead of showing you how to use the app, it will show a pie chart representing expenses and income, and also, it will show you a brief summary at the top. The new Summary page is shown in the below screenshot.
As I had set my income goal to 7,500, and I have already logged 7,500 as my income inside this app, it says that 100% of the goal has been met. As my Expense goal is 5,000, and I have spent only 800, it shows that only 16% of the expense goal has been met. It tells me that I have saved 6,700.
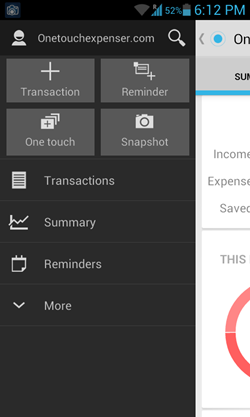
This is not all about using this app. There is also a hidden sidebar in this app that can be accessed when you slide your finger from the extreme right corner of the screen to the extreme left corner of the screen. When you perform this swipe action, the following window appears.
By clicking on the top search bar in this sidebar, you can type and search stuff at onetouchexpenser.com. Also, there are options to quickly add Transaction (add income/expense), Reminder (to be reminded of some task in the day or the next day), One Touch button (touching this will create a One touch entry in your app, and this button can be useful if you have done a transaction, and you don’t have the time to log it immediately. It saves a One Touch Entry on the summary page of the app, and clicking on that entry will allow you to enter the details of a transaction). In the above sidebar that appears, you can also take Snapshot of a transaction (say for a purchase transaction, you can take a snapshot of a bill and for an income transaction you can take a snapshot of the cheque, and the app will remind you to store this transaction later).
You can also access the list of Transactions, Summary page, list of Reminders and several other options as well from this sidebar.
This is pretty much all that you need to know in order to use One Touch Expenser. All in all, this app delivers on what it promises to do- keeping track of all of your expenses and income. If you are looking for an app to log and manage your expenses, you can definitely take your pick from this app, or from the list of 10 free expense management apps that we had discussed earlier.
Pros
- Lightweight.
- Google-NOW like theme.
- No ads.
- Smooth.
Cons
- The interface can be slightly complicated for new users.
Summary and verdict….
To wind it all up, this app is a good app to have if you want to manage your expenses. The interface is beautiful, and although it can be a little perplexing for new users, this definitely makes the task of managing your income and expense records much easier, and lets you stick to your budget.


