CoffeeCup Web Form Builder Lite is a free web form builder software that you can use to build web forms and publish on web in just one click. This is a free web form builder that you can install on your PC and create any type of form. Once done, the software will publish the form to web and will give you URL of the form. You can share URL of the form with others to let them fill the form. It also gives you embed code for the form, in case you want to embed the form in any webpage.
CoffeeCup Web Form Builder Lite comes from the makers of popular CoffeeCup line of software, which include CoffeeCup Free FTP software, and CoffeeCup Free Zip Wizard. With CoffeeCup Web Form Builder Lite, CoffeeCup has presented another solid product that is easy to use and still feature rich.
![Web Form Builder Lite Main form_thumb[1]](https://www.ilovefreesoftware.com/wp-content/uploads/2014/04/Web-Form-Builder-Lite-Main-form_thumb1.jpg "Web Form Builder Lite Main form_thumb[1]")
Features of CoffeeCup Web Form Builder Lite:
CoffeeCup Web Form Builder Lite comes with some interesting features:
- Free to download web form builder software that works on PC and Mac.
- Easily create forms by just drag and drop.
- Provides lot of form elements, like, text box, password, logo, captcha, list box, email field, and more.
- Once you have created a form, you can directly publish it online from within CoffeeCup Web Form Builder Lite. It does not requires any hosting space and CoffeeCup takes care of hosting the form for you.
- Once the form is published, it gives you URL as well as embed code for the form.
- If you want to make any changes to the form, just make the changes on your PC and publish them, and the same URL / embed code will start showing the updated form.
- All the form entries are collected in S-Drive (which has a free account as well). Entries can be downloaded in bulk in CSV format.
- It gives you an option to get an email notification whenever someone fills a form.
- Also, when someone fills a form, you can show them a confirmation message, or redirect them to some other page.
So, you can see, this software actually packs quite a lot of features. But it does have some major limitations as well.
Limitations of CoffeeCup Web Form Builder Lite:
- The free version lets you publish only one form. If you want to create another form, you need to delete the one you already have.
- Only 100 form entries can be saved in free account of S-Drive.
- Also, the software does not gives you raw HTML code that you can use to add to your own webpage; you can only use embed code on your webpages.
Some of these limitations might make this product unusable for lot of users. If you also fall in that category, you can check out Typeform, JotForm, or the plain old Google Forms.
How to Use CoffeeCup Web Form Builder Lite
Above limitations notwithstanding, let’s see how to use this otherwise fantastic software.
Start by downloading this software from CoffeeCup website, using link given at end of this review. Installation is a pretty standard affair. Once installed, launch the software.
![Web Form Builder Lite Blank Interface_thumb[1]](https://www.ilovefreesoftware.com/wp-content/uploads/2014/04/Web-Form-Builder-Lite-Blank-Interface_thumb1.jpg "Web Form Builder Lite Blank Interface_thumb[1]")
The software does not asks you to create an account when you are creating a form, but will ask for an account when you try to publish the form. I personally preferred to create an account upfront. For that, go to Settings –> Form Publishing.
This web form builder has a pretty intuitive interface. On the Left side, you will see the main form area in which you will create your form. All the elements that you can add to your form are present on right side. To add an element to your form, just click on the element on right side and drag on to your form. You can place it on the form wherever required.
![Web Form Builder Lite Drop Element_thumb[1]](https://www.ilovefreesoftware.com/wp-content/uploads/2014/04/Web-Form-Builder-Lite-Drop-Element_thumb1.jpg "Web Form Builder Lite Drop Element_thumb[1]")
Once you have added an element, you can modify its properties by clicking on “Properties” tab on right side.
![Web Form Builder Lite Properties Tab_thumb[1]](https://www.ilovefreesoftware.com/wp-content/uploads/2014/04/Web-Form-Builder-Lite-Properties-Tab_thumb1.jpg "Web Form Builder Lite Properties Tab_thumb[1]")
This software also provides various themes that you can apply to your form. For that, click on “Themes” option. It will show all the available themes. Just select any theme to apply it. It actually has some responsive themes as well, so that your web form will work on all screen sizes.
![Web Form Builder Lite Themes_thumb[1]](https://www.ilovefreesoftware.com/wp-content/uploads/2014/04/Web-Form-Builder-Lite-Themes_thumb1.jpg "Web Form Builder Lite Themes_thumb[1]")
The interface follows WYSIWYG style. So, at all the times, you can see how your final form would look. If you want to see how your form will render in a browser, you can click on “Preview” button. This will open the form in your default web browser. You won’t be able to “Submit” the form while previewing it, but you can interact with all other elements. Also, you can choose to see preview in any other browser of your choice (Firefox, Chrome, IE).
![Web Form Builder Lite Preview_thumb[1]](https://www.ilovefreesoftware.com/wp-content/uploads/2014/04/Web-Form-Builder-Lite-Preview_thumb1.jpg "Web Form Builder Lite Preview_thumb[1]")
When you are done with making all the changes, click on “Publish” button to publish your form to the web. If you did not create an account earlier, it will ask you to create an account at this time. Once done, it will publish the form to the web and will give you direct URL of the form, as well as its embed code.
![Web Form Builder Lite Publish Successful_thumb[1]](https://www.ilovefreesoftware.com/wp-content/uploads/2014/04/Web-Form-Builder-Lite-Publish-Successful_thumb1.jpg "Web Form Builder Lite Publish Successful_thumb[1]")
That’s it. Now you can go ahead and share the link with other people whom you want to fill the form for you. And do remember the limitation of 100 form entries only, so don’t circulate this form to too big a group.
Collect Payment using form:
One interesting feature that CoffeeCup Web Form Builder Lite has is that it lets you collect payment from within your form, and the payment can be sent directly to your Paypal account, Authorize.net account, or 2Checkout account. For enabling Payment options on your form, go to Settings –> Payment. Select the checkbox next to “Enable Form Payments”.
![Web Form Builder Lite Payment Options_thumb[1]](https://www.ilovefreesoftware.com/wp-content/uploads/2014/04/Web-Form-Builder-Lite-Payment-Options_thumb1.jpg "Web Form Builder Lite Payment Options_thumb[1]")
Now, this web form builder supports two types of payments:
- Fixed payments: In this case, each visitor will be charged a fixed amount for filling the form.
- Variable Payments: In this case, you can assign a payment value with different elements on the page, so that visitors are charged based on selections that they make.
I have not tested this Payments feature, so I suggest you test it out first, before adding this feature to your form.
Notifications:
Another interesting feature of CoffeeCup Web Form Builder Lite is that it can send you email notifications whenever someone fills your form. For that, go to Settings –> Email Notices. Here you can provide the email address on which notification should be sent.
![Web Form Builder Lite Email Notices_thumb[1]](https://www.ilovefreesoftware.com/wp-content/uploads/2014/04/Web-Form-Builder-Lite-Email-Notices_thumb1.jpg "Web Form Builder Lite Email Notices_thumb[1]")
If you want, you can even configure the content of the email by clicking on “Configure Email Message” button. I left the default settings, and when someone filled the form, I got an email which had all the information about the values that had been filled in the form. Pretty useful feature.
Another interesting option it gives is to send a auto-response message to the person who has filled the form. For that, in the same window, click on Auto-Response message, and provide “From” address from which email would be sent. For “To” address, you need to pick an email address field from the form. Of course, if the form does not have an email address field, this feature won’t work (how would it know whom to send email to!). You can configure the auto response email as well by clicking on “Configure Email Message” button.
Confirm Options:
Apart from the auto-response email mentioned above, CoffeeCup Web Form Builder Lite also gives some more confirmation options. When someone fills a form, you can redirect them to a custom HTML page, or you can even show custom HTML on the same page. For that, go to Settings –> Confirm Options. Here you will find three options:
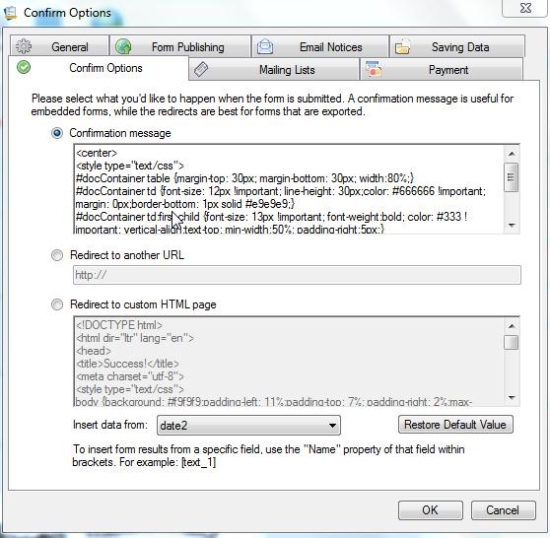
- Confirmation Message: Here you can type the confirmation message that should be displayed when the form is submitted. In this, you can add basic HTML as well as the values of fields from the form.
- Redirect to Another URL: This option simply redirects visitors to another URL.
- Redirect to custom HTML Page: In this option, you can provide HTML for a custom HTML Page, which could have data from form fields as well, and that will be displayed when someone submits the form.
List Elements
Here are the various elements that you can add to your form:
- Title/Heading
- Plain Text
- Text Field
- Text Area
- Number
- Password
- Drop Down
- Radio Button
- Checkboxes
- Upload Files
- Email Address
- Web Address
- Date
- List Box
- Image
- Phone Number
- Section Break
- Spacer
- Reg. Expression
- HTML
- Header
- Footer
- Logo
- Submit
- Captcha
- Signature
Analytics
CoffeeCup Web Form Builder Lite provides some basic analytics as well about your form. For that, you will need to login to your Dashboard in S-Drive website (where you originally created your S-Drive account). Here you can see how many people have completed the form, how many people visited the form, and how many people started the form. This will give you a good idea of bounce rate of the form that you created.

My Opinion About CoffeeCup Web Form Builder Lite:
Without any doubt, CoffeeCup Web Form Builder Lite is a fantastic web form builder software. It has been well thought of and provide end-to-end options related to form creation to data gathering and corresponding analytics. Creating form with this software is quite simple and anyone can use this software. However, I do hope they relaxed some of the limitations in the free version, especially because there are so many worthy free contenders out there. Personally, if I have to create a form in which I am not anticipating more than 100 entries, I would definitely go with CoffeeCup Web Form Builder Lite.