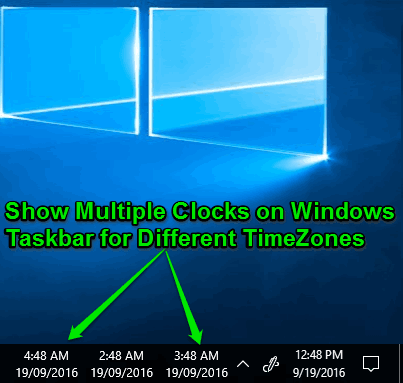
This tutorial demonstrates how to show multiple clocks in Windows taskbar for different time zones. After following this simple tutorial, you’ll be able to add multiple clocks (similar to the built-in Windows clock) with different time zones on Windows taskbar.
By default, Windows shows a digital clock (widget) on the taskbar with your local time. But, there is no built-in option in Windows using which you can put multiple clock widgets for different time zones. However, you can add up to two additional clocks of different time zones, which can be seen by hovering the mouse cursor over the clock widget on the taskbar or by clicking it. But if you want to have multiple clocks that are always visible, then there isn’t a direct way to do so.
So, today I have found a way which can be used to show multiple clocks on Windows taskbar. The best part is that these clocks are visible all the time, and you can add as many clocks as you want. For that, I will “Rainmeter” and integrate the clock widget skin “Windows Taskbar Clock” into it for adding multiple clocks on taskbar area.
How to Show Multiple Clocks in Windows Taskbar for Different Timezones:
As I mentioned above, the best part of this tutorial is that the multiple clocks that we add to taskbar will be always visible. So, if you have teams split across the globe, then one glance to taskbar is all it will take to see time of different timezones. Let’s see how to do this:
Step 1: Before you get started, the first thing you need to do is install “Rainmeter” on your PC and then integrate the “Windows Taskbar Clock” into it. After that, when you open “Rainmeter” you will be able to see a new skin named, “Taskbar Clock” added in the “Skins” tab.
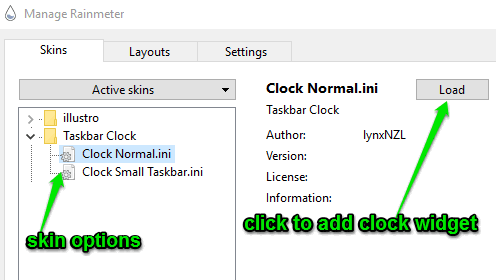
Now, you can use this skin to add a new clock widget (similar to the native Windows clock) into the Windows taskbar. For this, simply click on “Taskbar Clock” skin and then two different skin options named, Clock Normal and Clock Small Taskbar will appear. The first option will include both time and date in the widget, whereas, the second option will only display the time.
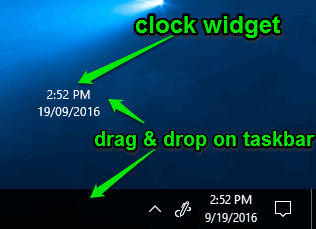
Step 2: Suppose, you want to choose the first option i.e. Clock Normal, then all you got to do is click on the option and hit the “Load” button on the right. As soon as yo do that, it will automatically add a new clock widget on the screen, as shown below. After that, you can simply drag and drop it on the Windows taskbar and disable the dragging option to keep it permanently on the taskbar.
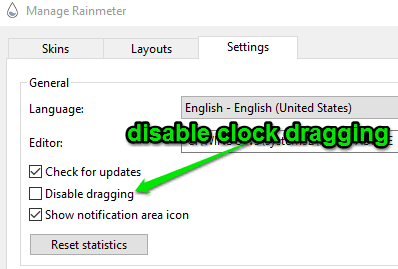
To disable the dragging option, switch back to the “Rainmeter” window and go to the “Settings” tab. Then click on the checkbox associated with the option “Disable Dragging” and the clock widget will become permanent on the taskbar area.
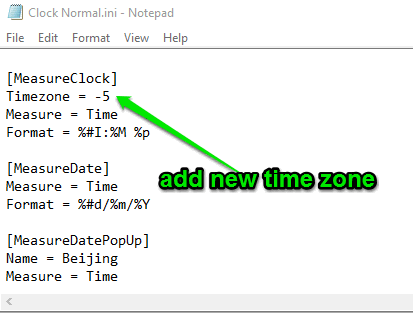
Step 3: Initially, the clock widget will display the default time and date of your PC, but you can edit the time settings to display the time of any time zone (in GMT) you want. To change the time zone, simply right-click on the widget and choose the option “Edit Skin”. After that, a notepad file will open up will various settings of the clock widget. Now, you need to scroll down and find the settings section named, “[MeasureClock]”. Under this section, you have to add a simple text as “Timezone =” followed by the GMT time. For example, if you want to display the time zone of GMT 5:00, then you have to type “Timezone = -5” and then press Ctrl + S to save it.
Step 4: After saving the changes, simply right-click on the clock widget and then select “Refresh Skin”. As soon as you do that, the timezone will change to GMT 5:00 and will be displayed on the clock widget. The best part is that the default Windows clock will keep showing your system time and the added widget will display the time and date from the time zone added by you.

In the same manner, you can edit the clock widget settings and put any time zone in GMT to display it on the clock widget.
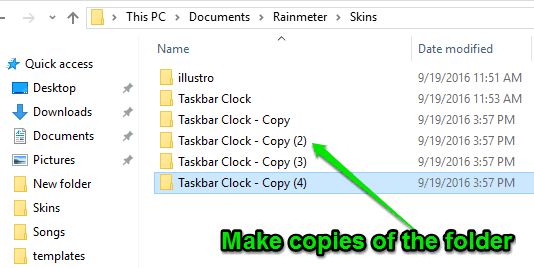
Step 5: Remember, the “Windows Taskbar Clock” skin for Rainmeter lets you add only one clock widget. Now, what if you would like to add more clocks on the taskbar for different time zones. Well, actually there is a simple trick using which you can add as many clock widgets as you want on the Windows taskbar. To do this, the first thing you need to do is go to the following location: “C:\Users\”YourUsername”\Documents\Rainmeter\Skins” and there you will see a folder named “Taskbar Clock”. Now, you need to make copies of the folder to add multiple clock widgets, as shown below.
Step 6: After making copies of the folder, open up Rainmeter and press the “Refresh All” button at the bottom. When you do that, all the folder copies will load as an individual clock widget screen and you can edit and add them to the Windows taskbar.

My Final Verdict:
If you have friends, family, or business partners in other countries with different time zones, and would like to know what the time is in their regions without using any third-party world clock software, then this tutorial is for you. Simply, go through the simple steps explained in this tutorial, and you will be able to add as many clocks as you want on the Windows taskbar for different time zones.
I hope you find this to tutorial interesting and useful.