In this post, you will learn how to track time spent on BitBucket issues automatically. There are some free time tracker websites available which enable you to track work hours on BitBucket issues with ease. For that, you would actually need to integrate these time trackers with BitBucket using their respective Chrome extensions. After that, you can track time on your issues without leaving the BitBucket workspace. They can track time separately for different issues and log the time entries to your account dashboard.
The Chrome extensions will add an option to the issues which you can use to start time tracking in one-click. They will keep tracking the time until you stop them manually. You can track your work hours on unlimited BitBucket tasks without any limit on the duration.
We have also covered how to track time spent on GitLab issues, Trello boards, and Asana tasks automatically.
Let’s get started with the websites.
Clockify:
Clockify is definitely one of the best time tracker websites which allow you to track time on BitBucket issues for free and automatically. You can integrate it with your BitBucket account by installing the Clockify extension for Chrome. Then you can track time on issues from BitBucket workspace directly. This website is completely free to use for tracking unlimited BitBucket issues with no limit on the time duration per session. All the time tracking sessions are recorded to your Clockify account.
How to Automatically Track Time Spent on BitBucket Issues with Clockify:
Step 1: Simply, open Clockify, create an account, and install the Clockify extension on Chrome. After that, it will integrate with BitBucket and you would need to click on the extension icon and sign in. It will now be ready for time tracking.
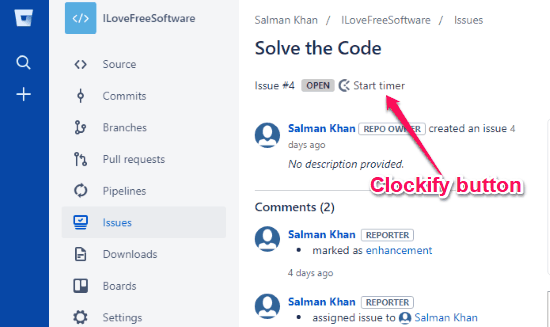
Step 2: Now, simply open any of your existing BitBucket issues or create a new issue on which you want to track work time. Then you can see a “Clockify” button at the top which you can click to start time tracking. It will keep tracking the time automatically and when you’re done working with the issue, click on the same button to stop the time tracker.
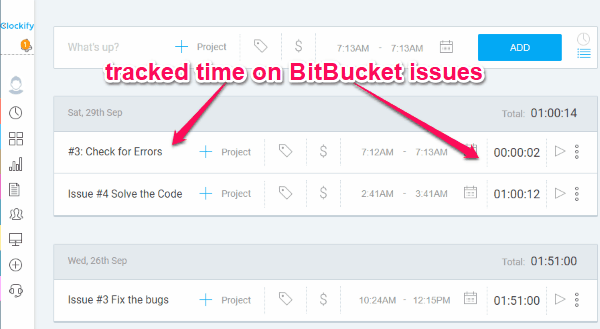
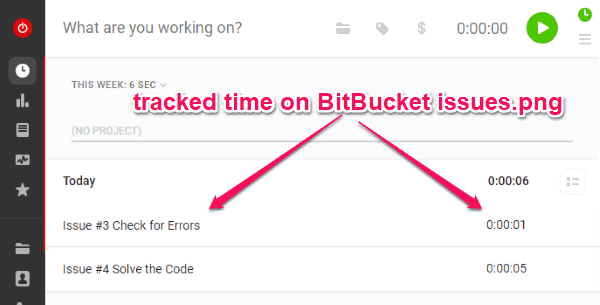
Step 3: As soon as you do that, it will log the data to your account as time entries. It creates separate time entry for each issue. You will also see how much time you have spent on all BitBucket issues.
Toggl:
Toggl is also a free website which you can use to seamlessly track your work hours on BitBucket issues automatically. For that, all you would need is to install the Toggl extension on Google Chrome. Then it will integrate with BitBucket and let you directly start time tracking from BitBucket. This website also allows you to track time on as many issues as you want without worrying about the time duration of each session. You can see the logged time on your Toggl dashboard with ease.
How to Track Time Spent on BitBucket Issues using Toggl Automatically:
Step 1: First, you would need to create an account on Toggl and then proceed to install its Chrome extension to integrate with BitBucket. Then it will ask you to allow permission for integrating with BitBucket. Once you do the same, it will be ready to let you track time on issues.
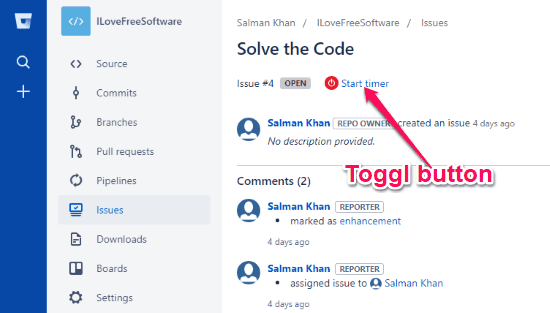
Step 2: Now, open BitBucket and create a new issue or you can also open any of the previous issues. After that, you can see a Toggl button on the top which you can click to start the time tracker for that issue. It will keep running automatically and track your work hours.
Step 3: Once your work is one with the issue, click the button on the issue again and the timer will stop. The session will be added to your Toggle dashboard as a new time entry. This one also creates separate entries for different issues. You will also see how much time you have spent on all the issues.
TMetric:
TMetric is another free time tracker website that can help you track time spent on BitBucket issues for free. It requires you to use a Chrome extension to integrate it with BitBucket and then start time tracking directly on the issues. It can automatically track time on unlimited BitBucket issues. It doesn’t even have any limit on the duration of each time tracking session. This website also comes with an intuitive dashboard where the time entries will be logged.
How to Track Time Automatically on BitBucket Issues with TMetric:
Step 1: after you create an account on TMetric, you can go ahead and install the Chrome extension. When you do that, TMetric will integrate with BitBucket and then you can start tracking your work time on the issues.
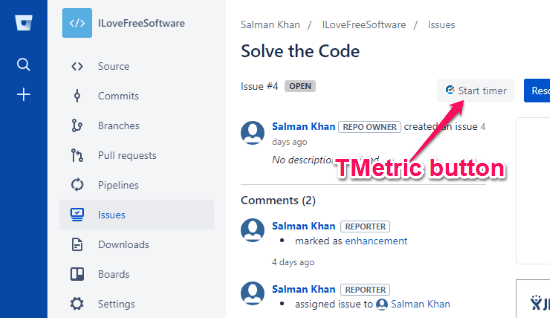
Step 2: Now, when you create an issue or browse any existing one, you can see a new TMetric button added to the editor. After that, you can track time on that specific issue by clicking on the button. It actually starts a timer which tracks the time automatically for you.
Step 3: When you finish working on the issue, you can click on the same TMetric button to stop time tracking. Now the time will be recorded and logged to your account’s dashboard. It logs the time for individual issues as well as for all BitBucket issues.

Closing Words:
If you have been looking for a way to automatically track your work hours on BitBucket issues, then the time tracker websites explained in this post can help you with that. They make it quite easy for you to track time on BitBucket issues without much effort. They are completely free to use for tracking time on unlimited BitBucket issues. The best part is that you can do that without even leaving BitBucket.
Try these websites and let me know what you think in the comments below.