This tutorial shows how to disable slideshow for Lock Screen in Windows 10. By default, you can access Settings of Windows 10 and then set the option to play slideshow on Lock Screen in Windows 10. But, if you prefer Windows Spotlight images on Lock Screen or a custom picture and don’t want anyone to access slideshow option and set it on Lock Screen, then you can simply disable the slideshow feature for Windows 10 Lock Screen. After that, slideshow won’t play on Lock Screen at all. Also, you won’t be able to add any image folder for slideshow and access advanced settings of slideshow.
To disable slideshow for Lock Screen in Windows 10, you have to take the help of GPO (also known as Group Policy Editor). If you have Windows 10 Enterprise or Pro version, then GPO is already available present in your Windows 10 PC. Those who are using Home version of Windows 10, they first have to install GPO so that they can use Group Policy and disable playing slideshow on Windows 10 Lock Screen. Perhaps, there would be some Registry tweak also for disabling slideshow for Lock Screen, but I wasn’t able to find that method. As soon as I will come to know about Registry trick for this, I will add that method also. For now, I am covering GPO method to disable slideshow for Lock Screen in Windows 10.

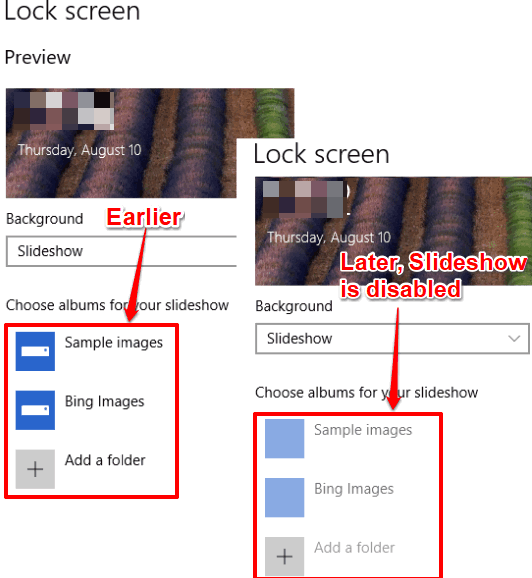
The screenshot above shows that earlier, slideshow feature was activated for Lock Screen, but later that feature was disabled by me using Group Policy method.
How To Disable Slideshow for Lock Screen In Windows 10?
Step 1: First of all, you have to launch GPO. You can do this using Search box. Type ‘gpedit‘ in that box and then search result will show “Edit Group Policy“. Select that option.
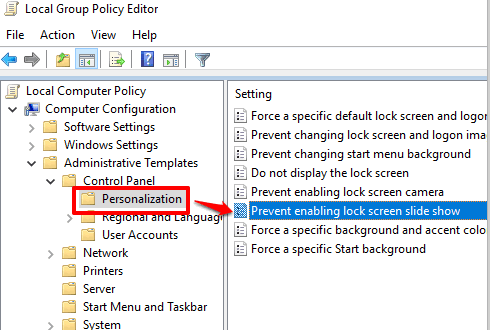
Step 2: In GPO window, go to the “Personalization” folder. To access this folder, first expand the Computer Configuration → then double-click Administrator Templates folder → Control Panel → and select Personalization.

Step 3: Personalization folder has different options visible at the right side. Double-click on the “Prevent enabling lock screen slideshow” option. See the screenshot added above.
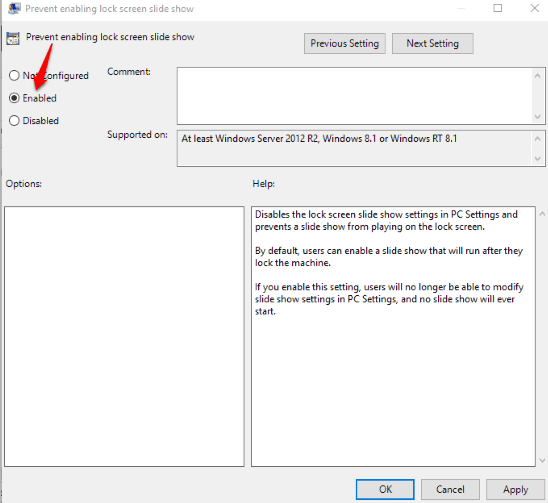
Step 4: When Prevent enabling lock screen slideshow window is in front of you, click on the Enabled option. Use Apply and OK buttons and your changes will be saved.

Now when you will access Slideshow option of Lock Screen in Settings app, you will see the slideshow folders, option to add a new folder, and advanced settings of slideshow are disabled. That simply means slideshow won’t play on Lock Screen on your Windows 10 PC.
To revert the changes, you can repeat step 1 to step 4 and this time you have to select ‘Not Configured/Disabled‘ and then save this new setting. This will help you select slideshow for Lock Screen again.
The Conclusion:
Personally, I don’t use slideshow on Lock Screen in Windows 10. Instead, I prefer to show Bing images on Windows 10 Lock Screen. So, disabling slideshow on Lock Screen is OK for me. If you also want to disable playing slideshow on Lock Screen in Windows 10, then these steps will be very helpful for you.