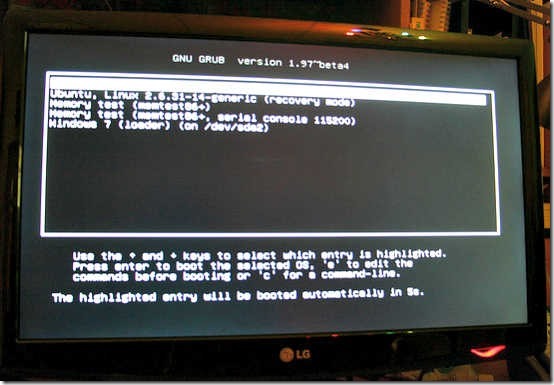
This tutorial article explains how to delete the unwanted entry of an Operating System that has been uninstalled/removed from a multi-boot computer system. Normally, removing an Operating System from a multi-boot system deletes the OS in its entirety. However, its entry still shows up as an item in the startup OS selection screen, but obviously, serves no purpose. This is quite an annoyance, and is encountered by a majority of users who have their computers in dual-boot configuration. However, it’s really simple to remove this useless entry from the startup screen. It can be done by either editing the boot file, and/or the Boot configuration data. Whether the other deleted OS was from the same OS family as your original Operating System or a different one, its entry can be easily removed. Intrigued? Head past the break to find out more.
(Note: This tutorial article is based on the assumption that the Operating System that’s removed is always other than the default OS that’s loaded up). (Also see: Things To Keep In Mind While Making Dual-Boot System.)

Know what dual-boot configuration you had, prior to uninstalling one OS
It’s very important that you know what type of dual-boot configuration you had before you removed one of the constituent Operating Systems, because the methods to delete the entry for the deleted OS vary according to this. Generally, most people have dual-boot computer systems set up in one of the following two configurations:
- Both Operating Systems belong to the same OS family (for example: Windows XP and Windows 7)
- Each Operating System belongs to a different OS family (for example: Windows 7 and Ubuntu)
Let’s talk about each of these configurations in a little more, and see how you can remove the uninstalled OS’ entry in each case.
Both Operating Systems belong to the same OS family
A lot of computer users have their systems set-up in a dual-boot configuration, where two OS’ are essentially different versions of the same software product. This can further consist of two scenarios:
Scenario 1: The two Operating Systems are Windows based (e.g. Windows XP and Windows 7):
This is one of of the most widely used combination of Windows based Operating systems that a lot of computer users have their systems set to dual-boot. However, the way boot information is stored in newer and older Windows based Operating Systems differ a little, and so does the process to remove the deleted OS’ entries. We’ll take a look at the two possibilities individually:
If the OS you want to keep is Windows XP (or earlier) and the deleted OS is Windows Vista (or later), then you need to edit the boot.ini system file, found in the same partition Windows XP is installed on (Being a system file, boot.ini is hidden. To view it, go to Folder Options > Uncheck Hide protected system files and folders). Here’s how to do it:
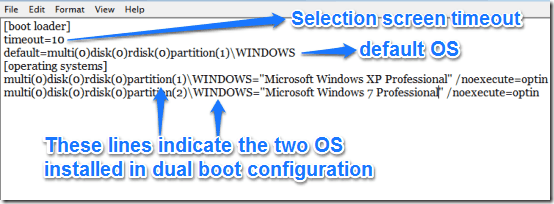
Step 1: Open boot.ini for editing, and it opens up in Notepad. It looks something like this

In the above screenshot, the last two lines indicate the two Operating Systems installed in dual-boot configuration. Windows XP is the default in this case, whereas Windows 7 is the OS that’s been uninstalled.
Step 2: To remove the useless entry of the uninstalled OS (Windows 7 in this case), simply delete the second line, having Windows 7 in it, and save the changes.
That’s it. From now on, whenever your computer boots up, it’ll no longer have the entry for the uninstalled Operating System.
If the OS you want to keep is Windows Vista (or later) and the deleted OS is Windows XP (or earlier), then the process is a little different. This is because newer Windows Operating Systems don’t store the boot information in a boot.ini. Consequently, to remove the entry for a deleted older OS version, you need to use the command line bcdedit (where bcd stands for boot configuration data) tool. Here’s how to do it.
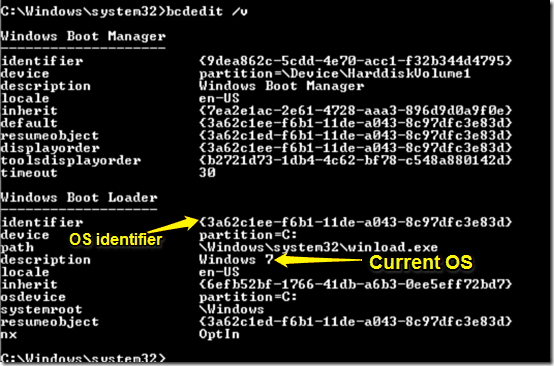
Step 1: Open up a command prompt with administrator privileges, type bcdedit /v and press Enter. The result should look something like this

In the above screenshot, there’s quite a lot of information presented about the installed (as well as the deleted) Operating System(s). However, we are specifically interested in two fields: description (which is just the label of the OS), and identifier (a random string that represents its UUID, or universally unique identifier). Note that in the above screenshot, the description reads Windows 7 (the OS installed on the test system). However, to delete the entry of an uninstalled Operating System, you need to find its name before the description field.
Step 2: Once the name’s been found, look for the identifier (UUID) of the uninstalled Operating System
Step 3: To delete the entry for that Operating System, simply type bcdedit /delete {UUID} and press enter. Here, UUID is the identifier string of the uninstalled operating system.
That’s it. Once you reboot the system after effecting this change, the entry for the uninstalled OS will no longer appear. How cool is that?
Scenario 2: The two Operating Systems are Linux based (e.g. Ubuntu and Linux Mint)
It may also be the case that the two Operating Systems installed in dual-boot configuration are both Linux based. If this is the case, then removing the entry for the uninstalled Linux distribution requires a different, Linux specific approach. However, the process to do so is exceedingly simple, and something that anyone well versed with Linux can easily do. It involves updating Linux’s default bootmanager (GRUB), after uninstalling the distribution that you no longer want. Here’s how to do it:
Open up terminal and enter the following commands:
sudo grub-install /dev/sda

sudo os-prober

sudo update-grub
Once you’ve successfully executed the above commands via terminal, GRUB will be updated, and the uninstalled Linux distribution’s entry will no longer be shown during startup. Simple as pie.
Both Operating Systems belong to different OS families
When your computer dual-boots Operating System belonging to different OS families (e.g. Windows 7 and Ubuntu), which is also the major reason why people set up their systems in dual-boot configuration, things get a little trickier, however the process remains fundamentally the same as in the cases discussed above. In this case too, two scenarios are possible. Let’s take a look at them one by one, and see how you can remove the entry for an uninstalled OS.
Scenario 1: If the OS you want to keep belongs to the Windows family, and the deleted OS is a Linux distribution.
Follow the same procedure as in the case of deleting a newer (or older) Windows OS version (discussed previously in the article), and accordingly, edit the boot.ini file (for Windows XP or earlier) or use the bcdedit tool (for Windows Vista or later).
Scenario 2: If the OS you want to keep is a Linux distribution, and the deleted OS is a Windows version.
The process here remains the same as well. All you have to do is update GRUB (Linux’s default bootmanager), after the Windows installation has been deleted. Here’s how to do it:
Open up terminal and enter the following commands:
sudo grub-install /dev/sda
sudo os-prober
sudo update-grub
The above commands, when executed, will remove any unwanted references to the deleted Windows installation. That’s all there’s to it.
Also see: Guide Regarding Correct Partition Sizes To Have While Installing OS
Conclusion
Having a dual-boot system gives us the flexibility to work with multiple operating systems, and greatly enhances the overall general usage experience (especially for power users). However, sometimes, one just wants to go back to having just one default OS, to make things simpler. In such a case, uninstalling the OS you no longer want is the only way to go. It’s all well and good, but things can go trouble-some if some general precautions are not exercised while working with dual-boot systems. I believe this article will help all of you dual-booting fellas get rid of those pesky unwanted references to the OS you just uninstalled from your system. Have fun.
Image Courtesy: Paul Schultz via Flickr