Oh look! Another online cloud service. I know, that’s the kind of feeling I had when I stumbled upon CloudSafe. On the face, it appears like yet another Cloud Based storage service trying to make a name for itself in a market that’s already getting crowded to the point of suffocation. But the fact is, it’s not. Want to know how? Read on to find out.
CloudSafe: An online vault to store (and share, if you want to) your private and confidential data.
I know, online vault sounds just like a technical term of a cloud storage service. To be honest, CloudSafe is that only. But it’s different in a way or two. It allows you to store and share the data in private safes, by delegating access rights to the users that you add up as collaborators. Although you always have the choice to use the storage for your private needs too. To see how this thing works, let’s create a free account first.
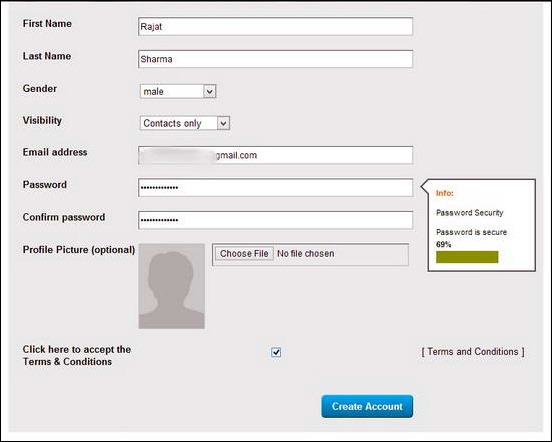
Creating an account is insanely simple. It gives you 2 GB Swiss grade secure cloud storage for free level with the possibility to create up to 3 Personal Safes. You just have to put your desired personal information in the required fields, get the confirmation link in the E-mail, click on it, and your account is activated. You can sign-up here.
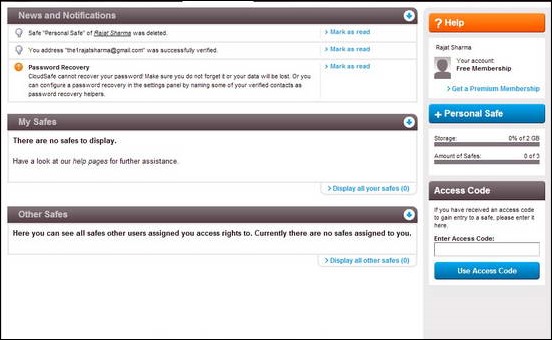
Once the account is created, you need to verify your E-mail. Click on the link that the service sends you in E-mail, and you’re good to go. After verification, the user is taken to the Main web UI of CloudSafe. This is how it looks.
Now the above interface is the default landing UI of CloudSafe. It’s something called a DASHBOARD. You can view system notification messages, account level, storage quota, and stuff like that here. But we’re interested in the online “safes” that makes it the secure Swiss vault. So, keep reading.
Creating Safes
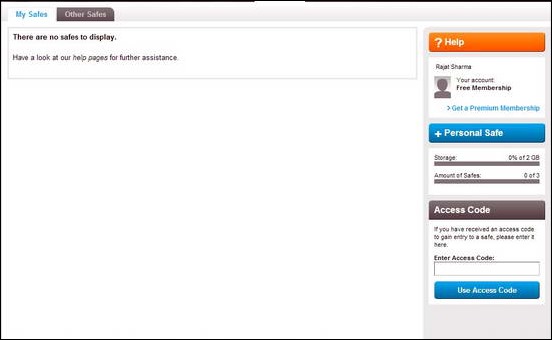
To access the Safe Interface, click the second “Safes” tab on the horizontal access pane. Since this is the first time you’re accessing the account, the screen tells you that there are no safes yet.
Now, click the blue button to the right that’s marked as “+PERSONAL SAFE”. This launches the Safe Creation wizard. The following screenshots help illustrate the process.
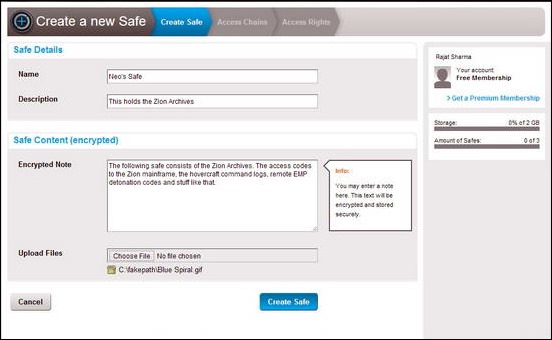
Step 1: In the first step of the Safe Creation Wizard, you are prompted to give a name and small description to your Personal Safe. You can add an encrypted note to it. Moreover, you can also add files via the “upload files” option, which will encrypt the files before adding them to the Safe.
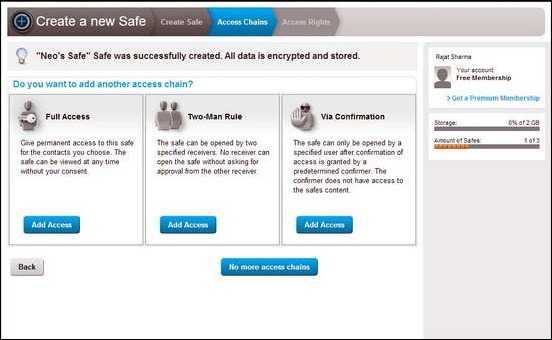
Step 2: The next step prompts the user to add something called an “ACCESS CHAIN” to the safe. This defines how the people who you add as contacts (sort of collaborators) in your CloudSafe can access your safe’s content. There are three distinct kinds of Access Chains, as detailed
- FULL ACCESS: This means any contact(s) that you choose can fully access this safe with or without your consent, at all times.
- TWO MAN RULE: This ensures that only two persons can access the contents of the safe. And even in that case, each will require the consent of another for access.
- VIA CONFIRMATION: This level of Access Chains adds a third user as a “CONFIRMER”, only after whose confirmation can the safe’s contents be accessed. Moreover, the confirmer can’t access the safe’s contents.
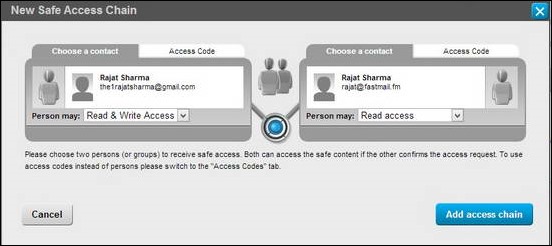
Step 3: Let’s configure the access chain according to the Two man rule. It’s important to note here, that the other person needs to have a CloudSafe account too. Here, you select the two users who’ll have access to the safe, and also whether they’ll have “read only” or “read and write” access to it.
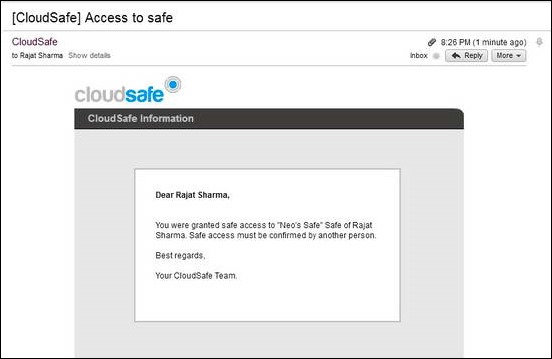
Step 4: Now since in two man access rule, access must be confirmed by the other user, the other user will get an access grant request E-mail so that access can be confirmed. Only upon validation of that, will the access be granted. This is how the E-mail looks like:
This is how access chains work. Although the process looks quite cumbersome at first, it’s not really that much difficult. Moreover, the Full Access rule is completely relaxed, and doesn’t require any intervention from other users at all. Only the original user needs to delegate full time access to his/her contacts.
Whenever any Safes are opened up by other users, a small visual notification graphic informs the original user about the safe’s opened status.
Cloudsafe: Features Summarized
- 2 GB Swiss grade secure cloud storage for free level accounts.
- 3 Personal Safes (maximum limit for free level).
- No feature restrictions in free accounts otherwise.
- Extremely Secure: Even CloudSafe can’t access your data. If a user forgets his/her password, there’s no way to recover it. So do remember your password; and if you find it hard to remember, you could try out these free password managers to securely store your confidential passwords.
- Access codes to regulate permissions.
Conclusion
Cloud Storage services are cropping up like mushrooms ever day. But only a handful of them manage to stay relevant. Even then, a majority of users are happy sticking to the big and established names only. It’s clear that if a cloud service (or any service, for that matter) has to stay relevant, it should be ready to offer something really unique. And that’s exactly what CloudSafe offers. Even though the free account is restricted to 2 GB, that’s more than enough for what CloudSafe is actually intended for. And that is, safely and securely sharing and collaborating on important documents. Services like CloudSafe really hold the potential to transform the way big enterprises and small users share and collaborate on their work, no matter how big or small it may be.
What do you guys think about CloudSafe? Do you already use it? How good do you find it to be? Let me know in the comments below.
