Hey guys! Sensei Pranjal is back with another dojo. In today’s tutorial, we shall talk about installing custom third party fonts on your Windows 7/ Windows 8 machine. Installing the fonts isn’t as complex as it sounds, and trust me, you will be done in no time at all. The installed fonts can then be used by you inside various text editing apps like Libre Office etc. There are a number of reasons why you would want to install a custom font on your Windows machine. Maybe you want to use a stylish looking font for your college project submission, or maybe you want that font to design some text for a poster. Whatever be the case, you can find a variety of applications of a third party font style, not to mention the fact that custom font is absolutely fun to play with!
So let’s not waste any more time, and get down to the basics of installing a custom font on your Windows 7/ Windows 8 machine.
The Steps Involved…
Step 1: The first step would be to grab a third party font file, which you are going to install on your machine. A quick Google search will show up the results to a variety of websites from where third party fonts can be downloaded, but my personal favourite website for downloading fonts is dafont. Head over to any of these websites and download the third party font file.
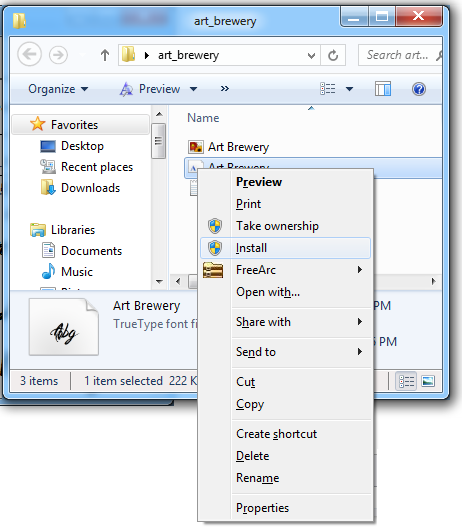
Step 2: I downloaded the Art Brewery font from dafont, and as you can see below, I ended up with a file which looks like the below screenshot.
In the above screenshot, the highlighted file is the third party font file.
Step 3: To install this font file, simply right click on it and select the Install option from the context menu that pops up.
The font’s installation process is instantaneous. As soon as you click on the install button, the font will be installed.
To preview the font file, you can double click on it, which will show you the font style in notepad (somewhat like the below screenshot).
You can also install the font file from the preview window shown above by clicking on the Install button next to the Print button in the above screenshot.
That’s it! Your font has been installed! Time to put this newly installed font to the test!
Using the Font…
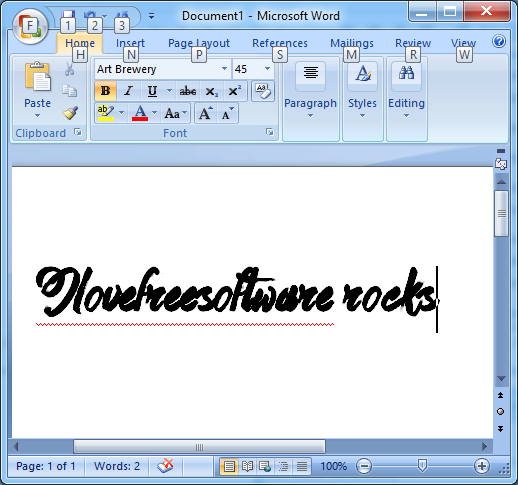
To use the font, head into your preferred text editor, and select the installed font from the drop down menu of Font Style. In my case, the name of my font is Art Brewery, and hence I chose the same from the drop down menu.
As can be seen in the above screenshot, the font has been installed properly on our test machine. This is all that you need to know about installing a custom font on your Windows 7/ Windows 8 machine.
What did you think of this tutorial? Let me know in the comments below. Till then, cheers, and happy themeing!


