This tutorial will elaborate all aspects of Background Data Usage in Android and ways to restrict background data usage on per app basis on your Android device. You will also learn how to Reduce Background Data usage drastically. I will show methods with and without third-party app(s) on how to also Control Data Usage on Android for specific apps.
Have you ever been left regretting after your mobile data plan was sucked up by some application in background? Does your smartphone consume too much data no matter what? If you answered both these questions in the positive, you need to read further.

What is Background Data?
The problem (and perk) with the Android OS is that it gives the installed apps a free hand over how and when they connect to the internet. Hence, even when you minimize or close certain apps, they keep sending and receiving data over the Internet for synchronization. This is actually required for a lot of apps to work properly (like, WhatsApp, Facebook, LINE, Skype, Gmail, and other similar apps), but it also leads to a helluva lot more data consumption on our devices.
The Internet used when an app is in the foreground, is mostly not a big concern for the users (primarily, because you directly control how long you are using an app). But if the culprit apps are in the background (minimised or closed), the data usage can be a big headache sometimes. You browsed the Internet on Chrome browser or Watched a YouTube video, or just downloaded some music — these activities can be kept track of, and so can easily be reduced or controlled. But Background data consumption is something that might happen even when you are unaware or your phone is just idle.
How to Check Background Data Usage by Specific Apps?
To start reducing your Background data usage, you first need to check as to which apps are using most of the background data. To check background data usage of any app, you need to head to your System Settings and then open Data Usage. After this, you’ll see the graph for your device’s data usage. Below this graph (shall be identical to the one shown at the beginning of this post) you’ll see a list of apps, sorted on the basis of data usage in descending order. Just tap on any app and you’ll see its specific graph, like the ones below. And just there below the graph, you will notice the foreground and background data usage for that specific app.

Now, did you notice something in the screenshots? While Chrome has used considerable amount of its data when in the foreground (when I must have been browsing the web); Google Plus seems to have consumed a large chunk of data in the background, considering the fact that it hasn’t used too much data in the foreground. You can check Background data usage for any app on Android in a similar manner.
How to Control Background Data Usage?
For most users, controlling data usage on Android is all about setting the Usage Limit within the Data Usage menu. But this feature only LIMITS the data consumption, and has no direct bearing on Background Data Usage. Until you hit this limit, your phone will use mobile data WITHOUT ANY RESTRICTIONS, and when the limit is crossed, the Data will be disabled. Also, this Data Usage Limit has nothing to do with Background data. Limiting your data will just be a reminder and a way to analyze your device’s data usage in the long run, or to remind you that your Carrier’s data usage cap has been reached.
While there are numerous apps out there which can help to restrict background data usage on Android devices, the OS itself has built-in settings to restrict background data usage too! Let’s start by taking a look at all of those straight away.

How to Restrict Background Data System-wide Without Any App (and why you shouldn’t do this)?
Yes, there is a built-in functionality in Android phones which allows you to view and control Background data usage! Even if you open your System Data Usage settings (simply by going to System Settings -> Data Usage) and find that one of the apps (or a particular bunch of them) is using up your data even when remaining in the background, you can easily restrict it (or them). Just follow these steps:
- To restrict all background data on your device, you need to head to Settings -> Data Usage -> Options -> Restrict Background Data. It is demonstrated in the screenshots below. Do note that this restriction happens only when you are using mobile data. If you are connected to a wifi network, then the apps will work normally and this setting will not have any effect whatsoever:

- Remember to tread carefully since this will restrict ALL data transfers that occur in the background (including the ones done by push-messaging apps like Whatsapp, Hangouts, etc.) and only the apps running in the foreground will refresh. You won’t be able to receive your emails or Instant Messages or any other such notifications, until and unless you have the app running in the foreground.
Now, in the title of this section, I mentioned that it shouldn’t be done. The reason for that is simple: You will simply be cut off from all the applications on which you rely to give you push notifications (like, Whatsapp, Facebook, Gmail, etc.). So, personally, I DO NOT recommend using this option to Restrict Background Data throughout the system. Instead, I will show you better options than this. Keep reading.
How to Restrict Background Data on per App Basis?
So, I mentioned that you should not Restrict Background data system-wide. A better option is to restrict background data usage for specific apps.
- Just scroll down the Data Usage page. Below the graph, you will find all apps listed in the order of their data usage history.
- Click on the app you want to restrict, and then select ‘Restrict app background data’. This will act as a firewall and restrict that app from accessing the Internet in the background. The app will function normally when it is in the foreground, though. This is the perfect option for those apps which consume a lot of background data, and hence you do not want them to run in the background (shopping apps are perfect examples, as they use use Background Data to get latest deals etc. for you and show you notifications of Sales frequently).


- TIP 1: To reduce data usage while browsing, you can go to Chrome’s in-app Settings -> Reduce data usage -> Turn On. This will compress pages using Google’s servers before downloading them. If you can make-do with lighter browsers, you can also try options like Opera Mini, UC Browser, or others which compress the webpages heavily and save even more data at the cost of some discrepancies in page layout.
- TIP 2: One background data restriction that you should definitely apply are the app updates via Google Play Store. You can do this within the Play Store app! Open the Google Play Store app, slide out the sidebar, and tap on Settings. Now Select “Auto-Update apps” and you will see a pop-up. Just select “Auto-update apps over WI-Fi only”. Doing this will Turn Off the Auto-updates for your Mobile Data; but as soon as you will connect to a Wi-Fi network, the apps will be automatically updated.
How to Control Background Sync Interval on Android?
One thing that consumes a lot of mobile data, whenever active, is the Synchronization feature of Android. Whenever the Auto Sync option of Android is switched ON, it means that the device will allow various Social Networking, Magazines, or other such apps to refresh and connect to the Internet. Quite a few people keep it switched ON, not realizing that it can consume a lot of data in the process.
How about just letting your phone do Auto-Sync after a fixed time for a short duration? And wouldn’t it be great if Auto Sync is automatically Switched Off after a while? Thankfully, this can be easily done with third-party app alternatives.
To set custom Auto Sync Intervals, you need to take a look at AutoSync2. This app is simple, free, and provides the great option of setting custom Auto Sync Intervals or set the preference for your connection type. As is shown in the 2nd screenshot here, you can set the connection type in which Sync should be switched ON. Pretty neat and simple, I think. And it can surely save you a lot of mobile data if you choose to sync only when your device is connected to a WiFi network.

And yes, Phone Schedule (which I have explained in the later section) can be used to turn OFF Auto Sync as well at a specified time. But if you only need to control the Sync Interval, AutoSync2 might be a better option.
How To Restrict Background Data Usage on Your Android Device with an app? [for ROOT users]
There are numerous apps which can control your data usage on Android. And honestly, there are several apps for non-root users too. These non-root firewall apps work quite efficiently too, but they do crash sometimes. I am not saying that other apps are perfect, but for an app which is supposed to make you that bit more relaxed, crashing overnight is not an option. There might be a non-root app which works 100% fine, but I just couldn’t find one reliable enough. The Root apps aren’t perfect either, but they can tweak the Linux kernel’s firewall rules and hence can work more reliably (they did for me).
We shall be taking a look at AFWall+ (Android Firewall Plus) as it’s a good option to set custom firewall rules and there are quite a few options for advanced users as well. Follow these steps to set it up:

- Download the app from the link provided at the end of this post and open it up.
- Once you launch it, you’ll see a list of all the apps installed on your device with specific selection boxes corresponding to each app’s LAN, WiFi and mobile Data rules, like it is in the first screenshot. This allows you to restrict data on per app basis in bulk.
- Don’t forget to grant AFWall+ the SuperUser Access when the dialog box pops up.
- You can now select the working mode from the main screen itself by tapping on the text ‘Mode:White list (allow selected)’. You can select AFWall+ to work in either Whitelist mode or Blacklist mode as per your wish.

- In Whitelist mode, the apps that you tick mark will get permission to use data. In Blacklist mode, the apps you select won’t be able to communicate with the internet, but all other apps can access data services normally.
- So, if you selected Whitelist mode, select all the apps that you WANT TO have connection to the Internet. In the screenshot above, I have selected Whatsapp only and hence I can receive Whatsapp messages without any hiccups while all other apps won’t be able to consume data.
- After this, you just have to tap the Options menu button and tap ‘Enable Firewall‘. Since I clicked on that already, you can see that My device shows the option to disable the firewall instead.
- Now click ‘Save Rules’. This should be done whenever you edit or change the apps in the list which are or aren’t allowed to access data.
- Oh, and if you want to customize the app’s behavior, you can always open up the Preferences menu (shown in the third screenshot up top).
- That’s it! The consumption of mobile data is now in YOUR hands!
- You can also achieve the same functionality with other apps as well, like ‘DroidWall’. DroidWall works flawlessly on older versions of Android but has a few issues on Android Lollipop.

How to Automatically Disable Mobile Data Traffic?
Sometimes, disabling Mobile Data Traffic via the System Settings proves to be a pain. It is easy, but if you follow a specific routine and your device switches a lot between your Home and Work WiFi, and Mobile Data; it might sometimes be problematic if you forget to switch between the two. Phone Schedule for Android is an app which allows you to add Schedules and Automatically Enable or Disable certain features of your Android device.
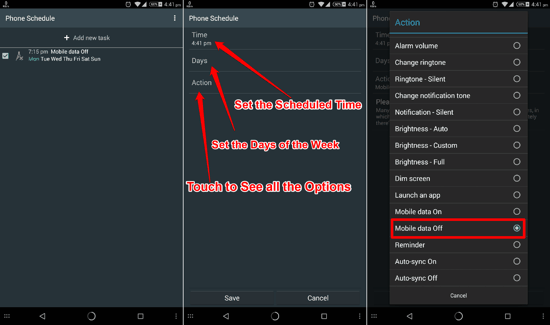
Just open up the app, tap on the “+ Add New task” option, and you will get to set up various options (as is shown in the 2’nd Screenshot above). Set the Scheduled time for everyday, set the days of the week, and then tap on “Action”. You will see a pop-up menu with various features listed there. Search for and Select “Mobile Data Off” from here (see third screenshot above). That’s it, tap on Save and your Schedule will be applied. Now onwards, your Mobile Data Traffic will automatically be Switched OFF at the set time, on the set days of the week. You can also try other actions from within the app.
Note: One thing I will clarify straight away, is that even though this app (and quite a few other similar apps) work(s) flawlessly on Android 4.4 Kitkat; Android 5.0 Lollipop is seemingly not supported.
Use Opera Max
If you want to control the data usage of your device for all the apps without anything else to take care of, Opera Max is the right solution for you. Do keep in mind that this app is available only for users in the USA. It is tempting, to say the least. And if you reside in the States, you can experience it straight away. I haven’t got the chance to test it, but the app promises to extend your Data Plan to a great extent by reducing data usage across your device. Opera already has a browser which compresses web pages from servers before sending them over to your phone in the form of Opera Mini. But Opera Max and its launch had a lot of hype around it since it seemed like the first full-fledged solution to Mobile data usage woes with the promise of saving up to 50% data!
How does it work? Well, Opera Max creates a VPN network which intercepts all data that your device sends over the Internet. This data is then encrypted and sent to Opera’s servers which send back the requested data to the device AFTER compressing it. So, all the data that your phone receives over the internet is compressed. This should potentially reduce your Carrier-billing charges. While the initial response from beta-users from USA has been extremely positive, don’t expect it in other regions yet, since it’s still in beta. And another thing, you may or may not experience battery drain on your device, but it is highly probable that you will.
Conclusion:
So I have explored the most effective ways to control your background data usage and data usage on whole. Yes, if you follow one of them efficiently, you might easily go the distance even by opting for a smaller data package from your Cellular Carrier. I know, this time around it must be your wallet which is grinning instead of you. Okay Okay. Thank me later! And yeah, if you have any suggestions or other ways to save data, don’t forget to mention those!
And to summarize, here are links of all the apps that I talked about in this article: