This tutorial explains a simple method to post tweets from Gmail. Using this method, you will be able to post tweets with images or without images from Gmail. You just need to send an email to yourself, and that email will be posted as tweet. The body of the Gmail text will be used as your tweet. If you add image to the email, then that will be posted as well (do note that only first image will be posted, and remaining images will be ignored).
To achieve this, we will use IFTTT. IFTTT lets us connect Gmail and Twitter. It will keep monitoring our Gmail account, and when it finds a Gmail that needs to be posted as a tweet, it will extract text from the Gmail and post to Twitter.

There is a bit of challenge while using IFTTT to tweet from email. It has separate options to post a tweet with image, or post a tweet without image. If you use the post tweet with image option, and your email does not have any image, then it will post a blank image in tweet! And if you use post tweet without image option, then it will ignore the images in your email.
To get around this, we need to create 2 applets in IFTTT. One will be used to post tweets with image and another to post tweet without image.
However, there is a new challenge that this introduces. If you send an email that you want to post as tweet, then both these applets will work together, and both of them will post email as tweet, so you end up with 2 tweets!
But don’t worry, there is a solution to that too, as I will explain below.
Other useful IFTTT tutorials:
- How to automatically log all phone calls to Google Drive.
- How to automatically backup Pinterest pins to Google Drive.
How to tweet from Gmail using IFTTT:
As I mentioned above, IFTTT has a couple of challenges to post tweet from Gmail. But there is a simple solution to that as well. The main problem is that we need to create 2 applets if we want to post tweets with images and without images, and both the applets work in tandem, resulting in 2 tweets getting posted for each email.
So, we need to ensure that only one of the applets work when we send an email that we want to post as tweet. Luckily, this is easy.
We will use Gmail filter options to separate the emails that we want to tweet with images and without images. We will separate them based on their subjects. So, we need to first decide fixed subjects of the emails that should be sent to Twitter. I chose subject “Image tweet” for the emails that I want to post to Twitter with images, and “Text Update” as the subject for the emails that should be posted to Twitter as text tweets.
Based on these subjects, we will use Gmail filters to label each type of these emails separately. And then in our IFTTT applets, we will configure those labels, so that one applet fires for first label, and the other for second label, and we end up with just one tweet.
Step 1: In this step, I will explain how to create a Gmail filter that will automatically separate emails by their subject lines and add them to different labels. You have to create 2 filters i.e. one to add emails to a label that will contain all emails that you want to post as media tweets and the other for text tweets.
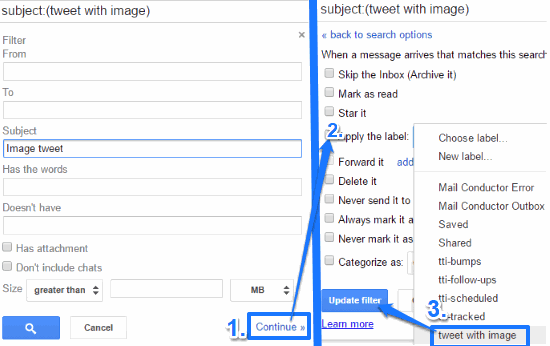
To create a filter in Gmail, click on the small down arrow in the search box. After that, you will see a dialog box to create a filter, as shown below.
Let’s first setup filter for emails that will have images and we want to post as media tweets. For that, specify relevant subject that you decided in the “Subject”field. Then, click on the “Create filter with this search”. This will take you to next screen. Here we need to specify the label that should be assigned to such emails. For that, click on the checkbox next to “Apply the label:” option. Also, click on the “Choose Label” drop-down and specify the label that you want to assign to those emails. It could be anything, like, “Label 1”. Now we have created the filter and corresponding label so that all emails that have that specific subject will be given the label we specified. You need to repeat the same process for emails that you want to post as text tweets. Make sure that subject is totally different that the one we specified earlier, and in the end give a different label to them (like “Label 2”). This completes our Gmail configuration.
Step 2: Now we need to head over to IFTTT to complete our configuration to tweet from Gmail. If you don’t have an IFTTT account, create it first (it’s free). After that, you need to connect your Gmail and Twitter accounts to it. You can connect your Gmail and Twitter account to IFTTT from the Services section. On the top, you will see an option to search, click on it and type the service name i.e. Gmail or Twitter. It will then show you the specific service; click on it and then click on the “Connect” button. This will open a new tab in which you will have to login with your service account to connect it to IFTTT.
In this way you can connect your Gmail and Twitter accounts and then move forward to create the applets to tweet from Gmail. I will just demonstrate how to create an Applet that will read Gmail emails with images and post them as tweets. In a similar manner, another applet can be created that will post tweets from Gmail, without images.
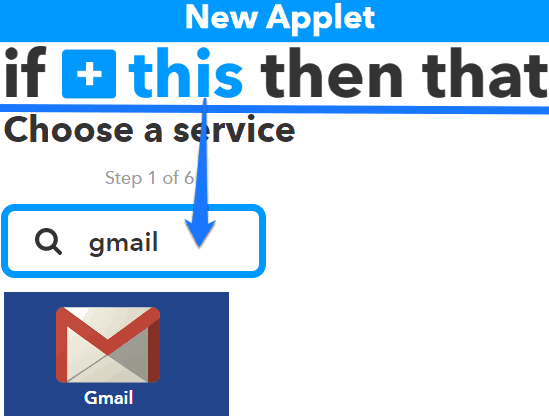
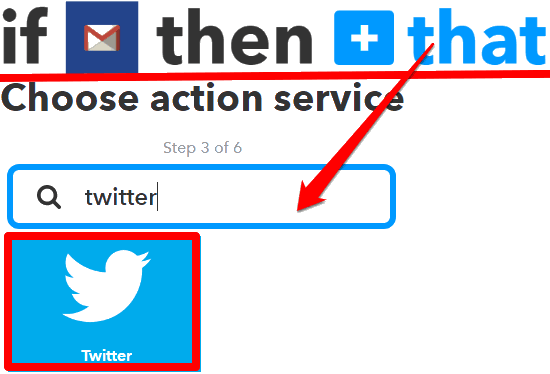
Step 3: In order to create an Applet, go to “My Applets” section and click on the “New Applet” section. You will first see “if this then that” written in a large text as shown below. Click on this “this” and then select Gmail as the trigger service.
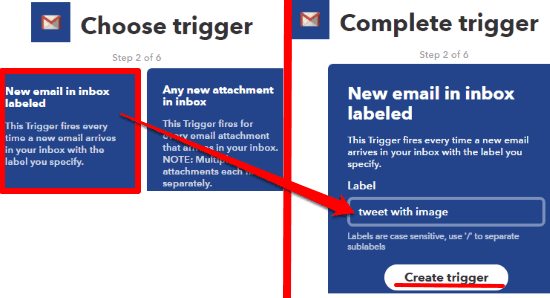
Step 4: In this step, you have to choose a Gmail trigger that will fire the IFTTT Applet. In our case, we want the Applet to automatically post Gmail emails as image tweets that falls under a specific label. So, you have to select the “New email in inbox labeled” as the Gmail trigger. Once you select that, IFTTT will ask you to specify the label name that you want to monitor. Enter the label name and click on the “Create trigger” button to move to the next step.
Step 5: Now, you will again see the “if this then that” written in the large font. Click on the “that” button and select “Twitter” as the Action service, as shown in the screenshot below.
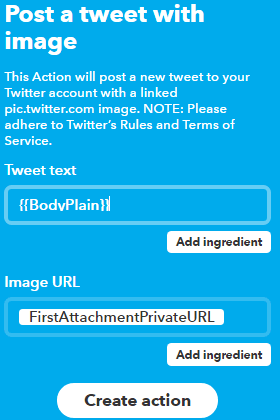
You will have to select the action to be performed when the trigger specified in the previous step fires. As you want to post the new labeled Gmail email as tweet with images, the required action to select is “Post a tweet with image”, as you can see in the screenshot below.

Step 6: Well, in this step all you have to do is choose which part of the email you want to use as the tweet text. This is the most important step and if you skip this step, I bet you will regret as all your tweets will be posted with a caption of your email subject i.e. “Image Tweet” and you will have to edit the Applet again. By default the Applet takes the Subject of the email as the tweet text. You can change it and choose to use body of the email as the tweet text; just delete the “Subject” from the Tweet text field and then click on “Add ingredient” button. After that, select BodyPlain from the list of options, as you can see below. You can leave the “Image URL” option unaltered as the Applet will use the first image attachment from the email to upload on Twitter. In the end, click on the “Create Action” button to move to the next step.
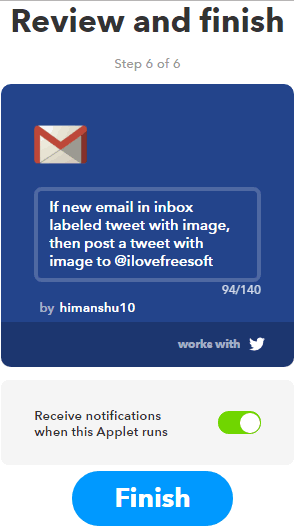
Step 7: In this step, you can review the Applet and make sure you have selected the right options like change the tweet text to body of the email and specified the correct Gmail label. Once you have checked all the components of the Applet, go ahead and activate it from the big “Finish” button.
After creating this Applet, you can create another Applet to post your text tweets from a specific Gmail label based on particular subject line. The same steps are applicable; you just have to select the “Post a tweet” action in the Step 5 and then the next step can be configured as explained in the step itself, the only difference is that you will not see any option to specify “Image URL” as we just want to post a simple text tweet.
Once, you have created both of these Applets, you can start tweeting from Gmail. All you have to do is send an email to yourself. If you want to post a tweet with image, then you have to specify the corresponding email subject, and similarly for tweet without image, choose the corresponding subject. In the body of the email, you can specify the tweet text.
Now, you can check whether the Applets work or not. Open Gmail and compose a new email, specify the subject as “Image tweet” and then the text of the tweet in the email body. Also, do not forget to attach the image to be uploaded to Twitter. After that, send the composed email to yourself. IFTTT will read that email and will post email text as tweet.
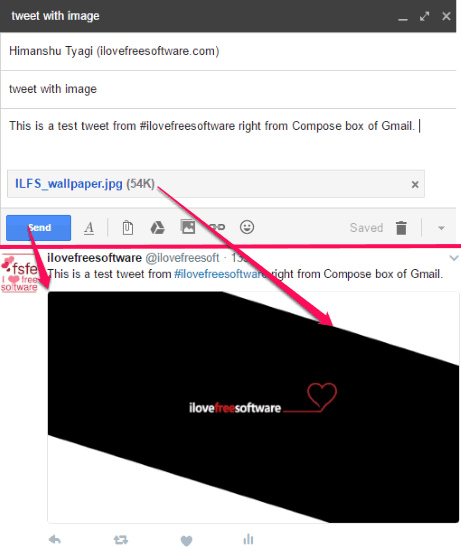
Do note that it is not instantaneous and it can take a while for the email to be posted as tweet. Also, note that you can also include hashtags, mention people, and include links in the tweets posted from Gmail; just include them in the email body.
Closing Words:
In this tutorial, I explained a method to post tweets from Gmail. You will be able to post tweets with or without photos without any problems using the method. In addition to that, you will also be able to include links, hashtags, and mention people in the tweets sent from Gmail.