This tutorial explains how to backup DigitalOcean, Linode to AWS Glacier. Here I have listed two methods to backup your data from any VPS to Amazon Glacier automatically at a set schedule. Both the methods below use different tools to backup your data and you can easily backup important files and directories from multiple locations on your server painlessly. With the tools below you can even sync your data and retrieve it as well when you need it. And of course, these tools are completely free.
Even though DigitalOcean and Linode like VPS provide you a built-in option for backups, but storing your server and backups at the same host can be a single point of failure. Therefore, you need to store another backup of your important data somewhere else and Glacier is one of the cheapest options available.
Glacier is a cold storage service by AWS, specifically meant to store data that you don’t need frequently. It is also a cheap data storage service to store data for as little as $0.004 per GB per month. This is an ideal option for customers who want to backup data from their multiple servers for the long term. And in this post, I will explain 2 handy methods to efficiently to do that right from your server. These tools can also create log of operations so you can audit a backup operation later.
How to Backup DigitalOcean, Linode to AWS Glacier?
Method 1: mt-aws-glacier
mt-aws-glacier is probably the best free tool out there to automatically store DO or Linode backups to Glacier. Think of this tool as a client application for Glacier that is specially created for periodic backups. It has features like multipart upload, full synchronization, multi-threaded upload/download, vault creation and deletion, tracking of uploaded files, archive retrieval, archive deletion, and archive download. You just need to set up this in the beginning using the API keys and then just run a single command to upload the backup.
This Glacier client supports Debian, Fedora, CentOS, Ubuntu like distros, so it doesn’t matter what OS is installed on your server. You just install it and configure it to backup files and folders from your server to Glacier. And in order to automatically backup data, you will have to use the cron jobs that you can easily create if you have knowledge of Crontab. Currently, the installation via package manager seems to be broken, which is why you will have to install this manually.
Installing and Configuring mt-aws-glacier on a VPS:
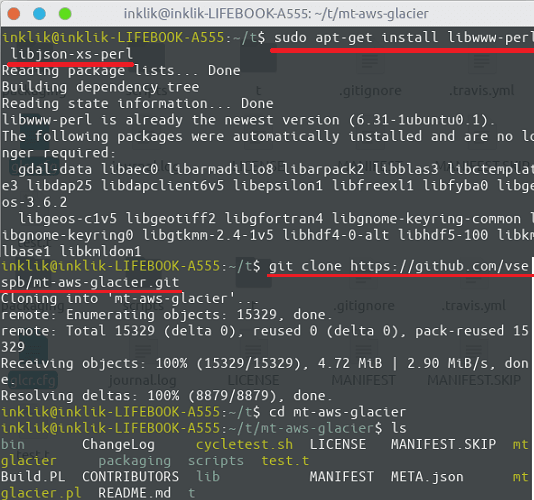
Open up the terminal and then start by installing the prerequisites. For this tutorial, I am using a VPS running Ubuntu 18.04 so if you have the same then simply execute the following command. Next, when the prerequisites are set up, you can start with the configuration steps. Next, just git clone the repository and then cd into it.
sudo apt-get install libwww-perl libjson-xs-perl
git clone https://github.com/vsespb/mt-aws-glacier.git
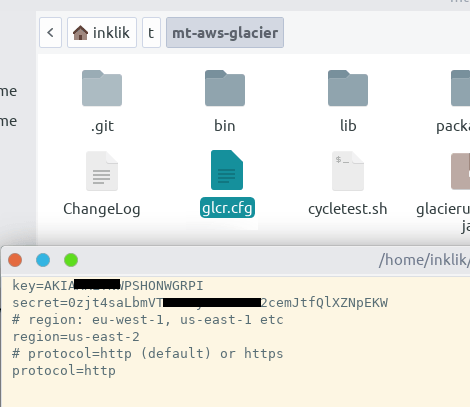
In order to actually using this tool to backup your data to Glacier, you have to create a configuration file. In the configuration file, we will have to specify the API keys to interact with the Glacier vaults. Along with the API access keys, details like region and protocol are also required. See the configuration file, “glcr.cfg” in my case which I have saved in the same folder where the “mt-aws-glacier” file is.
At this point, the installation and configuration of mt-aws-glacier have been done. You can do a test run by running a command to list existing values from your Glacier account.
Backing Up Data to AWS Glacier from DigitalOcean or Linode VPS:
In the previous section, we have configured the tool to start uploading backups. So, without wasting much time, let’s just get started.
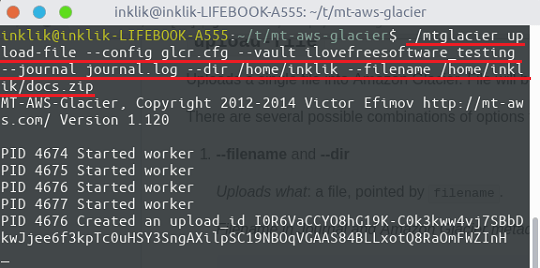
To upload a directory or a file, enter the following command in the terminal. It will verify the API credentials and will establish a connection to your vault and start uploading the files. You can see the upload progress right in the terminal.
./mtglacier upload-file --config glacier.cfg --vault myvault --journal journal.log --dir /data/backup --filename /data/backup/dir1/myfile
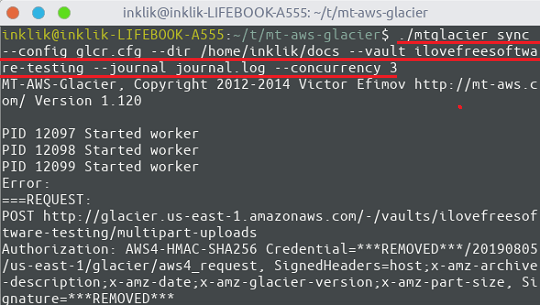
The sync operation in mt-aws-glacier propagates the local file system to Glacier. It supports 3 different modes for the sync operation namely: new, replace modified, delete removed(to delete files which are missing on the local machine). The basic syntax of the sync operation is given below.
./mtglacier sync --config glacier.cfg --dir /data/backup --vault myvault --journal journal.log --concurrency 3
In the above command, you can further add some switches to specify the sync mode. Also, not only that but you can add some filters as well to exclude some files to be uploaded to Glacier. For more details on the advanced usage, have a look at the documentation page.
Now comes the part about scheduling backups to happen automatically. I have added a separate section at the end of this tutorial for that, as that is common for both the methods.
s3cmd
s3cmd is another command-line tool to backup your VPS. Actually, this tool saves your files to S3 buckets but with the help of an S3 feature, you can transfer the backup to Glacier automatically. This is an indirect method of backing up data from Digital Ocean to Linode to Glacier, but it works perfectly. Basically, here I will divide the process into two parts. In the first part, I will show you how to configure s3cmd to backup data to S3 and in the second part, I will show you how to configure S3 to archive data to Glacier using a lifecycle rule.
After configuring s3cmd, you can start backing up VPS to an S3 bucket. And then create a lifecycle rule to transfer the objects to Glacier.
Let’s’ just start with the first part that is the installation and configuration of s3cmd.
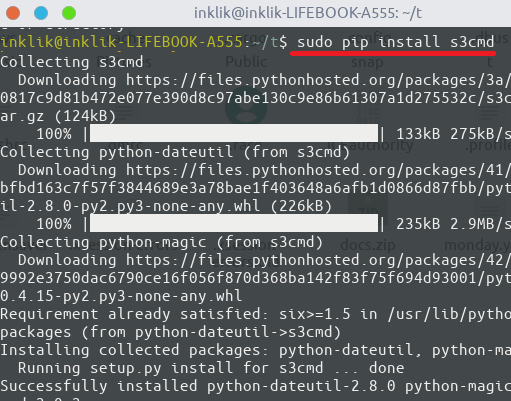
To install s3cmd, you need Python installed on your server. After making sure that Python is installed along with pip, run the following command.
sudo pip install s3cmd
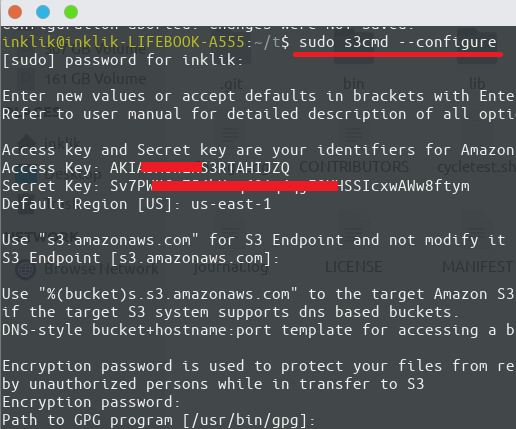
Now, proceed with the configuration part. To configure s3cmd, you will need to have API keys and region details, to let it access your buckets on S3. Enter the following command and then hit enter to start the configuration process. Just keep specifying the details that it asks and keep pressing the enter key.
sudo s3cmd --configure
In the end, you can do a test run and if that fails, start the configuration process again.
Using s3cmd to upload Data to S3 Buckets:
There is a very simple command to upload files to S3. Also, you can go for recursive mode too. The upload feature of this tool works with files and folders and you are free to choose any folder on your server. After when you have configured the tool, simply run the following command to upload a directory. In the command below, you just have to specify the target bucket and path to the folder you want to upload.
sudo s3cmd sync --recursive --preserve DiectoryToUpload s3://BucketName
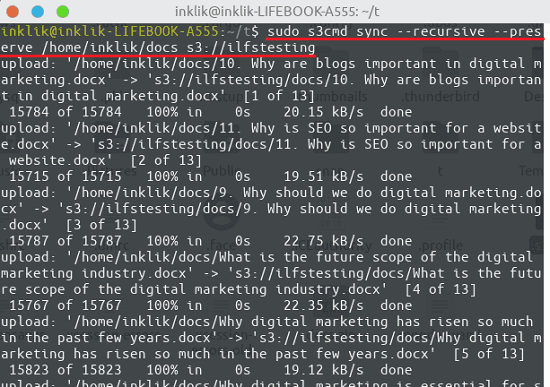
In the screenshot above, you can see the upload process via s3smd. The recursive switch in the command saves all the child directories. And then preserve switch keeps all file attributes and permissions same.
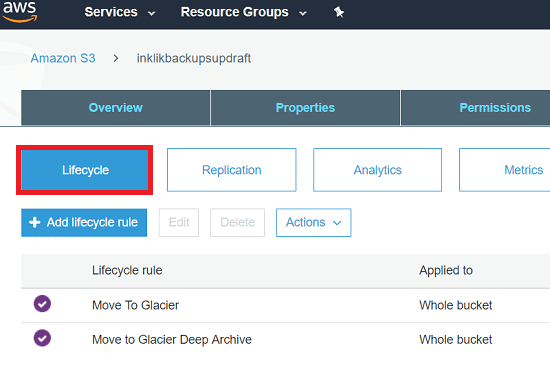
Creating Lifecycle Rule in S3 to Archive Objects to Glacier:
This is an interesting feature of S3 by which you can opt to archive objects from your buckets to Glacier. In S3, you can create a lifecycle rule to automatically transfer data from S3 to AWS Glacier. To do this, log in to the AWS Console and then reach the interface where the S3 buckets are. After selecting a bucket, open its properties and then click on the “Add lifecycle rule”.
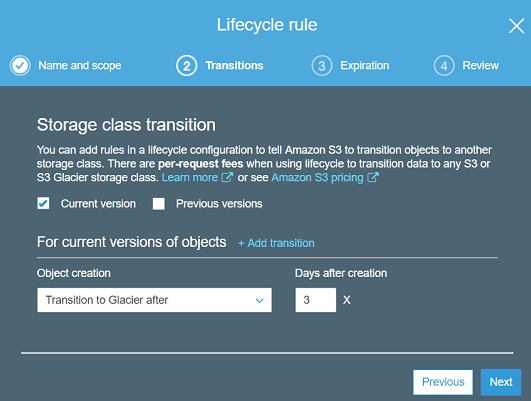
Now, proceed with the lifecycle rule configuration by giving it a name and specify a transition action. Select the object creation method to “Transition to Glacier after” and then specify the corresponding number of days. Next, just review the rule and save it. Now, it will automatically start transferring the old objects from the defined bucket to Glacier as per your configuration. You can edit or delete this rule later whenever you want.
This way, you can create a lifecycle rule for an S3 bucket to transfer old object to Glacier. You can do this anytime and with any bucket to get an extremely cheap backup solution to Glacier.
Do note a small caveat in it: your backups are first being transferred to S3 and from then they are being moved to Glacier. So, you will incur the additional cost for the duration for which the backups are on S3.
Scheduling Automatic Backups:
Using cronjobs, the backup process can be scheduled easily. This is helpful as you will not have to run the commands again and again for the periodic backup. For this, you just have to create a bash file and then simply create a cron expression. Save the job by scheduling in the crontab and then just forget it. The command will run automatically on the specified time and you can audit the logs later.
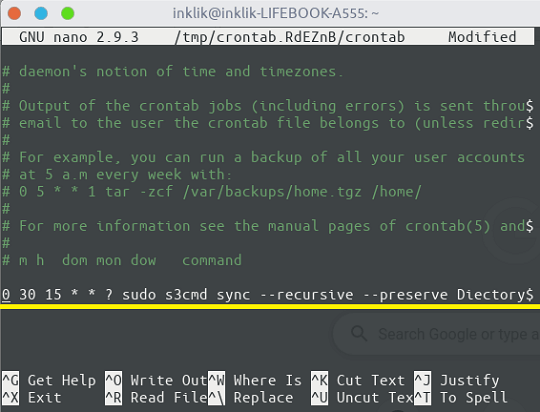
To create a cron job, run “crontab -e” in the terminal and then add any upload command that I have mentioned in case of the above tools. Along with the command, you will also have to specify a cron expression. The cron expression is responsible for the scheduling part. The cron expression that I have added in the following command will run this command daily at 15:30.
0 30 15 * * ? sudo s3cmd sync --recursive --preserve DiectoryToUpload s3://BucketName
Add the scheduling command with the correct expression and save it in the crontab. Now, you have configured the automatic backups to Glacier. The cron job will run automatically at the specified schedule and will sync/upload the data from the specified server directories.
Similar posts you may like:
- How to Backup DigitalOcean Droplet to FTP
- How to Setup your Own VPN Server on DigitalOcean
- 4 Free Linode Manager Services to Manage Linode Servers Online
Final thoughts
These the two best methods that you can use to set up automatic Digital Ocean backups to AWS Glacier or Linode backups to Glacier. In my opinion, the first method is more desirable as it is a direct method to connect to AWS Glacier to save server backup. But you are free to do go with the second one as well.