This tutorial explains how to add Permanently Delete option to Windows 10 Context Menu. By default, there is only ‘Delete’ option visible in right-click context menu, which sends the file/folder to the recycle bin. To permanently delete files, we need to empty recycle bin, use Shift+Del hotkey, or some third-party software. However, those who want to permanently delete files using Windows 10 right-click context menu, they can add a simple tweak in the Registry. After that, a Permanently delete option will visible in the context menu.
This tutorial covers all those steps using which you can add permanently delete option in the Context Menu of Windows 10. Using that, you will be able to bypass recycle bin and delete files permanently using the Context Menu. You can also remove this option anytime you want.

Above you can see that earlier there was no Permanently Delete option in Windows 10 context menu, but later it has added with the help of Registry tweak. Let’s see how to do this.
Note: Permanently delete files can also be recovered using some data recovery software. So, it is good to use some file shredder software that makes it almost impossible to recover deleted files.
How To Add Permanently Delete Option To Windows 10 Context Menu?
Step 1: Open the Registry Editor and go to the shell key. You can find it by going to HKEY_CLASSES_ROOT → AllFilessystemObjects → shell.

Step 2: Now you have to add a new key under shell key and name it “Windows.PermanentDelete“.

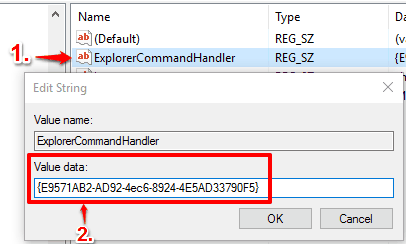
Step 3: It’s a very important step. You have to create three different String Values under Windows.PermanentDelete key. Right-click on Windows.PermanentDelete→New→String Value option. This way, you can create all those three string values. These are:
- ExplorerCommandHandler value: After creating this key, set its value data to “
{E9571AB2-AD92-4ec6-8924-4E5AD33790F5}“.

- Icon value: This value is used to show ‘red cross’ icon in Permanently delete option. You need to set its value data to “shell32.dll,-240“.

- Position value: Use this value to set the position of Permanently delete option in context menu. You can set its value data to Bottom/Top/Middle.

Step 4: When these three values and their value data is set, you can close the Registry Editor window. Now right-click on any file or folder and you will be able to see “Permanently delete” option in the context menu. Click that option and it will ask for the confirmation in a pop-up. It is the same pop-up that appears when you use Shift+Del key.

Step 5: When you have to remove this option from context menu, simply delete “Windows.PermanentDelete” key.
The Verdict:
People who are not used to ‘Shift+Del’ hotkey and usually first Delete file using the context menu and then Empty recycle bin to permanently delete files, they will like this feature. It is quite interesting as well as useful as you can permanently delete files in just 2 mouse clicks.