This tutorial demonstrates how to batch resize images in Word document. By default, Microsoft Word doesn’t have any option to batch resize images. But, there is a hidden trick using which you can now easily resize all the images in a Word document in bulk. To do this, you don’t need to use any third-party image resizer tools or add-ins, as Microsoft Word comes with a built-in feature named, “Macros” for that. You can create a simple Macro code with a custom size and then run it on any document to resize the images. The Macro code will let you batch resize images on both DOCX and DOC files.
Initially, the “Macros” feature will be disabled in Microsoft Word for some security reasons. So, you would need to enable it before you can proceed to create a code. No more manually resizing images one by one in a Word document. As creating a Macro code can now help you do that with just a click for all images.

How to Batch Resize Images in Word Document:
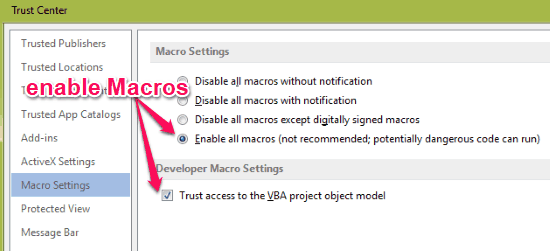
Step 1: Before you get started, the first thing you would need to do is enable the “Macros” feature. To do that, open MS Word and go to “File Menu → Options”. After that, a popup window will appear where you need to select the “Trust Center” tab and then click on the “Trust Center Settings” button. Then another window will open up and you need to check the “Enable All Macros” and “Trust Access” options under the “Macro Settings” tab.
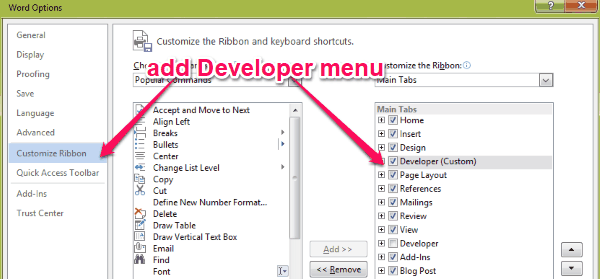
Step 2: After enabling the “Macros”, you would need to add the “Developer Menu” to the main menu list of MS Word. For this, go to “File Menu → Option” and select the “Customize Ribbon” tab. After that, move the “Developer” menu from the left to the right section. This will add the “Developer Menu” on the ribbon.
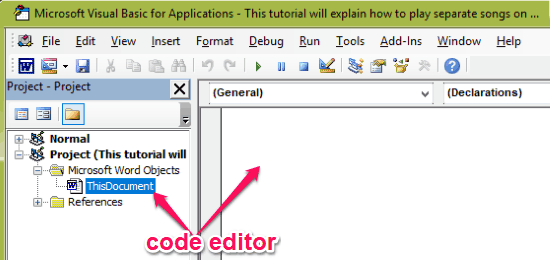
Step 3: When you’re all set with enabling the “Macros” and “Developer Menu”, you can proceed to create the Macro code. To do that, open the document in which you want to batch resize images and then select “Developer Menu → Visual Basic”. After that, navigate to “Project → Microsoft Word Objects” and then select “ThisDocument” file. After you do that, the code editor will appear on the right.
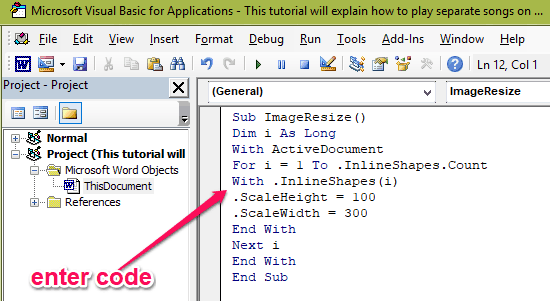
Step 4: Now, what you need to do is paste the following Macro code into the code editor.
Sub ImageResize()

Dim i As Long

With ActiveDocument

For i = 1 To .InlineShapes.Count

With .InlineShapes(i)

.ScaleHeight = 100

.ScaleWidth = 300

End With

Next i

End With

End Sub
In the code, you would need to name the Macro after “Sub”. For example, you can see in the above code that I have named the Macro as “ImageResize”. Apart from that, you can manually set any size you want to which you want to resize the images. To define the size, enter the pixel value after “.ScaleHeight” and “.ScaleWidth”. Then close the window.
Step 5: As soon as you do that, the Macro code will be activated and you can run it to resize all the images on the selected documents at once. To run the Macro, simply click on the Developer menu and select the “Macros” option. After you do that, a popup window will open up where you would need to enter the name of the Macro you have created. As an example, you can see in the below image, that I have entered the Macro name “ImageResize” in the input field.
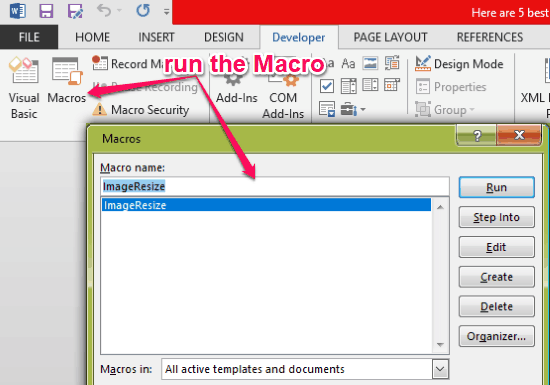
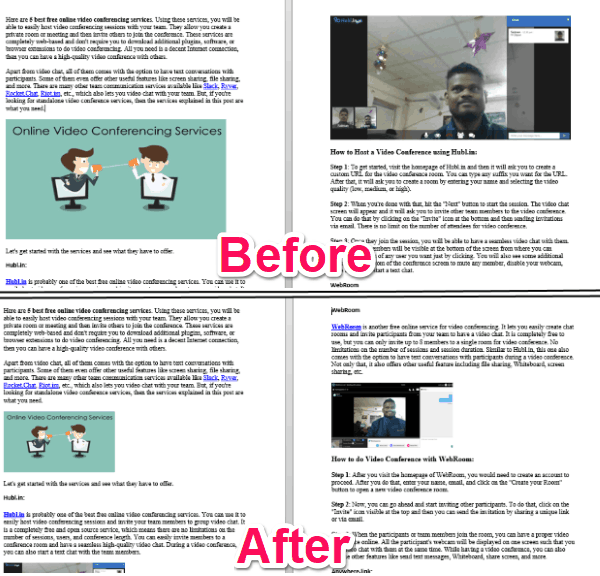
Step 6: Once done, simply hit the “Run” button on the popup window. As soon as you do that, all the images on the selected document will resize automatically to the size you have defined in the Macro code. You don’t even need to select the images for resizing. That means once the Macro runs it will automatically detect all the images and resize them. You can see an example in the image shown below.
Closing Words:
The Macros feature of Microsoft Word makes it very simple for you to batch resize images in a document. The best thing about this method is that you don’t need to install any add-in or software to change the size of all images at once. Go ahead and resize all images in a Word document with just a click.
Source: SuperUser.