In this tutorial, I am going to explain how to automatically email someone after you reach a destination.
If you want to automatically notify someone via email that you have reached a destination, then here are 3 different Android apps for that: Atooma, AutomateIt, and IF (by IFTTT). Using these apps, you can easily send automated emails to your friends and family about your safe arrival at any specific location.
However, if you want to send SMS instead of email, then you should probably check out this another tutorial “How to Auto SMS Someone When You Reach a Location“.
How to Auto Email Someone After You Reach a Destination with Atooma – Smart Assistant:
Atooma is a free Android app that works as your personal assistant and helps you perform dozens of automated actions. That means some of the usual actions which you do manually on your phone (like capture a photo and upload it to Facebook, set a reminder for calling your loved ones, and much more) can be automated using this app. Another useful task that your Android phone can perform automatically with Atooma is that it can email someone after you reach a destination. It works with the concept of “IF and “DO” rule, which means to perform any automated task you set a condition and a task in response.
Below, I am going to demonstrate how to auto email someone using Atooma after you reach a destination.
Step 1: Simply install and open the app to strat creating “IF” and “DO” rules. In the “My Atooma” section, there will be a “+” button which can be used to create new rules. Select the button in order to create your own custom rule for sending auto emails to anyone.
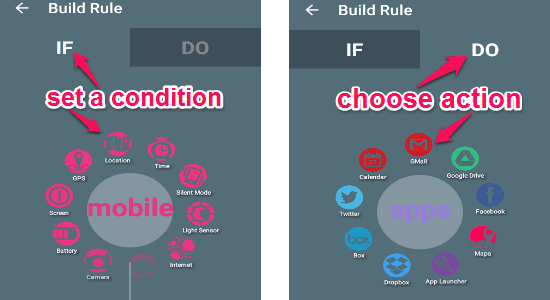
Step 2: In the rule editor, you will see two different options i.e; IF and DO. In the first option, select the location button and choose “Enter Area” to set a condition. As soon as you do that, it will allow you to select any specific location on the map.
Step 3: After selecting a location, proceed to the second option “DO” to set up an action in response. Swipe once on the screen to browse more actions and select the “Gmail” icon from the list. You will see a “Send mail” button, simply tap that button and enter the recipient email address. Keep tapping next in order to type email subject, email body, and attach files like photos, documents, etc.
Step 4: Once you’re done, simply save the rule to “My Atooma” section. The action or rule will automatically run each time it meets the assigned condition in Step 2. That means after you reach the selected destination, an email will be sent automatically to the email address you mentioned. If you want to stop the rule from running, then delete the rule from “My Rules” section.
Use AutomateIt – Smart Automation to Send Automated Email to Anyone When You Visit a Location:
AutomateIt is another interesting app for Android that can save your precious time by performing different tasks on your phone automatically. It allows you to create rules/triggers to make your Android device perform tasks inevitably like enable/disable Bluetooth, Increase/Decrease volume, On/Off phone vibration, send auto SMS when you reach a location, etc. Using this app, you can also make your phone send automated email to anyone when you visit a location. Lets say, you want to inform your parents that you’ve reached the Airport, then this app will help you send an automatic email to your parents about it.

Now, let use talk about how you can use this app to send automated emails.
Step 1: Open up the app and tap the “+” button on the “My Rules” section to add a new rule. After that, it will open up the editor with trigger and action options.
Step 2: That means to create a new rule, you’ve to define a trigger and an automated action for that trigger. In the “Trigger” section, find and choose the “Location Trigger” and assign a location, adjust coarse accuracy, set sampling rate of location, etc.
Step 3: When you’re done with creating a trigger, browse the “Action” tab and choose “Send Gmail Action” option from the list. Now, select the email address from which you want to send the automated email, add recipient email address (you can add multiple email addresses separated by commas), write email subject, and email body. It also allows you to add HTML tags in the email body section.
Step 4: Before saving the rule, you can enter the rule name, allow notification popup, or set a delayed execution in term of seconds, minutes, and hours. That’s all, your rule is ready to be triggered automatically.
Every time you enter the assigned location, the rule will be triggered automatically and the added recipients will get an email with your message.
Use IF (by IFTTT) to Automatically Send Location Based Email:
IF is a very useful Android app by IFTTT, which lets you create various recipes by combining two individual apps or web services. You can also use this app to search for recipes created by people all around the world and use them as your own recipes. Creating recipes help you trigger automated tasks like if battery level drop to 15% then Turn Off the Wi-Fi, if a phone call is not answered then send an SMS to that person, etc. So if you wish to automatically send an email to anyone when you reach a specific location, then this app makes it possible for you to do the same.
Step 1: After opening the app, simply select the “Recipe” icon and tap the “+” button to proceed. You will see a “Create a New Recipe” button at the bottom of the screen. Tap the button in order to create your own recipe for sending an automated email.
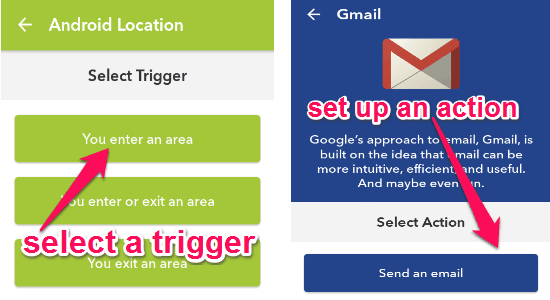
Step 2: Then choose the “if” button and select the “Android Location” service from the recommended channels. After that, you need to pick the trigger “You enter an area” from the list of triggers. To locate any destination, simply pinch and zoom inside the circle on the screen or type the destination name manually. When the trigger is ready with a location, tap the “Next” button to continue.
Step 3: The next step is for setting up an action in response to the created trigger. Tap the “then” button and select the “Gmail” service from suggested channels. Now, you have to select the action “Send an email” to proceed. To create a new email, it will ask you to enter recipient email id (you can enter up to 5 email addresses separated by commas), subject, message body, and you can also include attachment URLs with the email.
Step 4: As soon as you’re done with creating a new email, simply press continue and tap finish to save the recipe. The recipe will start running instantly.
Step 5: When you reach the defined destination on the trigger section, the email (which you’ve created in the above step) will be sent by this app automatically to the recipients. To stop the trigger, simply disable the recipe on your recipe list.
My Final Verdict:
This tutorial tells you about 3 best Android apps to automatically Email someone after you reach a destination. These apps let you perform various automated actions including sending location-based emails and SMS. As per my testing, I think “Atooma” is the best as it also allows you to attach files like photos, documents, etc. along with the email.