This tutorial explains how to delay restart for scheduled Windows updates in Windows 10. When you are not using a metered connection in Windows 10 and the option is set to automatically receive and download Windows updates, then your PC is restarted automatically on the specified scheduled time. However, sometimes it happens that your work is not completed and in between, Windows updates restart PC. That can be frustrating as you might lose your important data. In that case, you can set delay time for PC restart for scheduled Windows updates.
You can set the delay time between 1 to 30 minutes. For doing so, 2 different methods are covered here: Registry Editor and LGPO (Local Group Policy). After that, when scheduled restart time for Windows 10 occurs and you have set delay time for 5 minutes, then updates have to wait for 5 minutes before restarting the PC at the scheduled time.
Let’s start with the first option to delay Scheduled Windows Updates Restart.
Method 1: How To Delay PC Restart for Scheduled Windows Updates In Windows 10 Using LGPO (Local Group Policy)
LGPO is a part of Windows 10 Enterprise, Pro, and other editions. Windows 10 Home doesn’t provide this feature.
Step 1: Open LGPO window. You can do this by opening the Run Command and typing ‘gpedit.msc’. Or else, simply type group policy in the Search box of Windows 10.
Step 2: Find the Windows Update folder. Here is the location: Computer Configuration > Administrative Templates > Windows Components > Windows Update.
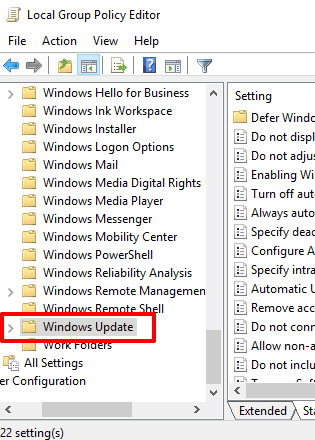
Step 3: When you have accessed this folder, a lot of options will visible on the right side. Scroll down options list and find “Delay Restart for scheduled installations” option.

Step 4: Double-tap on that Delay Restart…..option and another window will open. There you will see Not Configured, Disabled, and Enabled options. Select the Enabled option. After that, you will see an option to set the wait time on the left side. Enter a value between 1 to 30 (this is time in minutes) and save these changes.
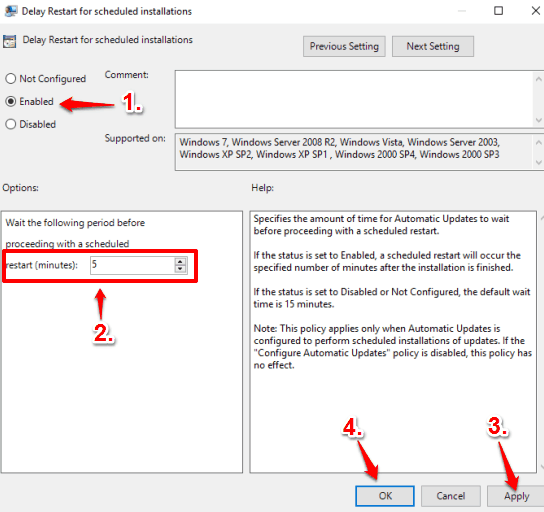
Now the next time when Scheduled Windows updates occur, updates first have to wait for the delay time set by you, and then the updates will restart PC.
Method 2: How To Delay PC Restart for Scheduled Windows Updates In Windows 10 Using Registry
If you are on Windows 10 Home version, your PC won’t have Group Policy Editor. In that case, you can make changes to your registry to Delay restart. Here are steps for that:
Step 1: Type ‘regedit‘ in the Search box or Run Command box to open the Windows 10 Registry.
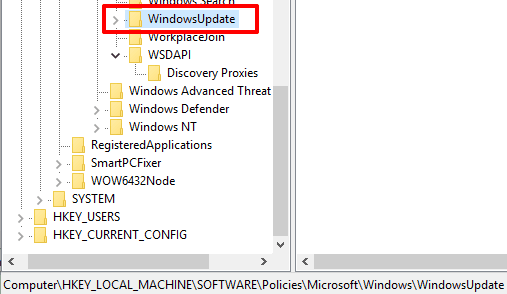
Step 2: Now go to the WindowsUpdate key. Here is the location: HKEY_LOCAL_MACHINE→ SOFTWARE→ Policies→ Microsoft→ Windows→ WindowsUpdate.
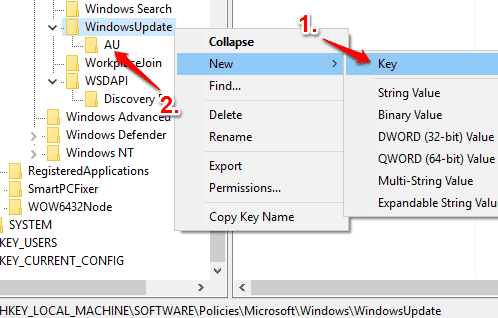
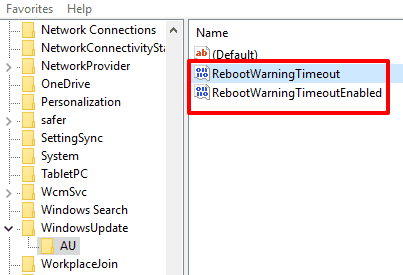
Step 3: Under this key, you need to create a new AU named sub key. Right-click on WindowsUpdate key→ New → Key. Set the name of that new key as AU.
Step 4: In this step, create two different DWORD values and set their names as: RebootWarningTimeoutEnabled and RebootWarningTimeout.
Step 5: Change default value data of both the values. For RebootWarningTimeoutEnabled, set value data as ‘1‘. And for RebootWarningTimeout, set value data between 1 to 30. Make sure you have selected Decimal option when you are changing value data of RebootWarningTimeout key.
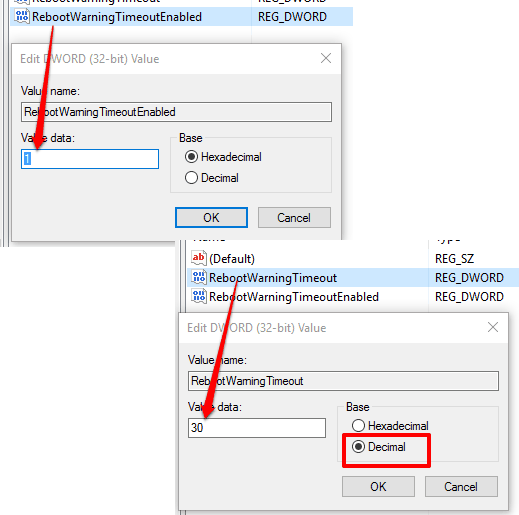
Save the changes and then scheduled updates will restart PC after the delay time specified by you.
You can also check how to turn off automatic map updates and how to set time period to defer updates in Windows 10.
The Verdict:
Both these methods are a bit lengthy but easy to use. Setting the delay time for scheduled updates can be very useful to prevent unwanted restart until the specified delay time. You will be able to wrap up your work and then let PC restart without any worries.