Image hosting is all we need when for saving website or personal images online. There is a long list of such services that you can use but you if you want to make that image hosting work as a free CDN then you may not find this kind of services for free. So, in this post, I am going to explain how you can set up your own free image hosting CDN using Backblaze B2 and Cloudflare Workers. This is because B2 comes with a very nice free plan, and we can tweak its storage with the help of Cloudflare to use it as an image hosting service to share images as well as serve images on website.
Backblaze B2 is cheap cloud storage service just like Amazon S3 with the support of buckets. The major key difference between the two is that, B2 provides you the first 10 GB of storage free of cost. And that is more than enough for individual bloggers and developers to host their images or use it as a backend to serve website images. In this post, I will use ShareX, Cloudflare Workers, Cloudflare DNS, Backblaze B2 for storage, and we will need a registered domain. If you don’t have domain then you can create one for free using Freenom that will live for up to a year.
So, basically here we will configure ShareX to use as a tool to upload images. With ShareX you can upload different type of files to B2 buckets by configuring the API keys. And we need Cloudflare to beautify the URLs of the uploaded images. By default, B2 gives you a very long URL which can be inconvenient sometimes. That’s where Cloudflare DNS and Cloudflare Workers come in handy. Using these two, we can create new URL with our domain, and we can easily strip some unnecessary parameters from the URL as well. Just follow the guide below.
How to set up Free Image Hosting CDN using Backblaze B2 and Cloudflare Workers?
For the simplicity, I have divided the whole guide into three sections. In the first section, we will create a bucket in Backblaze B2 account, and then we will proceed with the further process to configure ShareX and Cloudflare part. So, first let’s start with creating a bucket and generate keys to deal with the uploading part.
Part 1: Creating a Bucket in Backblaze B2 Account and Generate App keys
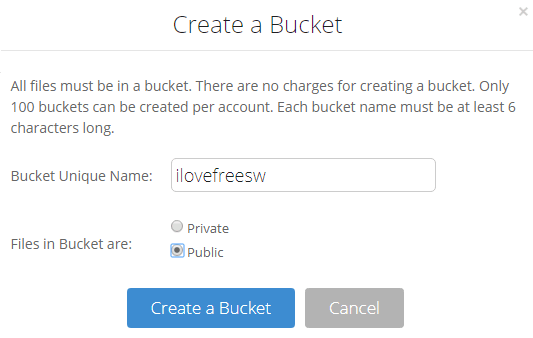
If you have a Backblaze account then you can simply create a separate bullet there to save images. If you don’t have B2 account then create one using your email address and then proceed with the bucket creation process. Here you will have to make sure that the bucket you create is public. Also, while creating a bucket, give it a simple name that will be easy to culled from the URL via pattern matching.
After creating a bucket, you need to generate API keys. From the main Backblaze UI, you go to the “App Keys” section and create a new application. Give your new application a name, say ShareX and then copy down the credentials; key ID and application key. You can see the screenshot below.
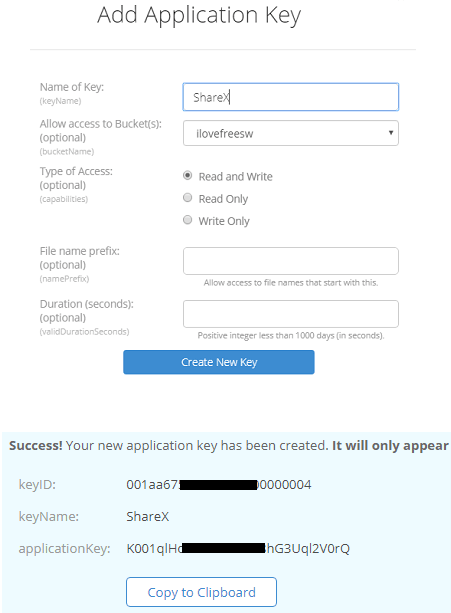
Note: While generating the keys, make sure that you only select the bucket you want to save images in. This is a good practice to secure your account. Also, please note down the “applicationKey” as it will only shown once.
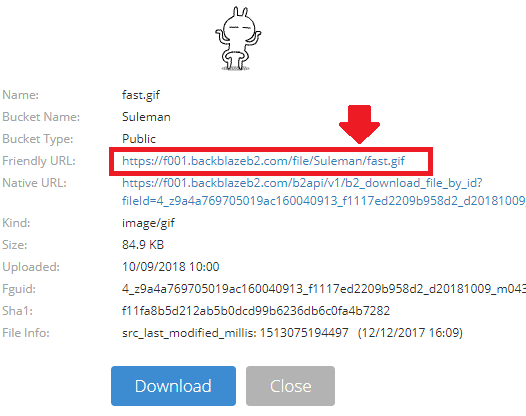
One more thing that you have to here is that upload a test file in the newly created bucket. After that, simply click on the “i” icon to see its details. Here you have copy down the URL of the bucket because we will need it later in the Cloudflare setup. Especially, copy the URL of the bucket to identify its host and that URL looks like something: https://f001.backblazeb2.com/.
Now, at this point the B2 part has finished. You can now start with the Cloudflare part.
Part 2: Configuring Cloudflare DNS to Create a Subdomain.
Here I am assuming that you have a registered domain name with you. So, just create a free account on Cloudflare or if you already have one then simply login in to your dashboard. Start by adding a domain here and then simply proceed with the verification process. To do that, you will have to replace the name servers in your domain hosting to Cloudflare’s nameservers. For example, in my case I am using a free domain that I have created using Freenom. You can copy the name servers from the Cloudflare interface and then simply update them in the DNS records on your registrar (Freenom in my case).
After your domain is added to the Cloudflare, you will have to create a subdomain. For that, add a CNAME record the DNS records in the Cloudflare’s interface. You can choose any subdomain that you want and you will have to point it to the URL that you copied earlier in the previous section. And you don’t need to add slashes and protocol in the target and make sure that orange shield is on. You can see the screenshot be to understand how it looks. I have created “ilfs” subdomain and redirected it to URL that I copied earlier from my B2 bucket.
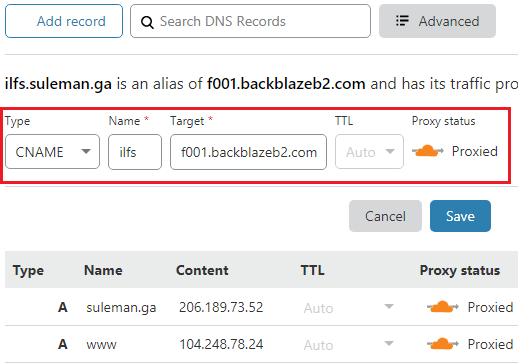
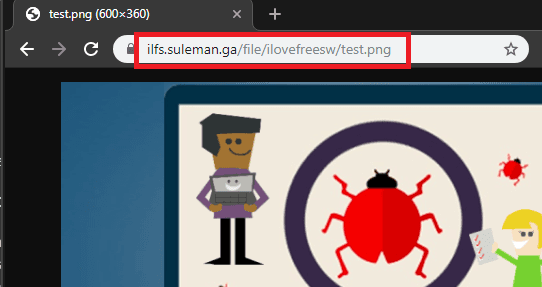
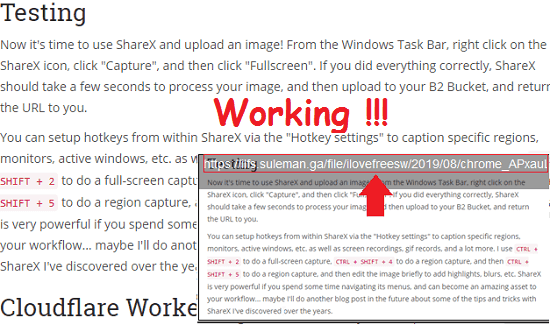
Now here you can save changes and then test if its is working. Now, you just copy a URL of a file already in bucket and then replace the “fxxx.backblazeb2.com” part with the “subdomain.domain.com” that you have created in Cloudflare. So, the “f001.backblazeb2.com” in my case, will now become “https://ilfs.suleman.ga/“. You can test the URL by pasting in browser and you can see that in screenshot below.
In this way, you can configure the Cloudflare DNS part and then save all the changes. Now, all we have to do is configure a Backblaze B2 client or uploader to upload images to B2 buckets. And for that, I will be using ShareX and you can see the steps to configure that in the next section.
Part 3: Configuring ShareX to Upload Images to BackBlaze B2.
The best part about ShareX is that it comes with B2 integration. It is a popular screenshot software and uploader software that you can use on your PC. It has almost all the features of a decent screenshot software that you can hope for. Here I will not be explaining so much about it but you can see its full review by use here.
After downloading and installing ShareX, all you have to do is configure B2 for uploading the images. One other reason that I have for using ShareX that it gives you a right click menu entry to upload any file to B2 in two clicks. After uploading the file, it leaves its URL on the clipboard that you can save anywhere easily.
Open ShareX and open the Destination Settings and then go to the BackBlaze B2 section. Here enter the keys that we have already copied in the first part. And then proceed with specifying the destination path. Leave the bucket name and then opt for the custom URL option. Enter the URL that we have created above(the one with the subdomain) and additionally append “file/BuketName” in it. It will generate the corresponding preview of the final URL as you can see in the screenshot above.
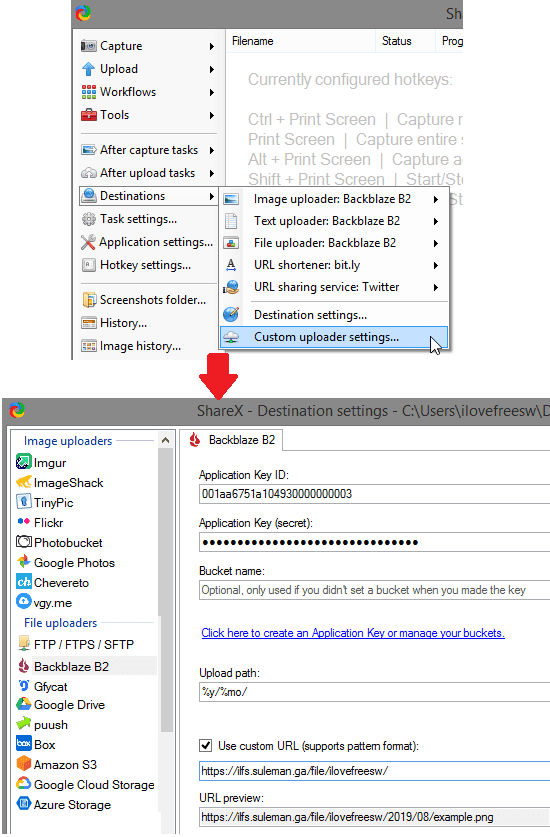
In the above steps, you will also have to specify the path in the bucket. And for that, you can choose some wildcards for year, date, etc. In my I have case, I have used wildcards “%y/%mo/“. This means inside the bucket, it will create a folder with the name of current year and a subfolder with month number and in side that folder it will save images. After this is done, you can take a screenshot with post capture upload option enabled. If is able to upload the files to B2 then you will see the URL of the uploaded file and you are done.
At this point, ShareX has been configured. And our purpose of uploading files to B2 from desktop has also served. If you wish, you can stop here. But if you stop here then you will get long URLs to the images. To deal with that, we can e Cloudflare Workers to make them short by stripping of unnecessary text and that is mentioned in next part.
Part 4: Beautifying the B2 URL of Uploaded Image using Cloudflare Workers
Cloudflare Workers is one of the most amazing feature of this service. Basically, here it lets you execute JavaScript code on the edge of CF which can greatly help developers in creating server less applications. Currently, you can read more about Cloudflare Workers here and then you can simply see how they work. And they even come up with Cloudflare free tier as well.
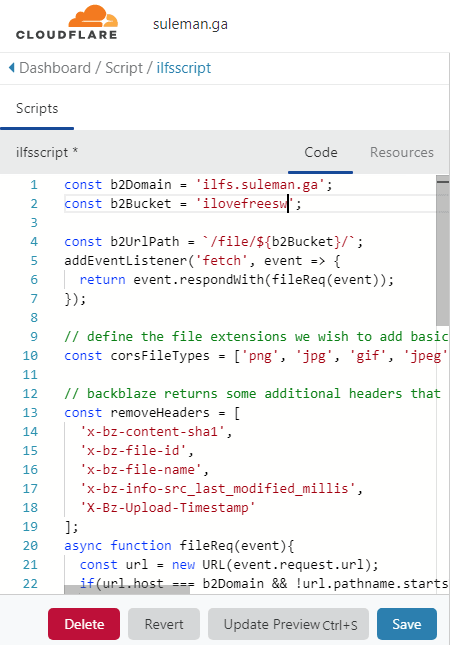
Right now we have the unnecessary “/file/<bucket-name>/” part in the B2 URL that we get after uploading an image. And with the help of Workers, we can tweak it the URL and make an image URL from “https://ilfs.suleman.ga/file/ilovefreesw/test.png” to simply “https://ilfs.suleman.ga/test.png“. For that, create a Worker using the Workers section on the Cloudflare website. After that, paste the following code there and you only have to change the two variables on the top(ones with red color) and let everything else by same.
const b2Domain = 'ilfs.suleman.ga';
const b2Bucket = 'ilovefreesw';

const b2UrlPath = `/file/${b2Bucket}/`;
addEventListener('fetch', event => {
	return event.respondWith(fileReq(event));
});

// define the file extensions we wish to add basic access control headers to
const corsFileTypes = ['png', 'jpg', 'gif', 'jpeg',  'webp'];

// backblaze returns some additional headers that are useful for debugging, but unecessary in production. We can remove these to save some size
const removeHeaders = [
  'x-bz-content-sha1',
  'x-bz-file-id',
  'x-bz-file-name',
  'x-bz-info-src_last_modified_millis',
  'X-Bz-Upload-Timestamp'
];
async function fileReq(event){
	const url = new URL(event.request.url);
	if(url.host === b2Domain && !url.pathname.startsWith(b2UrlPath)){
		url.pathname = b2UrlPath + url.pathname;
	}
	// fetch image, apply Cloudflare lossless compression
	const response = await fetch(url, {cf: {polish: "lossless"}});
	let newHdrs = new Headers(response.headers);
	if(corsFileTypes.includes(url.pathname.split('.').pop())){
		newHdrs.set('Access-Control-Allow-Origin', '*');
	}
	removeHeaders.forEach((header) => {
		newHdrs.delete(header);
	});

	return new Response(response.body, {
		status: response.status,
		statusText: response.statusText,
		headers: newHdrs
	});
}
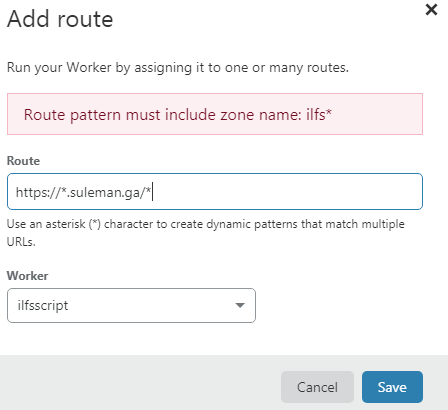
Save your worker after giving it some name. But do note that, it won’t start work unless you attach it to a route. So, in route name, you specify something like and save that. The route path must be changed based on the subdomain that you have configured in your case.
One last thing that you have to do is change the upload URL in ShareX. All you have to do is just omit the “/file/<bucket-name>/” from the upload URL. Next just save it and test if its working and then you are simply done.
Closing things up…
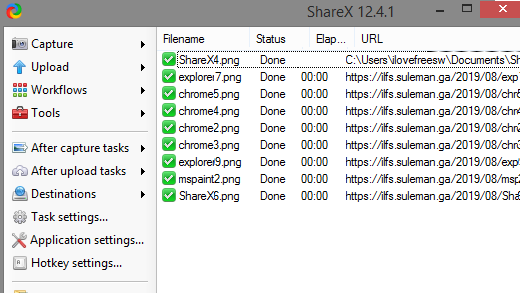
This is all the fuss about setting up your own image hosting CDN. All the things that are used in this post are free or offers a generous free tier. This is all one time effort in configuring the ShareX software and Cloudflare. After that, you can just start uploading the files and use their links anywhere you want. ShareX logs all the images that have been uploaded and you can see them right on its interface. You can get their links from the ShareX UI or just delete them. You can give this method a try and let me know what you think. Or, if you face any problems then you can tell me in the comments down below.