ASUS webstorage is a free cloud storage service from the stable of Taiwanese electronics and computer manufacturing giant ASUSTeK Computer Inc.. It offers 5GB of free Cloud Storage, with the ability to earn 10GB more via referrals. It has native sync applications for all major platforms out there. In addition, this free cloud storage service also has some pretty good sharing and collaboration goodness built into it. On top of that, it has clients for all major platforms, including: Windows, Mac, Linux, iOS, Android, Windows 8. Excited? Head past the break to find out more!
How to create a free account with ASUS webstorage
Creating a free account with ASUS webstorage is a pretty standard affair. All you have to do is go to the service’s homepage, click the Sign Up link at the top right corner, fill up your details and you’re good to go. It’s as simple as that!
Note: Here’s a little something about the sign up process. When you enter your details and click next, you receive an activation Email from the service. You need to confirm your account by clicking the link in the activation Email. This step is required to bump up your free storage to 5GB, as the initial sign up only gives you 3GB of free account. The additional 2GB get credited to your free account only after your confirm it.
ASUS webstorage: The Primary Web UI
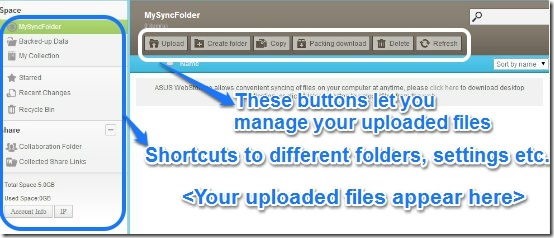
Once your account is successfully created, you are automatically logged in. The Web UI is pretty standard, and manages to look clean and intuitive. The interface is primarily divided into two panes. The left pane consists of shortcuts to your primary sync folder, starred items, recycle bin etc.; whereas the larger right pane is where all your uploaded files and folders appear. Here’s how the Web UI looks:
As illustrated by the above screenshot, the action buttons up top are pretty much self explanatory. Still, here’s a little description, for the sake of it:
-
Upload: Lets you upload a file/folder or multiple files/folders.
-
Create a Folder: Lets you create folders. You can create as many folders as you like.
-
Copy: You can use this to copy uploaded files from one folder to another (There’s also a move button, which only appears if you have some files uploaded to your free cloud storage).
-
Packing download: This option lets you download multiple files and folders as a 7Z archive.
-
Delete: Toss the stuff you don’t want, into the Recycle Bin.
-
Refresh: This obviously does what the F5 key has always done.
Apart from the above standard options, there are also file and folder specific actions that you can perform on your uploaded stuff. These options appear as icons on the extreme right of the file/folder name, when you hover your mouse pointer over an uploaded file/folder. These are: Rename, Download, Delete and Sharing Settings (More on this later).
The left pane, as mentioned before, consists of shortcuts to some important system places, as mentioned below:
-
MySyncFolder: This is the default folder that all your uploaded files sync to, regardless of whether you upload them via Web or the Desktop sync application.’’
-
Backed-up Data: Toss the things that you just want to back up and not update continuously in this folder.
-
My Collection: This specifically lists the movies, music and the photos you upload to your cloud storage.
-
Starred: You can star important files/folders and quickly access them via this shortcut (Gmail users would love this!).
-
Recent Changes: This lists the most recently changed/modified files and folders.
-
Recycle Bin: Your deleted files/folders go here.
How to Upload files/folders to your ASUS webstorage?
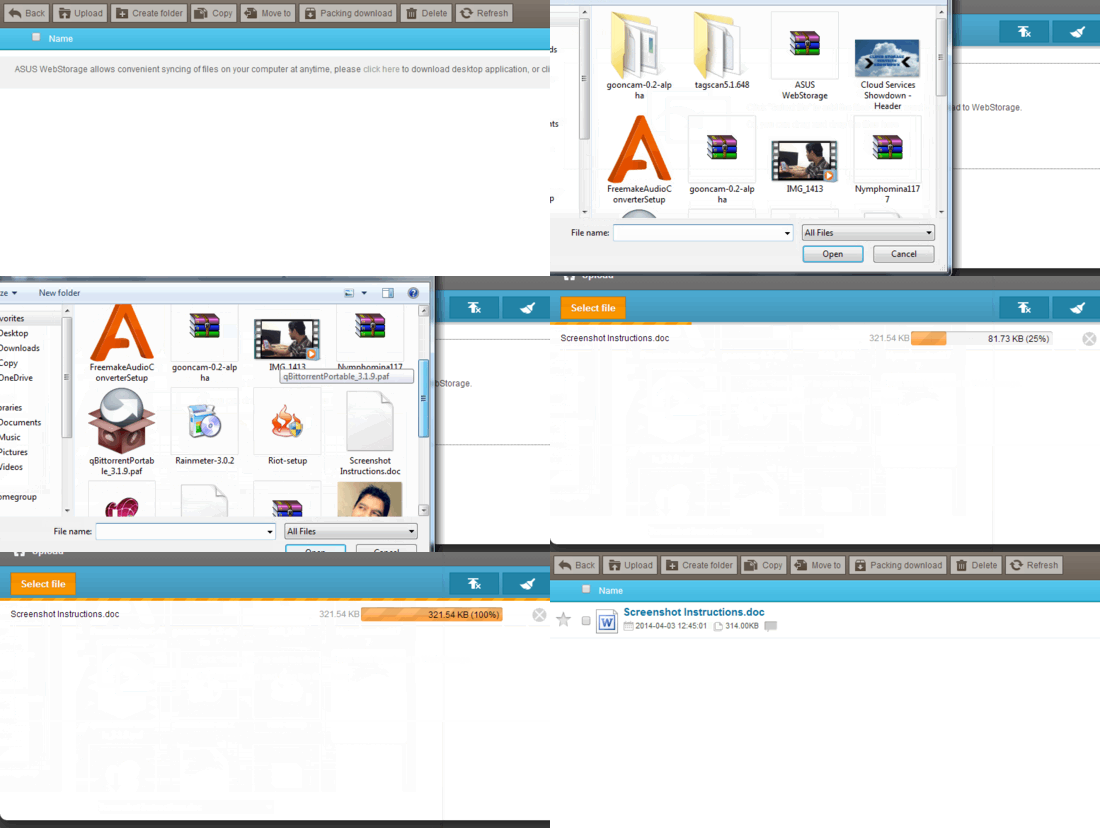
It’s so simple, I’m not sure why I’m even writing about it. All you have to do is press the upload button, and a window pops-up. Select the files/folders you want to upload, and it’s done. You get individual progress bars for each file/folder as it’s being uploaded, and when it’s all done, you’re alerted by a simple browser pop-up. It seriously can’t get any easier than this. Here’s a little demonstration, anyways.
Sharing and Collaboration features of ASUS webstorage
As I’ve said time and again, collaboration is something that every web service (especially the cloud storage ones) seems to be be very particular in including in their offerings. And Asus webstorage is no different. It has some pretty cool collaboration features built into it.
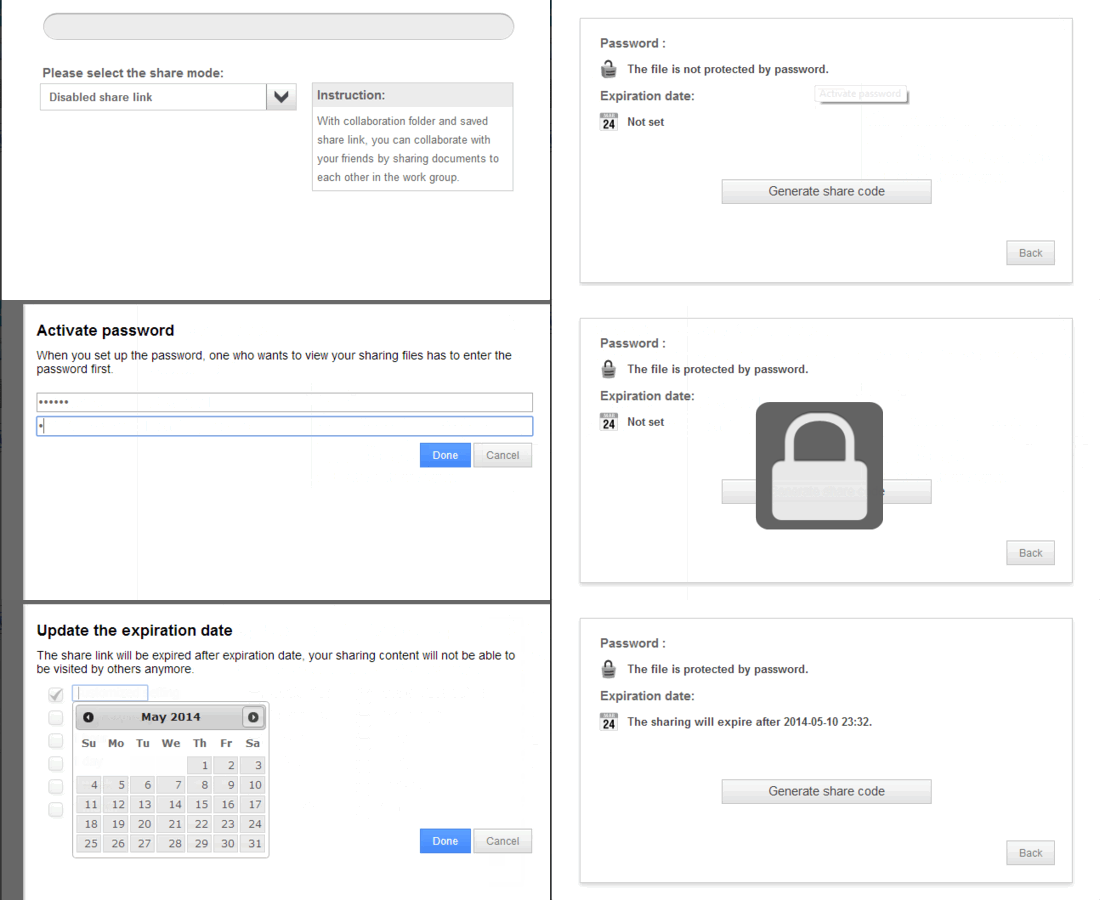
You can publicly share any file/folder stored in your free cloud storage account, via a uniquely generated URL. Now this might seem like a regular deal, but here’s the real kicker. You can set passwords as well as expiration dates for the files/folders you publicly share. These two features ensure added security, because even if someone gets to know the publicly shared URL, he/she won’t be able to access it without a password, and/or beyond the set expiration date. Awesome, isn’t it? Here’s how to do it:
Step 1: Hover over any file/folder that you want to share, and click the Sharing Settings icon (chain link).
Step 2: On the pop-up that appears, select Public Share. This will generate a unique URL that you can give to anyone who you want to share the target file/folder with.
Step 3: To add a password and/or file expiration date, click the button saying Advanced Settings.
Step 4: Finally, add the password and expiration date beyond which you want the file to be unavailable.
That’s it. Pretty simple if you ask me! Here’s a little demonstrative graphic:
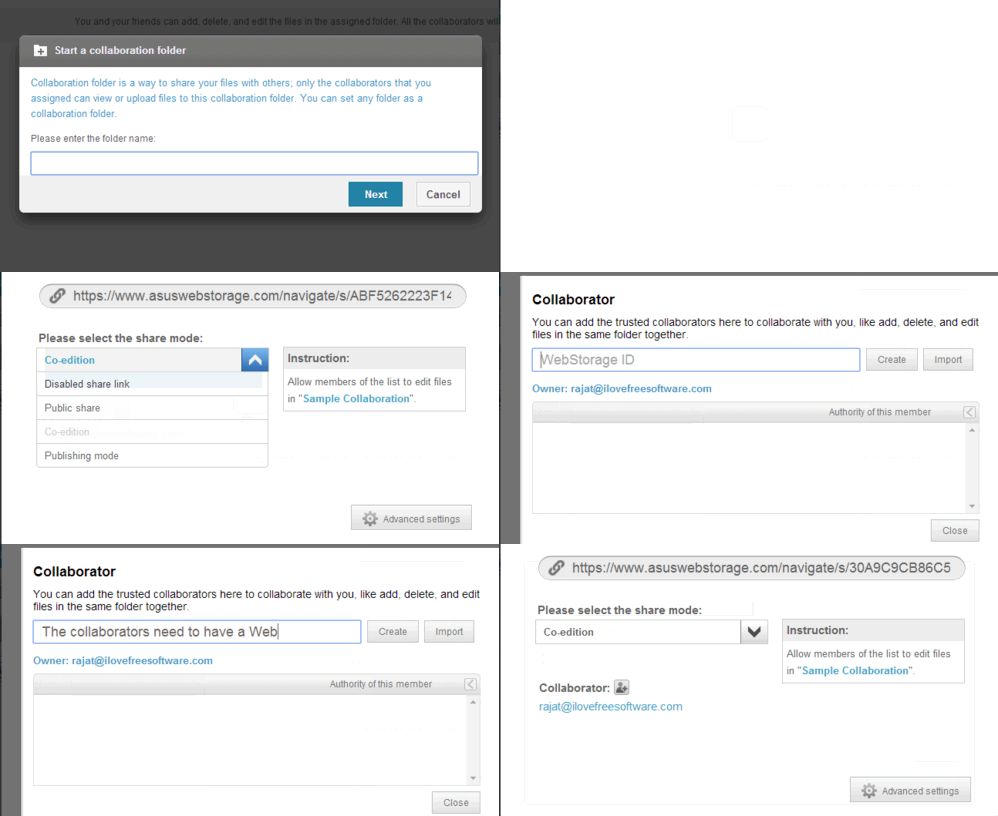
Asus webstorage also has nice collaborative capabilities. It allows you to create a special Collaboration folder, and all the files and folders in this folder can be collaborated upon by multiple users. Here’s how to do it:
Step 1: Start a Collaboration folder by creating it via the Collaboration Folder link in the left pane.
Step 2: Once you do that, click Go to Share Setting, to add other collaborators.
Step 3: On the next screen, select the sharing mode. Public Share just allows others to view the files, Co-Edition allows the collaborators to work on the files in the collaboration folder, and Publishing mode combines these two.
Step 4: After choosing the required mode, click Advanced Settings, and add the Collaborators’ IDs. However, this is where a major limitation surfaces. Your collaborators also need to have a ASUS webstorage account (also called a Webstorage ID), to collaborate. This limitation, in my opinion, is a major bummer.
Anyways, here’s a little animated graphic demonstrating the above steps:
No matter what platform you use, ASUS webstorage has you covered
Native syncing applications are a must for any cloud storage service to be successful, because no longer people use only one device to access their cloud synced content. Thankfully, ASUS webstorage doesn’t disappoint on this front. ASUS webstorage’s sync applications exist for all major desktop and smartphone platforms, and can be found on the service’s download page.
ASUS webstorage’s sync applications for all platforms work pretty much the same way. You download the application for your platform, link your webstorage account, and it starts doing the syncing in the background.
The following procedure demonstrates the working of the desktop sync application for Windows:
Step 1: Once the routine download and installation part is over, the desktop sync application creates a folder called MySyncFolder. Everything that you copy into this folder is automatically backed up and synced to your ASUS webstorage cloud account. Check the screenshot below:
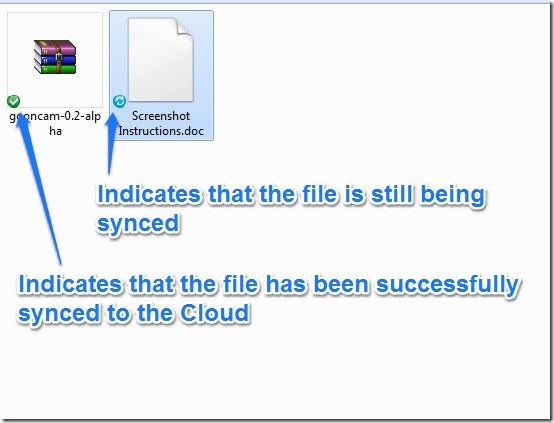
Step 2: The sync process is automatic. All you have to do on your part is copy the files that need syncing to this special MySyncFolder. Sync status is also displayed by little icons on the files. The files that have been uploaded/synced successfully have a green check mark icon, and those still being synced have a blue cyclic arrows icon. In addition, the native sync application also alerts you of successful syncing by system tray balloon notifications. Check out the screenshot below:
ASUS webstorage: Pros and Cons
Pros:
- 5GB free storage, upgradeable to a maximum of 15GB via referrals (with 512MB per referral).
- Native syncing apps for almost every major desktop and mobile platform out there.
- Secure collaboration and sharing with features like password protection and expiration dates.
Cons:
- Free account limits the daily upload and download limit to a maximum of 500MB.
- Files of only up to 500MB can be uploaded.
- Collaboration features are not exactly intuitive, and require others to have a ASUS webstorage ID.
Conclusion
ASUS webstorage has a lot going for it. It offers decent free storage, and more can be earned via referrals. Availability of native sync apps ensures that you can access your files no matter what platform you use. These, topped off with sharing capabilities and features like passwords and expiration dates give it quite an edge. However, it’s not without its limitations. The file size limit, download/upload quota, need to have an account for collaboration are all downers. But then, nothing is perfect. However, with more and more cloud storage services cropping up every day, it’s no longer easy to be the next OneDrive or Dropbox. How much share ASUS webstorage manages to grab for itself, is something only time will tell.


