This tutorial explains how to hide specific Control Panel Items In Windows 10. Control Panel contains Administrative Tools, Programs and Features, Ease of Access Center, Mouse, Sound, and other crucial items. Anyone who has access to your PC can access these items and make changes. So, if you want, you can hide Control Panel items of your choice in your Windows 10 PC. Even after accessing Control Panel, no one will be able to access those hidden items. Neither Control Panel search nor Search box of Windows 10 will help to access the items hidden by you. You can temporarily or permanently hide or remove specific Control Panel items in your Windows 10 PC.
To hide Control Panel items of your choice in Windows 10, you can use Regedit (Registry Editor) and/or GPO (Group Policy window). GPO is not available in Home edition of Windows 10 (unless you manually install Group Policy). So, whatever method suits you, try that method and hide Control Panel items in Windows 10. I have covered both the methods.
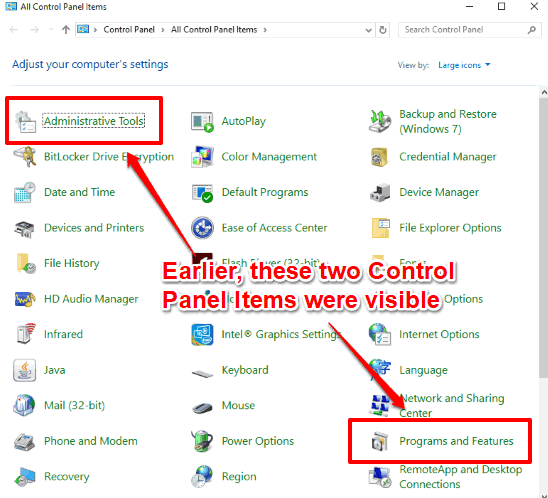
In the screenshot above, you can see that earlier Administrative Tools and Programs and Features items were visible in Control Panel.
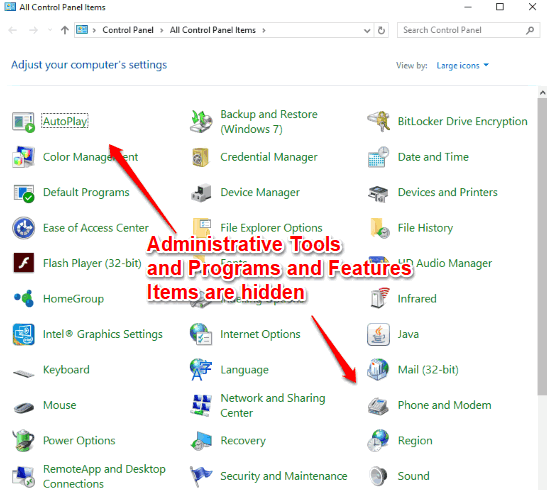
Now, look at the screenshot below, you can see that both of those items are hidden in Control Panel of my Windows 10 PC.
Let’s start with Group Policy method.
Method 1: How To Hide Specific Control Panel Items In Windows 10 Using Group Policy?
Step 1: Open Control Panel using Search box and then switch to Large icons view mode, as visible in above screenshot. This will help you check which items you want to hide or remove from Control Panel.
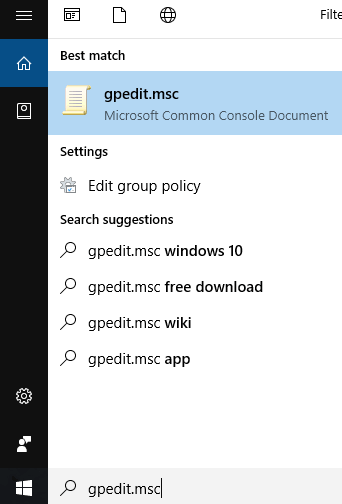
Step 2: Type gpo or gpedit.msc in Search box of Windows 10 and open Group Policy.
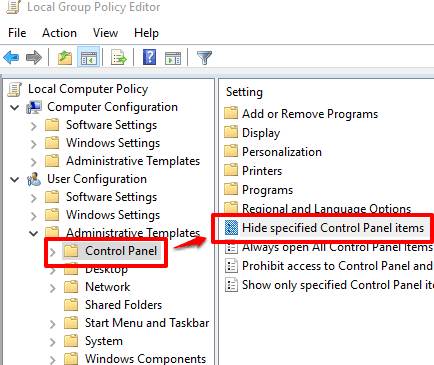
Step 3: Once Group Policy window is launched, double-tap on “User Configuration” menu, then double-tap on “Administrative Templates“, and select “Control Panel“. After doing this, you will see a “Hide specified control panel items” option on the right-side. Double-click on it.
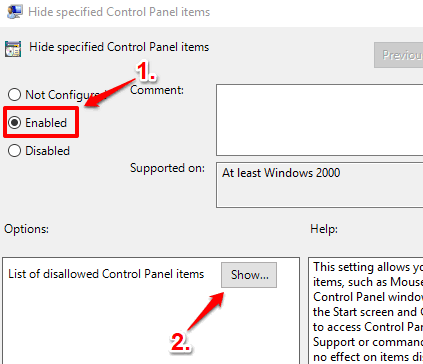
Step 4: A large window will open that contains “Enabled” option. Select it. After that, you will see “List of disallowed Control Panel items” section on the left side. That section contains Show button. Click that button.
Step 5: A small window related to ‘List of disallowed Control Panel items‘ will open. Here, you need to double click on the Value field and enter the name of Control Panel items (one by one), say Programs and Features, that you want to hide. Remember, you have to type the exact name. That’s why I mentioned opening Control Panel in step 1. Look for the name of Control Panel item and then add it.
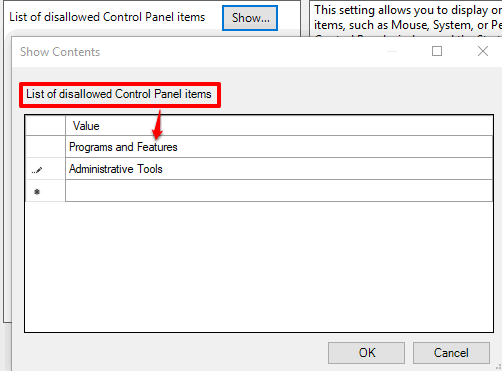
In a similar way, you can add more Control Panel items. When you are done, press OK button. You will come back to the same large window that you opened in step 4.
Apply your changes and save them.
Now close Control Panel and open it again. Switch to Large icons view mode. You will notice that those particular Control Panel items are not visible anymore. That means you have hidden those items.
Step 6: Follow step 1 to 4 and this time you have to choose “Not Configured” option visible in the large window. Save your changes and launch Control Panel.
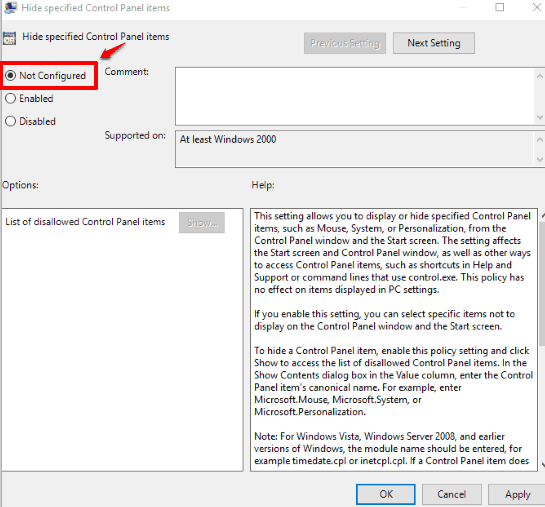
The hidden items were visible again.
Method 2: How To Hide Control Panel Items of Your Choice In Windows 10 Using Registry Editor?
Step 1: Type the ‘regedit‘ text in Windows 10 Search box to open the Regedit (Registry Editor) window.
Step 2: Go to the “Explorer” registry key present in Policies. You can use this path to find that key: Computer →HKEY_CURRENT_USER →Software →Microsoft →Windows →CurrentVersion →Policies →Explorer.
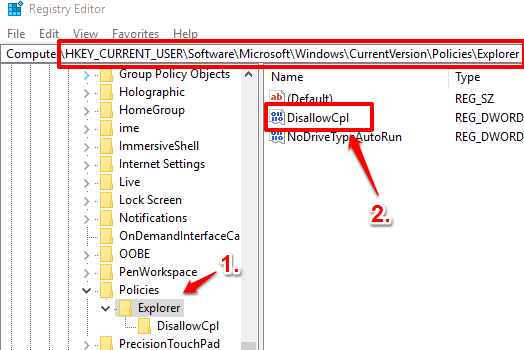
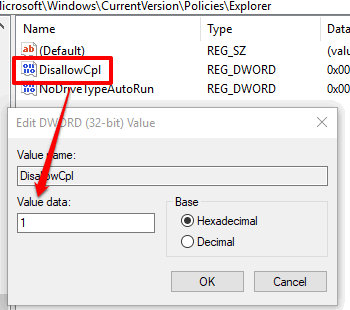
Step 3: On the right side of Explorer, create a new DWORD value. After doing that, set its name “DisallowCpl“. See the screenshot above.
Step 4: Double-click DisallowCpl value and write ‘1‘ in value data of this value. Press OK to save it.
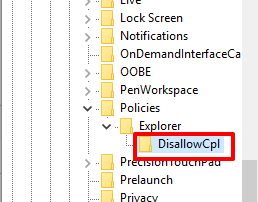
Step 5: Now, right-click on Explorer key → access New → and select Key to create a new registry key under it. Rename new key as “DisallowCpl“.
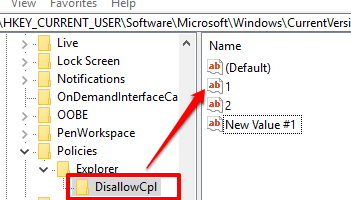
Step 6: On the right-side of DisallowCpl key, right-click on empty space, then 'New' option, and select String Value option. When New String value is created, rename it as ‘1‘.
Step 7: After that, double-click 1 name String value and enter name of Control Panel item, say “Programs and Features”, in the Value data of that String value.
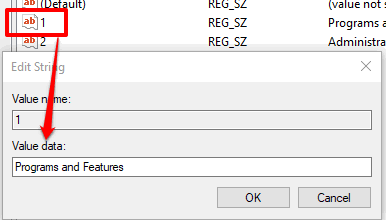
Save it. This will hide that particular Control Panel item.
In a similar way, you can create another ‘2’ name String value, and add name of some Control Panel item in its value data field. That particular Control Panel item will also hidden.
To show all hidden Control Panel items again, you can simply delete ‘1’, ‘2’ and other created String values.
You may also learn How To Add Control Panel To File Explorer In Windows 10 and Prevent Users From Accessing Control Panel And PC Settings In Windows 10.
The Conclusion:
If you don’t want someone else to access some specific Control Panel items in your Windows 10 PC, then hiding those items from Control Panel is a nice trick. For that, these two methods are very helpful. Try these methods and show and hide Control Panel items of your choice in your Windows 10 PC.