This tutorial shows how to center taskbar icons in Windows 10. By default, the taskbar icons on Windows 10 platform appear on the left side, just next to the Search box. But those who want to align taskbar icons to the center part, this tutorial is handy. I have covered two different methods here for this purpose.
To add Windows 10 taskbar icons on center, I have used a free software and a manual method. Both the methods are pretty easy to use. You can check these methods and then try the best one for you. In the screenshot added below, you can see that my Windows 10 taskbar icons are aligned to the center part.
![]()
Let’s start with the first method.
Method 1: Center Taskbar Icons In Windows 10 Using Free Falcon10 Software
Falcon10 is a very simple software and it is the easiest option here to center Windows 10 taskbar icons. Just one click will help you align taskbar icons to center position.
Step 1: Download the set up of this software which comes in a zip file. After downloading, extract that zip file and execute “Falcon.exe” file.
Step 2: The software will sit in the system tray. Double-click that icon and its interface will be visible to you. There, select “Center Taskbar Icons” option and it will immediately shift all taskbar icons from left side to center part.
![]()
You can uncheck the same option to move taskbar icons to their default positions, which is left side.
Method 2: Align Taskbar Icons To Center In Windows 10 Using Taskbar Toolbar
This method is longer than method 1 but the best part is you don’t need to use any software. All you need to do is create a taskbar toolbar which will help you align Windows 10 taskbar icons to the middle part.
Step 1: First of all, you need to unlock the taskbar. Right-click on taskbar and uncheck “Lock the taskbar” option.

Step 2: Now again open taskbar right-click menu → access Toolbars option → and click on “New toolbar..” option.

Step 3: A window will open prompting you to select a folder. You must choose an empty folder. You can also create a new folder and then select that folder.

The name of that folder will be visible on the taskbar. That means toolbar is added. You will see two vertical bars (each vertical bar with two lines) on the left and right hand side of the taskbar.

Step 4: Now quickly drag right vertical bar (which includes the name of toolbar) to the left side of taskbar. This will move all taskbar icons to the right side along with the vertical bar which appears on the left side.
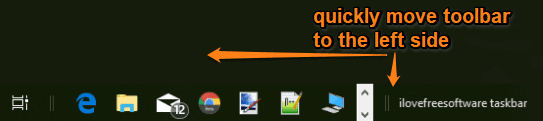
Step 5: Now drag the right hand side vertical bar to the left side and it will start moving taskbar icons to the center part.

Step 6: Right-click on toolbar and then uncheck “Show Text” and “Show title” options. This will hide toolbar name but vertical bars will still appear on the taskbar.

Step 7: Right-click on the taskbar and “lock the taskbar“. This will hide both the vertical bars.

That’s all you need to do. You have successfully added taskbar icons of Windows 10 to the center part.
Did you know you can also separate unpinned and pinned items on taskbar in Windows 10?
The Conclusion:
I find both the methods quite useful to center taskbar icons in Windows 10. Among both the methods, I prefer first method. Though the first method needs a software but it is much easier than method 2 and therefore it is OK for me to use a software to align taskbar icons to center in Windows 10.