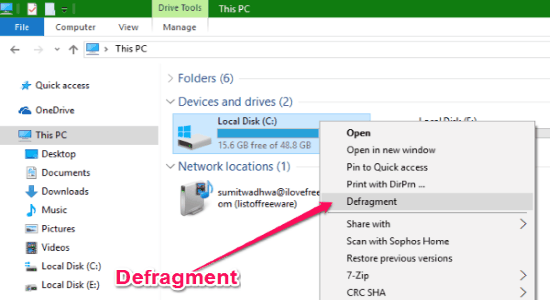
This tutorial demonstrates how to add “Defragment” option to right-click menu in Windows. Using the steps explained in this article, you will be able to easily add the “Defragment” option to the right-click menu or context menu in Windows. Doing so, you can defragment any drive in your PC by simply selecting the “Defragment” option from the right-click menu. You might be aware of the fact that almost all the new versions of Windows defragment drives automatically on weekly basis, however, if you like defragmenting drives manually then this tutorial can help you do that with ease.
It is actually pretty easy to do this. Just some modification in Registry required. I will walk you through all the steps required to add Defragment option to Right Click Menu.
How to Add Defragment Option to Right-Click Menu in Windows:
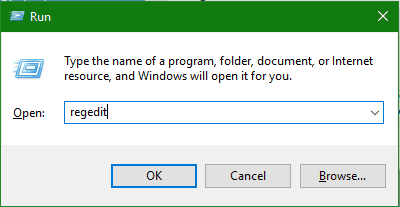
Step 1: First, press “Windows Key + R” to open up the “Run” program and then type” regedit” in the input field. After that, click “OK” or press “Enter” and it will open up the registry editor.
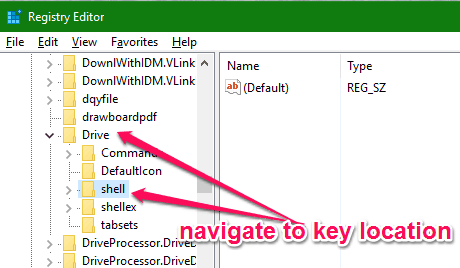
Step 2: On the registry editor, simply navigate to the following key location:
"HKEY_CLASSES_ROOT\Drive\shell"
Step 3: After that, right click on the “Shell” key and then select “New → Key” to create a new key. Once you’re done creating the key, simply name the new key as “runas“.
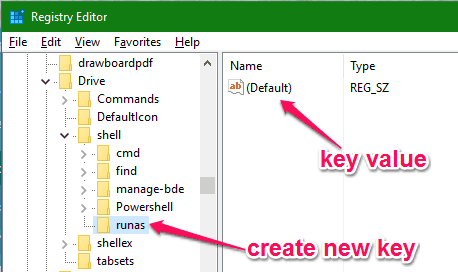
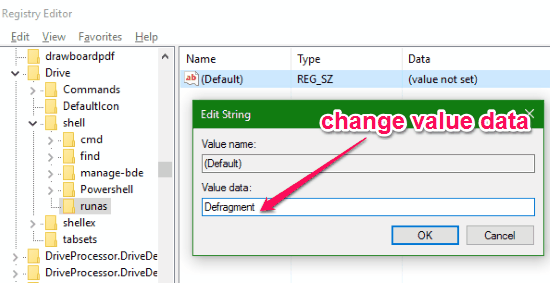
Step 4: On the right panel, you will see a key value named “Default” for the “runas” key which you have created. Double-click on the key value and then a popup window will appear where you have to type “Defragment” in the “Value Data” field, as shown below.
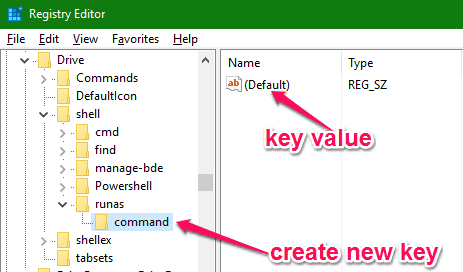
Step 5: When you do that, you need to right click on the “runas” key and then again select “New → Key” to create another key. This time, you have to name the key as “command”.
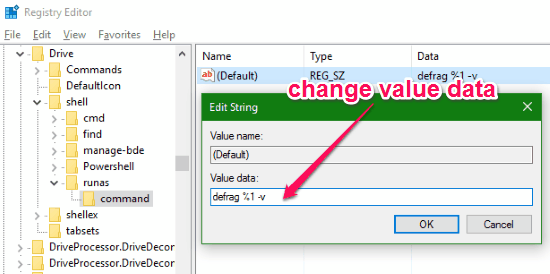
Step 6: After creating the key, double-click on the key value “Default” on the right panel. Then go ahead and enter the following string in the “Value Data” input field:
"defrag %1 -v"
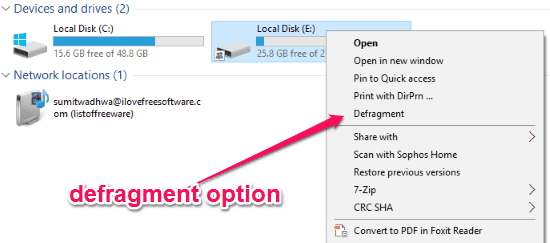
Step 7: When you’ve entered the string, simply click “OK” to save changes and then close the registry editor. Now, whenever you right-click on any drive in your PC, you will be able to see a new option “Defragment” in the context menu. That means you can now defragment a drive from the context menu with a single click.
My Final Verdict:
If you’re looking for a quicker way to defragment drives with ease in Windows, then go through the simple steps in this post and add the option of “Defragment” to the context menu. After that, you can start defragmenting drives from the right-click menu with a single click.
I hope you find this article useful.