This tutorial talks about how to deactivate fast user switching in Windows 10. Here I will talk about two different methods to do that. There are some tweaks that can be applied via system Registry and Group Policy Editor to do the same. And in the following sections, I will talk about both the methods. After applying the tweak that I have mentioned, you will not be able to use Fast User Switching on your Windows 10 PC.
Fast User Switching is a very nice feature of Windows, but generally, most people don’t use it. That’s why it is wise to deactivate it. With the help of fast user switching, you can switch to another user account on your PC without logging off your current session. Windows makes this feature enabled by default, but I will tell you how to deactivate it for good.
How To Deactivate Fast User Switching In Windows 10?
Here are two different methods to deactivate Fast User Switching in Windows 10. It completely depends on you which method you would like to use. And the best part is that there is no other third-party software or tool you will need to do this.
How To Deactivate Fast User Switching In Windows 10 using System Registry?
The very first method to deactivate Fast User Switching in Windows 10 is via System Registry Editor. You just have to modify some values to get the job done.
Here are some easy steps to deactivate fast user switching in Windows 10 via Registry Editor.
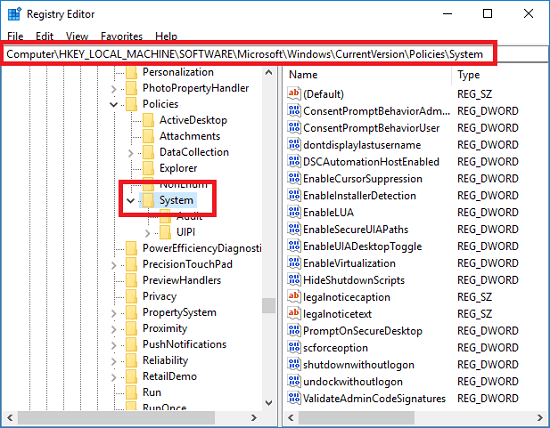
Step 1: Open Registry Editor by typing “regedit” in the Run dialog. After Registry Editor opens, navigate to this key: “HKEY_LOCAL_MACHINE\SOFTWARE\Microsoft\Windows\CurrentVersion\Policies\System".
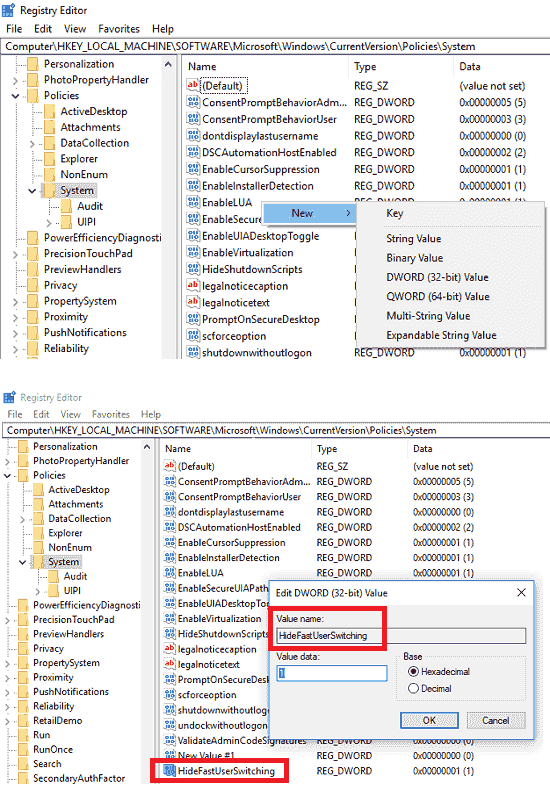
Step 2: Here, create a new registry key by right-clicking on the empty area. Create a DWORD(32 bit) and then name it “HideFastUserSwitching”. Next, when the key has been created, you can double-click on it to open it and then specify the value to 1 and save the changes.
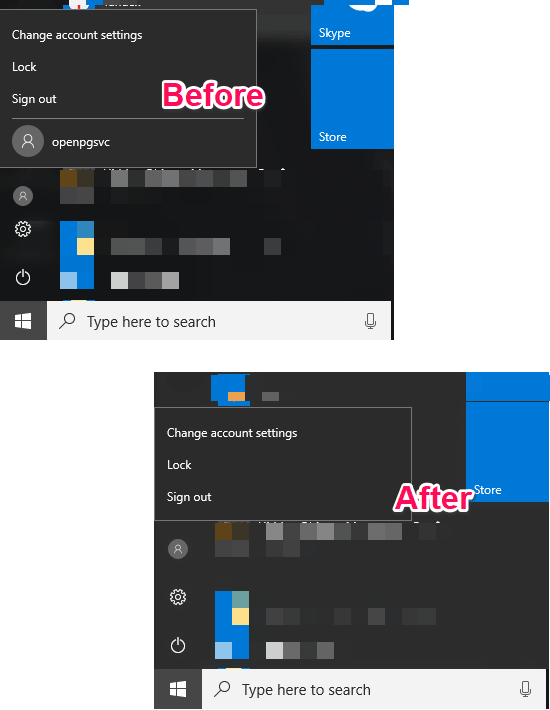
Now you can close the Registry Editor and you will see the other users section has vanished from the Start. And the situation will look like what I have shown in the first snapshot of this article.
How To Deactivate Fast User Switching In Windows 10 using Group Policy Editor?
In the above section, I used Registry Editor of Windows to deactivate Fast User Switching. And now in this section, I will explain how to do the same using Group Policy Editor of Windows.
Here are the steps to deactivate Fast User Switching in Windows 10 using Group Policy Editor.
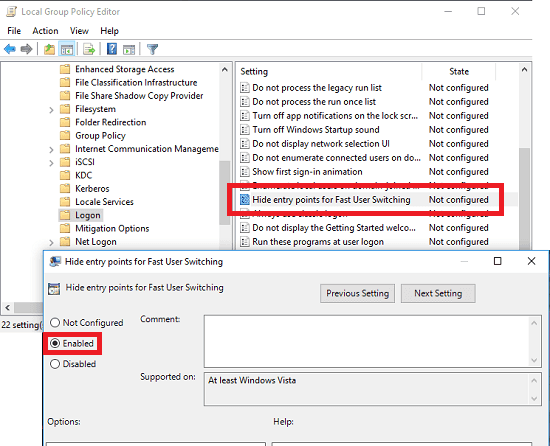
Step 1: Open Group Policy Editor by typing “gpedit.msc” in Run dialog. After when it opens, navigate to “Administrative Templates > System > Logon".
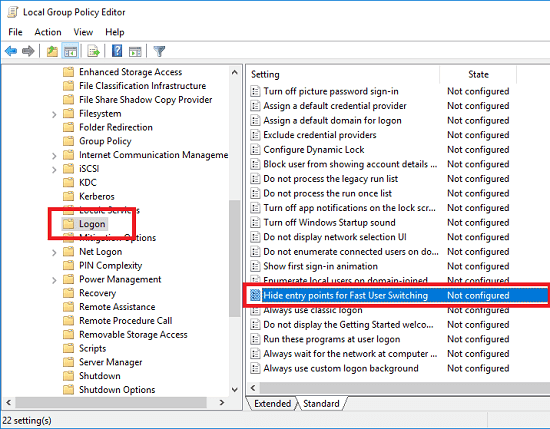
Step 2: Here you will see an entry “Hide entry points for Fast User Switching“. Double click on it to open it and then you can check the “Enabled” button and apply changes. The Fast User Switching has now deactivated successfully.
In this way, you can deactivate Fast User Switching in Windows 10 using GP Editor. It will take hardly a couple of minutes to do that.
Now, you have seen two different methods to deactivate Fast User Switching on Windows 10 PC. Both the methods worked fine for me on my PC.
Note: If you are using Windows 10 Home edition then you won’t find Group Policy Editor in that. So, you may consider installing Group Policy Editor in windows Home edition or you can use the Registry Editor method to do the same.
Closing Thoughts
I never thought that Fast User Switching can be deactivated. I wanted to disable it on my PC because I was facing very heavy load on my system while using two user accounts simultaneously. But with the help of the methods I have explained, I have successfully disabled Fast User Switching. So, if you also want to do the same, then the above tutorial will help you.