This tutorial describes how to disable a hardware device in Windows 10. Operating Systems of today are incredibly complex (this is something I’ve said before as well), and can handle a vast variety of tasks, all at the same time. Apart from that, they are also intelligent enough to perform most of the standard OS level functions (memory allocation, device management etc.) with minimal user intervention. Microsoft’s latest product, Windows 10 is the prime example of a modern OS. If we take hardware management as an example, it can automatically detect all the devices that you’ve connected to your PC, and set them up on its own. Quite convenient if you ask me!
In one of my recent blog posts, I talked about manually updating device drivers. But that’s for making a faulty hardware device get up and running. What if a device is already working fine, but you want it to stop doing that, even if for a short time?
Super simple, as Windows 10 easily lets you disable a hardware device on a temporary basis. Stoked? Let’s see how you can disable a hardware device in Windows 10.

How To Disable A Hardware Device In Windows 10?
Disabling a hardware device is pretty simple. It temporarily halts all the functions associated with the device and can come in really handy during troubleshooting for errors. Here’s a detailed step-by-step tutorial, illustrating how to do it:
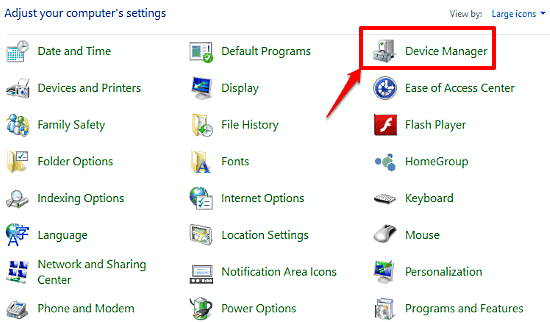
Step 1: Go to the good old’ Windows Control Panel, and hit the Device Manager option.

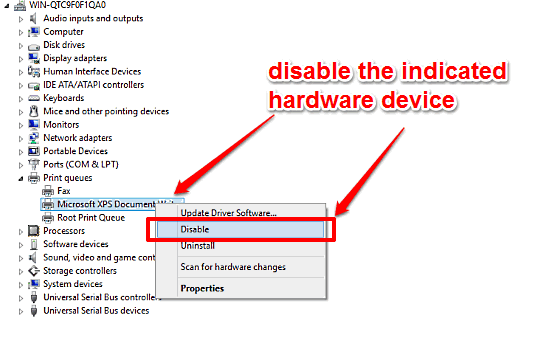
Step 2: The Device Manager applet presents a comprehensive listing of all the devices (functioning as well as erroneous) connected to the computer, structured in the form of a nested tree. Navigate to the hardware device that you want to deactivate. When found, right click on it, and select the Disable option from the context menu. A prompt comes up, asking you to confirm whether you really want to disable the selected device or not. Click Yes to confirm. Here’s a screenshot:

That’s it. You’ve successfully disabled a hardware device. To get it working back, simply right click on it again and choose Enable this time. Simple as pie!
Also Check Out: How To Disable Microphone For Apps In Windows 10?
Wrapping It Up
The ability to disable connected hardware devices is a simple but useful feature for deactivating devices on a temporary basis. It can come in really handy in situations when you want to troubleshoot erring devices. Give it a shot, you’ll love it.