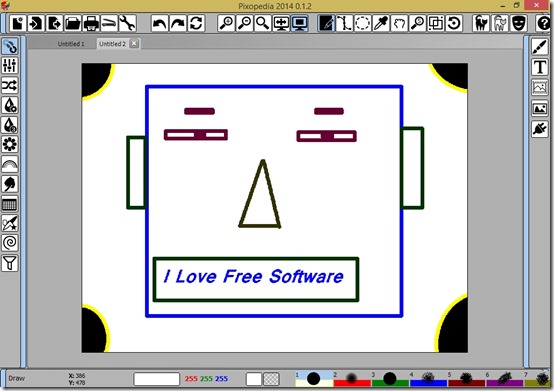
Pixopedia is free portable software that can be used to edit and create images. This freeware gives you a range of advanced and simple tool for image editing. Key feature of this software is that it is a portable software and doesn’t require installation. You can save images in more than 20 image formats like, JPG, PSD, TIFF, GIF, PNG, etc., so you can share and/or save the files as per your need.
Compared to the default image editor of Windows, Pixopedia gives you a lot more editing tools.
Pixopedia offers you two modes: Standard Mode and Menu Mode. Standard Mode is default mode, where you get all the tools on the home screen. Once, you get used with the operations, you can switch to the advanced mode: Menu Mode. Here, all tools reside in settings, which allow you to have a better view of workspace.
How to Start With Pixopedia
Follow the link available at the end of this review to download Pixopedia. After extracting the downloaded file, you can run this application. This will open Pixopedia Window in the Standard Mode (Default) with blank workspace. You can start with a new image, or open an existing one.
You can perform following operations on the images with Pixopedia:
Draw a Shape in Image
You can draw shapes using Operation Mode Buttons on Top Pane. It has two tools that allow shaping: Standard Shape Button and Special Shape Button.
Standard Shape Button offers you different type of shapes, like: Line, Polygon, Rectangle, Ellipse, and Text. After clicking this button, you need to use right click to select the shape. To create that shape, you need to click and drag your mouse.
Special Shape Button is almost similar to Standard Shape Button. Using it, you can draw shapes, like: Polyline, Spline, etc. To create these shapes, you need to click to the points on the boundary of intended shape and finally double click on the last point. Finally, right click and choose “Apply”.
Insert Text in Image
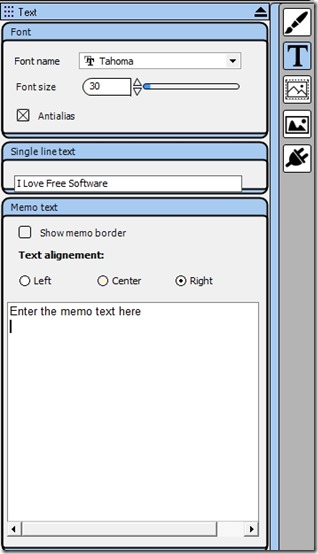
To insert the text you need to use the standard Shape Button and then right click on the workspace and select “Text” and follow these steps:
- Choose Text Button on the Right Pane.
- Select the Text style and size.
- Enter the text in the text box name “Sample Text”.
- Click on the Brush tool to select the color of the text.
- Click on the workspace, where you want the text to be inserted.
Character limit for inserting a text is 35. To add a lengthier text, you need to choose “Text Memo”, after the right click on the workspace. Rest of the steps are similar as stated for Text. Only change is that you have to enter the text in “memo text” field.
Coloring the Image
Initially, coloring of image requires you to follow the same steps as used for drawing shape. Then you need to select brush style, size, and color. For that, you can use predefined style and colors of the shapes available on the Bottom Pane.
If you require more options for size and color of the shape, then you would have to choose with “Brush Tool” on Right Pane. Here, you can decide the color, shape, and size of the brush with ease.
Are you unable to find the color that you already have on image? Try Color Picker option. You can use this tool to get that particular color from the image itself.
If you want to color precisely, without spilling then, you should try “Selection Tool”. You have many options with the selection tool, like: Free hand Selection, Shaped Selection, Magic Wand, etc., which are very helpful in coloring. If you start coloring after selecting a region, the color will not spill out of the selected region.
Controlling Aspects of Coloring
Using the above mentioned operations, your image can be complete but it might not be attractive enough. To make image more visibly attractive, you might have to use the tools, like: brightness, hue, saturation controls. You can use “Colors”, “Pixel shifting”, “IPL Filter”, “3×3 Filter” and other options from Left Pane.
Other Important Operations of Pixopedia
- Revert is used to cancel all the editing in the image. If you wish to edit from beginning again, revert returns the image to the original image.
- Pixopedia gives you the option for masking the colors. Select the masking option that you want from Top Pane.
- Options on Left Pane like: Wrapping, Color twisting, Ornaments, etc., can be used to add the effects on the image. Some of them are very interesting.
- Contour & Selection rules option on right pane can be used to modify magic wand settings for better selection.
- Plugins tool is used to add and use the plugins available with Pixopedia.
My experience with Pixopedia
I am well versed with Image and Graphic Editors, so I didn’t struggle with it at beginning. But, for the complexity it has, Picopedia can’t be cake walk for beginners in the graphics. But tons of options that it provides more than makeup for the complexity.
There are some bugs in this tool, that are mentioned on its official website. Bug that troubled me most was that many times it stopped working when I used “Undo”. In that case, it gave no choice for saving current file. To make it worse, there is no recovery option. This bug is not mentioned by the makers.
Another poor thing about this freeware is that there is no warning given when you close unsaved work.
Still, Pixopedia has many impressive features which can make it competitive against the best in market. But to reach there, it need to improvise a lot. Currently, I’d not use this portable software to edit and create image, but I will try to keep track on its future versions. Once these bugs get repaired, Pexopedia can do wonders.
Try Pixopedia.


