Here are 2 free software to convert images to PDF using right-click menu of Windows. That means, Windows context menu will be used to convert multiple images to PDF files. The output is generated as separate PDF file for each input image or a single PDF file that contains all the input images (depending on the software used by you). All common or I say popular image formats (like BMP, JPG, PNG, etc.) are supported for conversion.
Apart from converting images to PDF using right-click context menu, these software has other benefits too. You can bulk resize images, add watermark to an image, convert an image to other image formats (like TIFF, ICO, GIF, etc.), etc.
Let’s check these free software to convert images to PDF using Windows context menu.
ImBatch
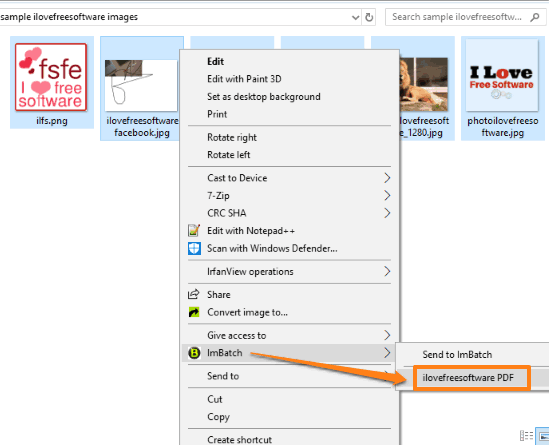
ImBatch (free for personal usage) is a multipurpose software for images. You can use it to batch watermark images, resize images, convert, crop images, edit EXIF data, and more. And yes, the feature to convert images to PDF using right-click menu is also there which works great.
It lets you create a single PDF for input images or separate PDF file for each image. So, you can avail the benefit of both the options. You just need to create a task for converting images to PDF using its interface and then add that task to Windows right-click context menu. Let’s check how this can be done:
Step 1: Install and run this software. Click on “Add Task” drop down menu, go to “Save” option, and select “Save To PDF” option.
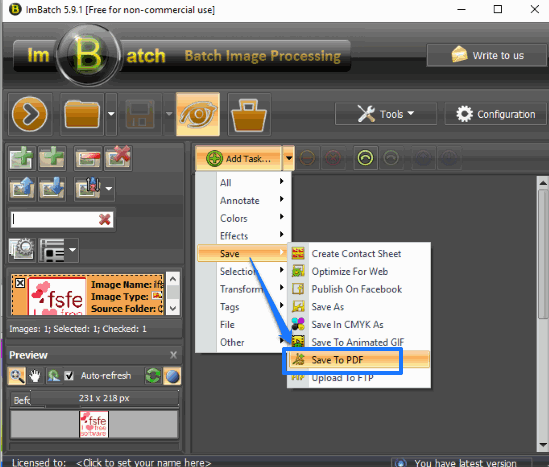
Step 2: Save To PDF task will be added on its interface. Now expand this task to set up options. There will be options like set file name, folder path to save output PDF, create separate PDF file for every image, set compression using pre-defined compression options, set paper format, etc. To get good output, you should set compression option to “No compression” and Paper format to “A4” option. The options to set PDF author name, title, subject, keywords, etc., are also present that you can fill as per your convenience.
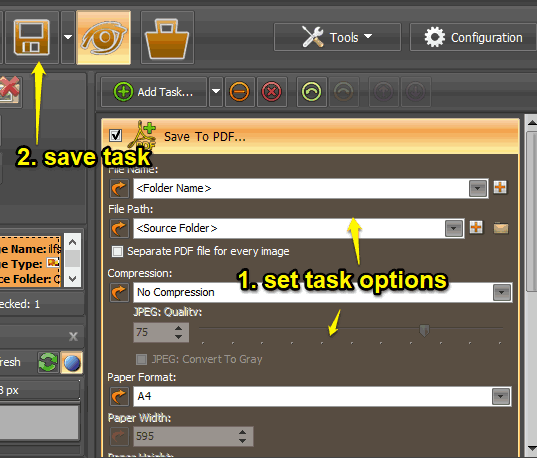
You can customize all the options later also. This will be handy when the output doesn’t come as expected.
Step 3: When the task options are set, save task to a particular location on your PC. The file is saved in “BSV” format.
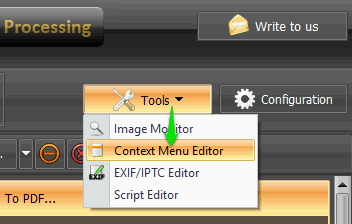
Step 4: Now the task is created, you need to add it to right-click context menu. For that, click “Tools” menu and select “Context Menu Editor” option.
Step 5: A Windows Context Menu Editor window will open. There, use “Add” button, and then you can add the BSV file that contains the task created by you. When the file is added, give a “Caption” to that file. That particular caption will be visible in the right-click menu.
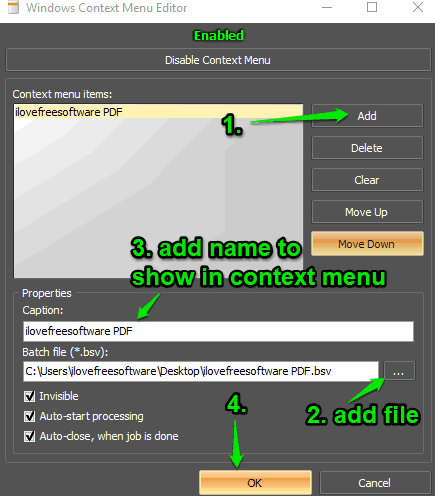
Press OK and save the change.
Now you can select some images and right-click to access “ImBatch” option. Under that option, you will see the name of BSV file that you added to context menu. See the first screenshot. Click that name and this image editing software will create a PDF file for you.
Though you need to follow some steps but that is one time only. Once the task is created and added to context menu, then converting multiple images to PDF using right-click menu will be pretty easy for you.
You may also read the detailed review of IrfanView here.
RentASoft Image Converter
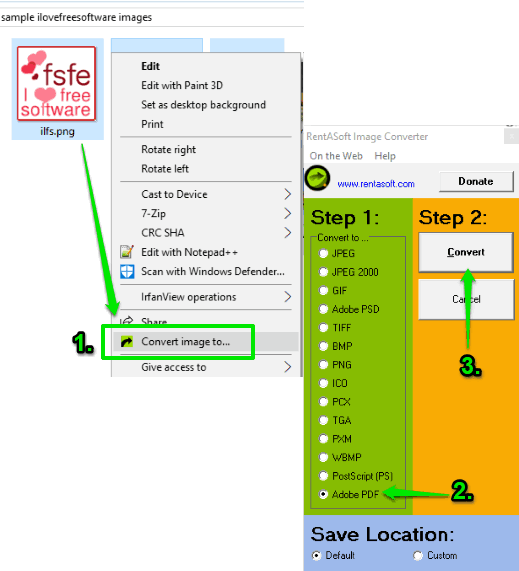
RentASoft Image Converter (Homepage) is another useful software here to convert images to PDF using right-click context menu. This software generates separate PDF file for each JPG images. You might not like the fact that it can’t generate a single PDF for multiple images. You need to use some PDF merger to combine output PDF files as a single PDF file. But those who want to generate different PDF files for each image using right-click context menu, they will surely like this software.
To convert multiple images to PDF files using Windows context menu, select the input images, and then right-click. You will see “Convert image to..” option. Use that option and a separate box will open. In that box, you will see “Adobe PDF” option. Select it and press “Convert” button. This will convert all images and create PDF files in the same folder where input images are available. You can also choose a custom location but saving PDF files to the input location is good.
The Conclusion:
There are many other image converters (check the list here) but the option to get output as PDF is not supported there. So, for this purpose, these two software are very helpful. Among these software, “ImBatch” is surely a better software. The reason is it can help you get the output as a single PDF or separate PDF files.