Here is a list of 5 free lossless audio compressor software for PC. Using these software, you will be able to perform a lossless compression of audio files without compromising the quality of the audio. That means you can compress and reduce the size of the audio files without actually affecting the quality of the audio. Some of the lossless audio compressors are Monkey’s Audio, WavPack, FLAC, etc. You can compress all the standard WAV audio files using these software into their respective compressed formats like APE (Monkey’s Audio), WVC (WavPack), etc. Some of them also let you compress RAW audio files.
There are many online audio compressors available using which you can compress audio files. However, most of them don’t offer lossless compression and ultimately reduce the quality of the audio files after compression. But, if you want to compress audio files without altering or reducing the quality of the audio, then these lossless audio compressor software can help you do that. You can also decompress the audio files if you want using some of these software.
Now, let us get started with the lossless audio compressor software and see how to use them for compressing audio files.
Monkey’s Audio:
Monkey’s Audio is probably one of the best lossless audio compressor software for PC. You can use this software to easily compress audio files without reducing the audio quality. Currently, it only supports WAV audio files for compression. In addition to that, you can also decompress all the compressed audio files into their original sizes.
How to do Lossless Audio Compression using Monkey’s Audio:
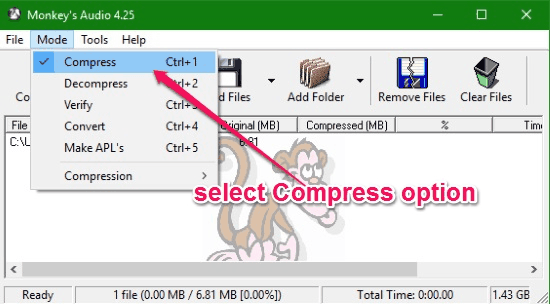
Step 1: First, simply install Monkey’s Audio on your PC and open it up. After that, click on the “Mode” option at the top and select “Compress” from the list.
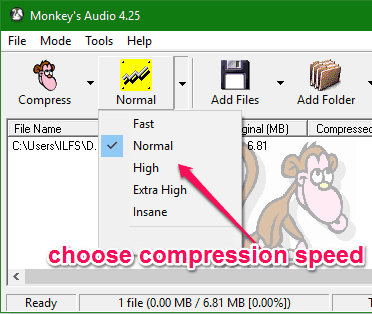
Step 2: When you do that, you can proceed and import the WAV file which you want to compress. You can either drag & drop the file or click the “Add File” button to import the audio file from your PC. When you’re done importing a WAV file, simply click on the “Compression” button and then choose the compression speed. You can either choose Normal, Fast, High, Extra High, or Insane.
Step 3: As soon as you’re done with selecting the speed, you can go ahead and hit the “Compress” button to start compressing the WAV file. When the compression is complete, you will see an “.APE” file created in the destination folder assigned by you.

This file is actually the lossless compressed file of the original audio file. You can now go ahead and play the “.APE” file with any of the supported media players. I was able to play the file using VLC perfectly.
- Supported File Formats: WAV audio files.
- Supported Media Players: VLC, Media Player Classic, Zoom Player, Winamp, FooBar, and more.
You can read the full review of Monkey’s Audio from here.
FLAC:
FLAC actually stands for “Free Lossless Audio Codec” and it is also available as a command line tool using which you can compress audio files without affecting audio quality. It allows you to compress WAV and RAW audio files. With a simple command, you can compress and decompress audio files losslessly using FLAC.
How to Compress Audio Files with FLAC without Affecting Audio Quality:
Step 1: To get started, simply download FLAC and then extract the ZIP file. After that, you will see a file named “flac.exe” which is actually a command line tool and can be run using Command Prompt. So, simply open up Command Prompt and then drag & drop the “flac.exe” file. Then hit “Enter” and it will display the usage instructions using which you can compress audio files, decompress, etc.
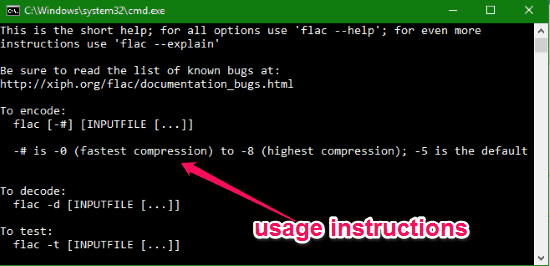
Step 2: Now, to compress an audio file, the first thing you need to do is drag & drop “flac.exe” again on the Command Prompt. When you do that, you would need to add the compression rate in the range between “-0” to “-8”. After you’re done setting the compression rate, simply drag & drop the audio file which you want to compress in the Command Prompt to complete the “Compress” command. The final command will look something like this:
file path of "flac.exe" -# source audio file path
In the command, “-#” will be the compression rate set by you. In the below image, you can see an example of the command.
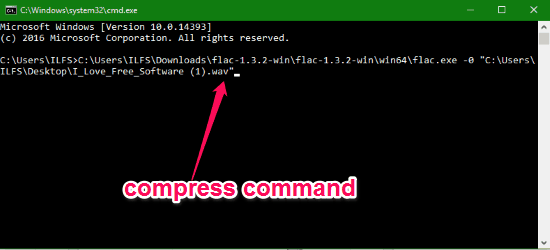
Step 3: As soon as you’re done with creating the compress command, simply press the Enter key and FLAC will start compressing the source audio file. After compression, it will create a new file with the extension “.FLAC” which will be the compressed file. You can now play the “.FLAC” file with the supported media players.
- Supported File Formats: WAV and RAW audio files.
- Supported Media Players: Windows Media Player, VLC, Winamp, VUPlayer, etc.
You can know more about FLAC from here.
WavPack:
WavPack is also a command line tool which allows you to easily compress audio files. It also offers lossless compression and doesn’t affect the quality of the audio during compression. Similar to FLAC, this one also supports WAV audio files and RAW files like DFF, DSS, etc., which you can compress. While testing WavPack, I didn’t see any decompressing option.
How to Compress Audio Files without Reducing Quality using WavPack:
Step 1: To get started, you need to download and extract the ZIP file containing WavPack. Then you will see a “wavpack.exe” file inside the extracted folder which you can run in Command Prompt. After you run it, it will also display all the usage instruction to help you easily compress audio files.
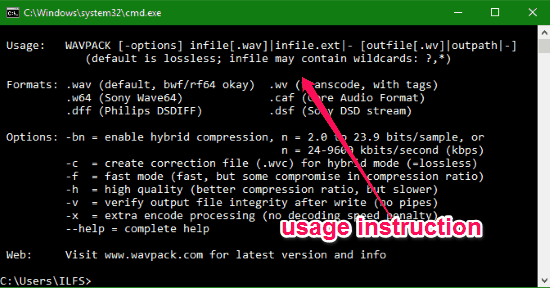
Step 2: To start compressing an audio file, you would need to drag and drop the “wavpack.exe” file in the command line. After that, simply add any of the available compression options which are visible in the usage instruction. You can choose options like -bn (where n = 2.0 to 23.9), -c, -f, etc. When you’re done adding any compression option after the “wavpack.exe” file path, you can go ahead and drag & drop the audio file for compression. Doing this, you will complete the command and it will look like:
wavpack.exe file path -[compression option]audio file path
The below screenshot shows an example of the command required to compress an audio file.
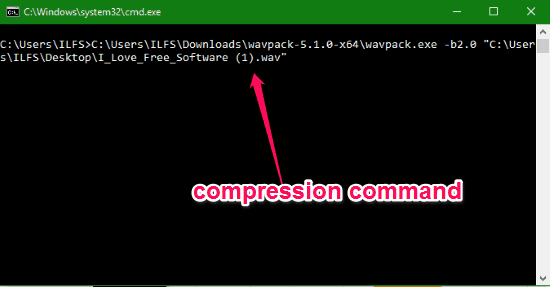
Step 3: Once you’re done with creating the compression command, simply run the command by pressing the Enter key. When you do that, the audio file will be compressed without affecting the quality and a new “.WVC” file will be created. Now, you have the compressed “.WVC” file which you can play with the media players supported by WavPack.
- Supported File Formats: WAV, RAW files like DFF, DSF, WV, etc.
- Supported Media Players: VLC, Winamp, Foobar2000, FL Studio, and more.
La:
La is another simple lossless audio compression software which you can use to compress audio files into smaller sizes but without compromising the quality. One of the best features of this software is that apart from supporting WAV files, it also lets you compress audio files generated by other lossless audio compressors like Monkey’s Audio, OptimFROG, FLAC, WavPack, etc. Unfortunately, this one also doesn’t have any option to decompress the compressed audio files.
How to Use La to Compress Audio Files:
Step 1: To get started, simply install and open up La on your PC. After that, click on the “File → Add File” option at the top to select the audio file that you want to compress. After selecting a file, you can go ahead and choose the encoder and compression mode. You can either choose the “La” encoder or select other encoders like FLAC, WavPack, Monkey’s Audio, etc.
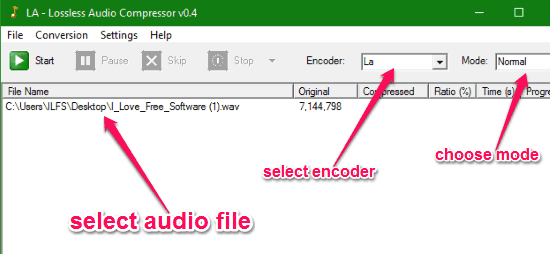
Step 2: After you’re all set with selecting the encoder and compression mode, all you got to do is hit the “Start” button. As soon as you do that, the audio file compression will start and you will see the progress at the bottom of the window.
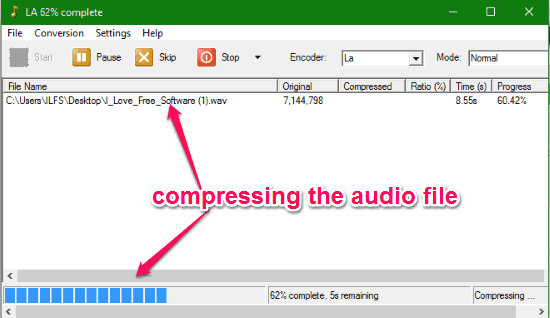
Suppose, you have selected the “La” encoder, then after the compression is complete, it will generate a new “.La” file that can be played using any of the supported media players.
- Supported File Formats: WAV, APE, FLAC, WVC, OFR, etc.
- Supported Media Players: I was only able to play the “.LA” files using Winamp.
OptimFROG:
Similar to FLAC and WavPack, OptimFROG is another command line tool which can assist you to do lossless audio file compression. This one also supports WAV as well as RAW files for compression. It offers a high variety of compression preset levels which you can choose while compressing audio files. This lossless audio compressor also allows you to decompress audio files.
Note: Homepage of OptimFROG mentions a lot of media player that support the files compressed by OptimeFROG. However, in my testing, I wasn’t able to play the generated file using any of these supported media players. I am not sure if there is some special codec or plugin to be installed. So, it will be a good idea to try one of the lossless audio compressors mentioned above, before you try this one.
How to Compress Audio Files without Losing Quality using OptimFROG:
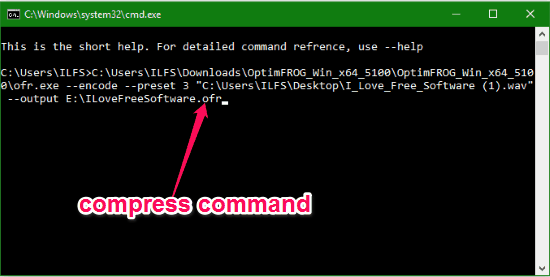
Step 1: Simply, download OptimFROG and then extract the ZIP file. When you do that, you can open the extracted file and there you will see a file named “ofr.exe”. You can run this file in Command Prompt for compressing audio files. When you run this file for the first time, it will display all the usage information including how to compress and decompress audio files.

Step 2: Now, you can simply follow the command instruction to create a compress command. For this, you would need to drag & drop the “ofr.exe” file in the command line. After that, add the “–encode” command at the end of the command line. When you do that, you can choose and add any of the compression preset levels to the command. Then simply drag & drop the source audio file at the end of the command line. Now, you can proceed and add the output file name with the “.OFR” extension after typing “–output” in the command. The command must look like this:
ofr.exe file path --encode --preset [level]source file path --output filename.ofr
You can see in the below image that I have created an example of the command.
Step 3: When you’re done creating the command, simply hit the Enter key and the command will run and start compressing the source audio file. After it is done compressing, it will create a new compressed file with “.OFR” extension. Even though, the homepage of OptimFROG says it supports various media players but I was unable to run the “.OFR” file with any media player. Maybe, I am doing something wrong on my side.
- Supported File Formats: WAV and RAW audio files.
- Supported Media Players: As per the homepage of OptimFROG it supports media players like Winamp, Foobar2000, Media Player Classic, Windows Media Player, Zoom Player, etc.
Closing Words:
All the lossless audio compressor software explained in this post can help you easily compress audio files without compromising the audio quality. I was able to compress WAV audio files with all of them and the resulting audio files (except .ofr files) sound perfect and exactly like the original audio files.