This tutorial explains how to install Windows 10 on a Virtual Hard Disk. If you want to play around with Windows 10, the newest member of the Microsoft Windows family, but are just not ready to toss your existing stable Windows OS installation out in favor of Windows 10, then this is how you can do it. You can easily install Windows 10 on a Virtual Hard Disk, and see what it’s all about, without having to fuss around with your current Windows install. The best part about using Windows 10 on a virtual hard disk is that there are no risks involved. You can deploy the OS on the virtual hard disk, use it all you want, and when done, simply delete the created virtual hard disk. Sounds like fun? Let’s see how you can install Windows 10 on a Virtual Hard Disk.
What Exactly Is A Virtual Hard Disk?
Before we even get started, I’m sure you guys must be wondering, “what exactly is a virtual hard disk?” Contrary to what its name might appear it to be, the concept of Virtual Hard Disk is actually pretty simple. In the most basic of words, a Virtual Hard Disk is a regular computer file (just like any other file) that the system treats as a HDD. Just like a regular physical hard disk, you can store files and folders on it, install programs, and even Operating Systems. It also has its own file system. Therefore, in almost all ways, a virtual hard disk works and behaves as a regular physical HDD. Except that it’s not one, but just a file. A Virtual Hard Disk, thus, is a file created from a chunk of space taken from an actual HDD partition, that the computer treats as a separate hard disk.
That’s All Good, But Why Install Windows 10 On A Virtual Hard Disk In The First Place?
The questions just keep coming, don’t they? As almost everyone knows, if you want to test drive Windows 10 (or any other OS, for that matter), you can always create a separate HDD partition on your HDD, and install the OS on it. Heck, you can even install Windows 10 on a virtual machine and use it just fine. So why even bother going through all this hassle of creating Virtual Hard Disks in the first place? Quiet a valid question. You can always use those options, but I believe the reasons listed below might just convince you into believing as to why using VHD (Virtual Hard Disks) is a better option:
- No hassle of creating a separate partition for the new OS. You can simply utilize the free space on an existing partition to create a VHD and install Windows 10 (or any other OS) on it. No more messing around with existing system partitions and accidental formats (and hence, data losses).
- Since you don’t have to create separate partitions, you don’t have to delete them once you’re done. This means lesser tinkering with the HDD, and in turn, more stability in general.
- You can easily move files between the VHD and the host OS’ file system.
- Simplified backup and restore, and easy deployment on multiple systems (especially beneficial for organizational computer systems).
- Direct use of system hardware resources makes an OS running on virtual hard disk much faster, as compared to an OS running on a virtual machine.
A Few Points To Note Before Getting Started
Now that you have a grip on what a VHD is and you also know about its advantages, it’s time to take note of a few important things. You cannot just get started with creating Virtual Hard Disks and installing stuff just like that. Here are a few things you should know, before getting started with Virtual Hard Disks:
- To create Virtual Hard Disks, your system must be already running 64 bit Windows 7 Ultimate or Enterprise.
- You must have a bootable USB flash drive with Windows 10 installation on it.
How To Install Windows 10 On A Virtual Hard Disk?
Installing Windows 10 on a Virtual Hard Disk (VHD) is essentially a two part process. The first part involves creating a virtual hard disk file from one of your existing disk partitions, whereas the second deals with the actual OS installation after booting from the installation media (USB flash drive in this case). Let’s see how it’s done:
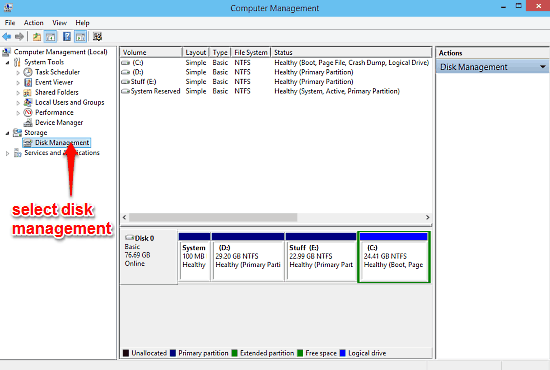
Step 1.1: Right click on My Computer, and select Manage. This should open up the Windows Computer Management Console. Select Disk Management from the left pane.
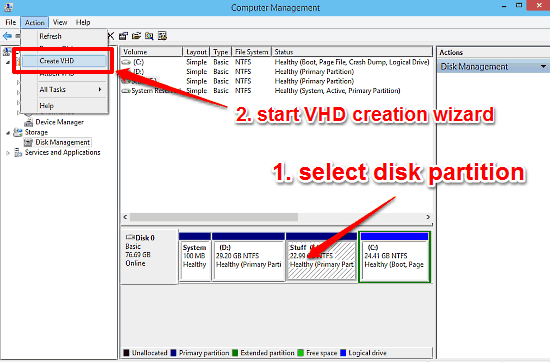
Step 1.2: Now, click the disk partition from whose space you want to create the Virtual Hard Disk. After selecting it, select Action > Create VHD from the menu options.
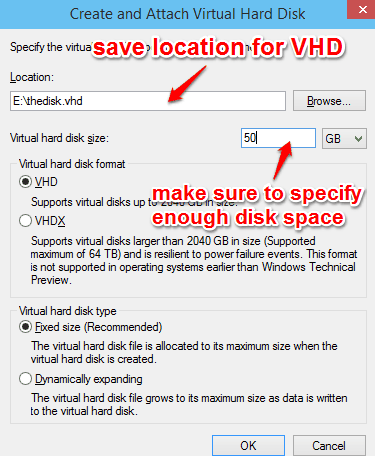
Step 1.3: This should start up the VHD creation module. Here, you can specify a location where you want to save your VHD file, as well as the total disk space you want to allocate for it. As far as the other options (disk format and type) are concerned, it’s best to leave them as such. Here’s a screenshot:
Step 1.4: Your Virtual Hard Disk (VHD) will now be created (depending upon the space allocated to the VHD file, this process might take a few moments). Once the VHD has been created, it’ll appear in the disk partition graphical view pane. Right click on it, and select Initialize to mount the disk and bring it online.

Step 1.5: Once the disk is online, you can format it to create a separate disk partition out of it. This marks the end of the first stage. This newly created virtual hard disk, now seen by the OS as a separate disk partition, will be used for installing Windows 10, once the setup is started from the bootable media in the next stage.
For the next stage, restart the computer, and boot into the Windows 10 installer environment via the bootable flash drive.
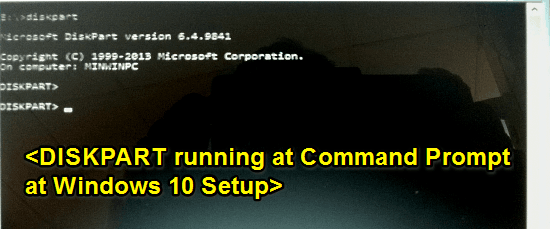
Step 2.1: Now that we’ve booted into the Windows 10 installer environment, it’s time to a little tinkering with the good ol’ Command Prompt. At the very first screen of the Windows 10 setup, hit Shift+F10 to bring up the command prompt window. Once Command Prompt opens, use the dir command to navigate to the disk partition where the created VHD file is located. Now, type DISKPART and hit Enter. Here’s a screenshot:
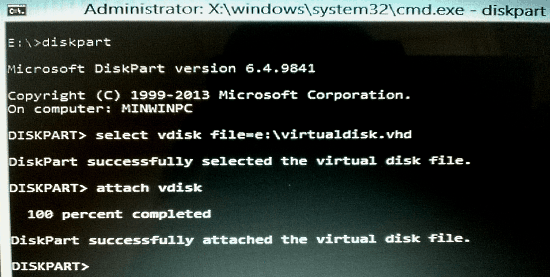
Step 2.2: The next step is to add the created Virtual Hard Disk to the list of available disks, so that it can be seen by the Windows 10 installer. To do so, type in the following two commands (one at a time, pressing Enter after each command):
select vdisk file=E:\virtualdisk.vhd (replace this with the path of your stored VHD file)
[press Enter Key]attach vdisk
[press Enter Key]After running these commands, the Command Prompt will display some confirmation messages (check out the screenshot below). Now, close the command prompt to proceed to the installation’s next step.
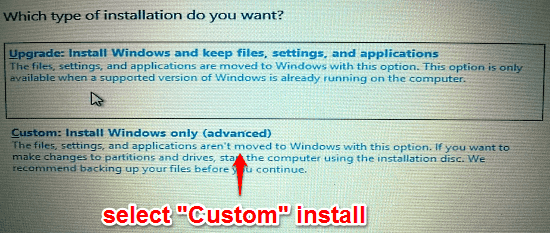
Step 2.3: Now we can easily continue with the installation procedure as it is always carried out. Once you’re on the Installation type selection screen, select Custom Install.
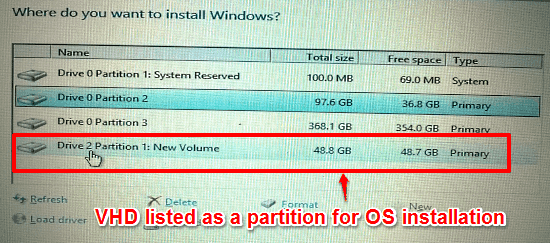
Step 2.4: And here we go folks! As soon as you select Custom Install and the installer proceeds to the disk partition selection screen, you’ll see your created Virtual Hard Disk listed as a separate disk partition. All you have to do is select it for installation, and let the Windows 10 installation proceed as it always does. Once installed, you’ll see Windows 10 listed in the boot-time OS selection screen. Select it, and enjoy your brand new Windows 10. Yay!
Also See: Install Windows 10 From ISO Without DVD or Flash Drive
Conclusion
The ability to install Windows 10 on a Virtual Hard Disk is incredibly useful. It gives you a truly powerful yet easy to use way of installing and booting into Windows 10 (or any other OS, as a matter of fact) without having to go through the potentially risky process of creating and manipulating partitions. And the fact that the installed OS has direct access to all system hardware resources makes sure that you get the best performance out of it. So what are you waiting for? Go ahead and give it a shot, and let me know your thoughts in the comments below.