This tutorial covers how to take screenshots in Windows 10 with built-in screen snip feature. This is a whole new feature of Windows 10 that lets you take screenshots in freeform, capture a specific region, and the entire desktop screen. The freeform or freehand capture mode makes this feature more interesting and a bit special because Windows 10 already had the feature to take specific area screenshot and full screen snapshot but freeform screen capture mode was not there. Thankfully, this new and built-in screen snip tool has come with an option which makes screenshot capturing more fun.
Once the screenshot is captured, it is automatically copied to the clipboard. Furthermore, you can also open captured screenshot to built-in Screen Sketch app of Windows 10 to annotate it and then save it as a PNG image. Before you try this feature, do note this feature has not arrived in April Update of Windows 10. Instead, it has introduced in the preview build 17666. If you have already installed this build, you can try the feature.

In the screenshot above, you can see a screenshot was taken in the freeform mode using this screen snip feature of Windows 10.
How to Take Screenshots in Windows 10 With Built-In Screen Snip Feature?
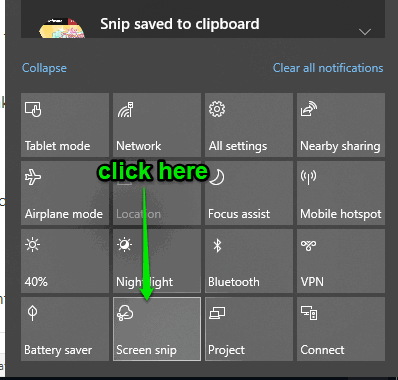
Step 1: Open Action Center by clicking its icon available on the bottom right corner. When Action Center is opened, use Expand option to see all the quick actions. There you will see the new “Screen snip” option. Click on it.
Step 2: Now the screen snip mode will be activated. You can also use “Windows key+Shift+S” hotkey to open this mode. On the top part of your desktop screen, you will see three icons: Rectangular Clip, Freeform Clip, and Fullscreen Clip.
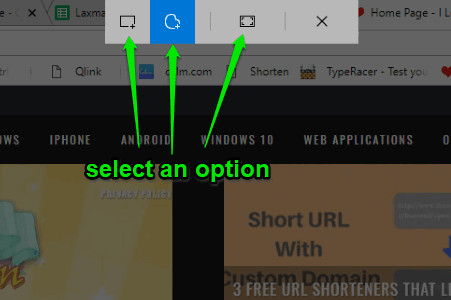
The first option helps to capture the screenshot of a specific region, the second one lets you take the screenshot in freehand mode, and the last option takes the screenshot of the full desktop. Use an option to take the screenshot.
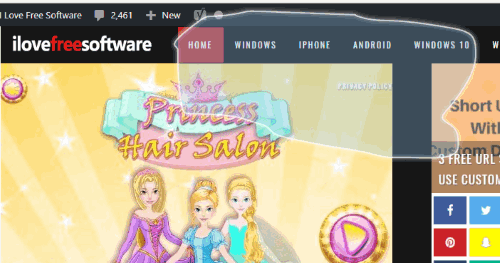
Step 3: As soon as the screenshot is captured, it is copied to the clipboard. You will also see the notification pop-up that screenshot is captured. You can tap on that notification if you want to annotate screenshot with Screen Sketch app. There are highlighter, pencil, pen and other tools available to use.
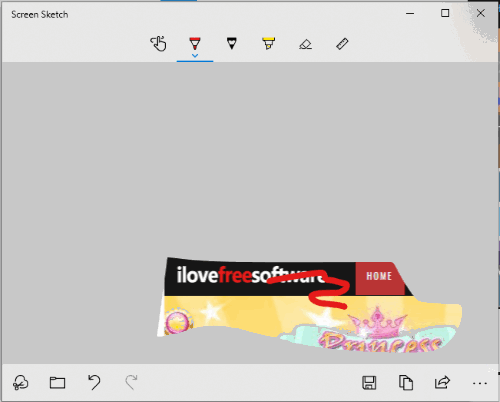
When the screenshot is annotated, you can save it as a PNG image.
The Conclusion:
I find this built-in screen snip feature of Windows 10 very useful and interesting. I wish it would have come with an option to automatically save the captured screenshot as JPG or PNG file, instead of storing it to the clipboard. Still, the feature is helpful. Try this feature yourself.