This tutorial talks about how to add, change, and remove signatures in Word, Excel, PowerPoint. Signature in digital documents are way of notifying the other party that the document is actually signed by the owner and the information in it hasn’t been changed. And in this tutorial I will demonstrate how you can add a signature in Office documents, change it, and even remove it. To create digital certificate, you need to have one installed on your PC. If you don’t have any, then you can create a certificate easily. You can add your actual signature image in document you are signing and add a digital certificate with it.
Digital signature nowadays plays an important role while exchanging information. They are a way of ensuring that the message or information that you have hasn’t been changed by a third person (intruder). Also, if someone tries to alter the information in the middle, then the Digital Signature will be changed and you can discard that information without thinking about it twice.

Before this we have covered articles like adding digital signature to PDF’s. And now I am taking another step forward to explain how to add or remove digital signatures in Word, Excel, PowerPoint files.
How to Add Signatures in Word, Excel, PowerPoint?
You can add or remove digital signature in a document in two different ways. And I will explain both the methods to add digital signature in an Office document. The first method of adding a digital signature is by adding a visible signature line in the document. The second method of adding digital signature is the silent method. In silent method the digital signature will not be visible to the user.
So, lets start discussing the first method to add visible digital signature in Office documents.
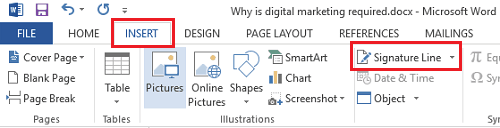
Step 1: Open Word or any other MS Office application. After that, from the tabs on Top, click on Insert. After that, click on “Signature Line”.
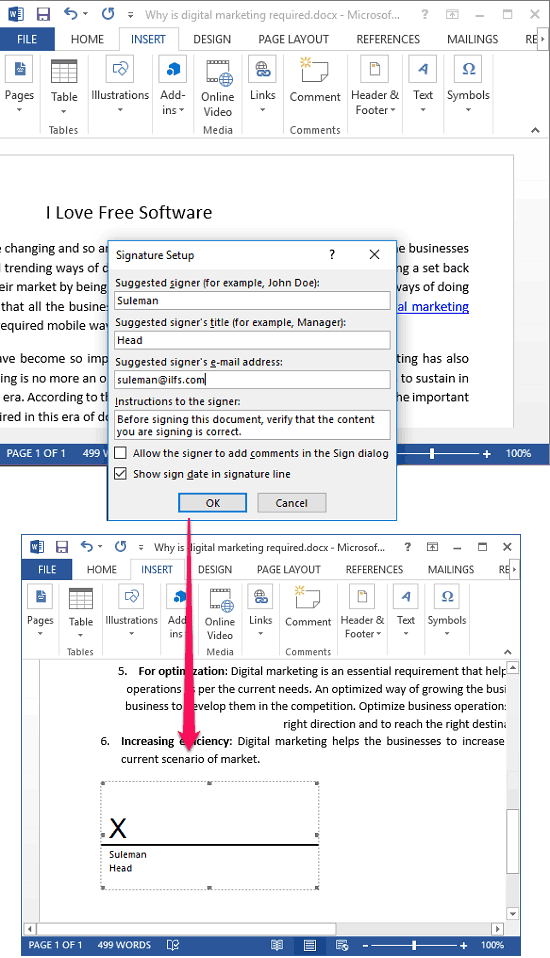
Step 2: A dialog will open up now in which you have to fill out your information. Specify your Name, Email, Designation, etc and click on OK. After that a box will appear in the document with an X mark on it. In the box you can see your name and designation.
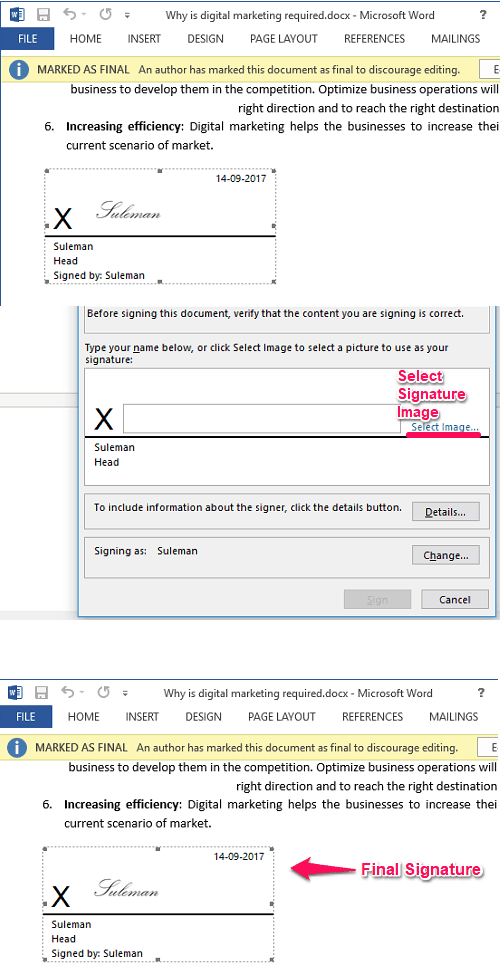
Step 3: Now, the signature stamp has added in the document. All you have to do is attach your hand written signature image and a digital certificate with it. To do that, right-click on the box and click on Sign. If there is already a certificate available, it will ask you to simply choose your signature image and signature certificate. If there’s no signature certificate available, then it will not allow you to sign your document. You can see here how to create and install a digital certificate.
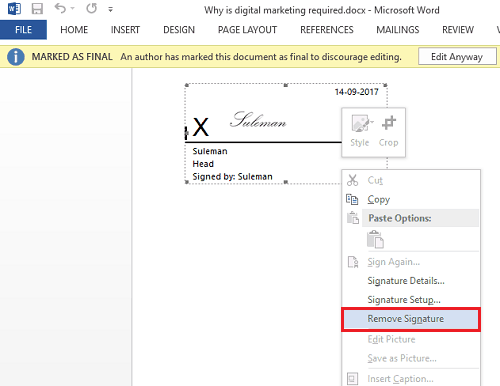
In this way you can easily add a signature in Word, Excel, PowerPoint. Also, this method is the simplest one to add a visible signature in Office document. To remove a digital signature from a document, just right-click on the signature and select “Remove Signature” option. The signature will be then removed from the document.
Now, I will explain how to add silent digital signature in office documents.
How to Add Silent Signatures in Word, Excel, PowerPoint?
Now you know how to add visible digital signature in Office files. If you don’t like the visible signature in Office documents, then MS Office allows you to add silent signatures. Silent signature doesn’t show up in the document but it is there. It makes the Word file read only and if someone tried to edit it, MS Office will remove the signature from the document. And you will know that the document has been manipulated by someone before reaching your hands.
To add a silent signature, the conditions are same. You should have a digital certificate available on your PC that you can use to sign a document. After opening your document, click on File from the top left. After that, from this page click on the Protect Document drop down and click “Add a Digital Signature”.
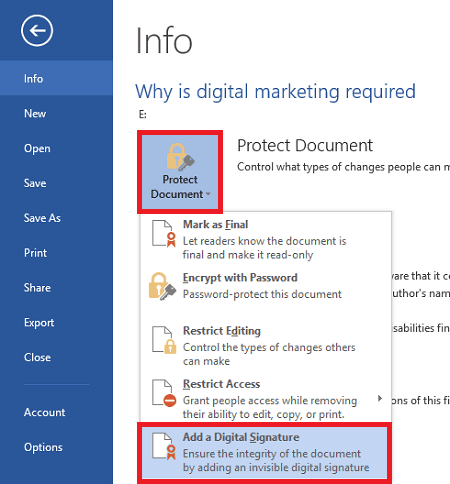
Next, it will ask you to choose a certificate, specify the certificate and add it. There is no need to save the document first, just close it after you have signed it.
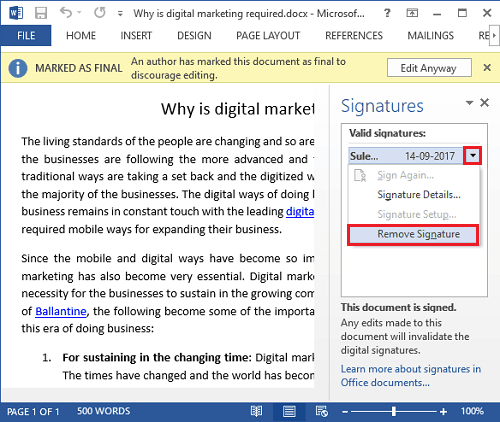
In this way, you can easily add a silent signature to Word, Excel, and PowerPoint. To remove it from the Word file, just open the document and from the certificate pane that will automatically appear, click on the Remove Certificate. Alternatively, you can go for second approach that is just edit the document forcefully and it will remove the certificate from the document.
Closing Thoughts
Adding digital signature in Office documents is very easy. Also, it doesn’t require a third-party software to do that. Just create your certificate and add it to your document. Both the methods that I have explained will help you add, change, and remove signatures in Word, Excel, and PowerPoint.