In this tutorial I will talk about how to add Live Noise Gate to Audacity, Skype, Slack, Hangouts, or any other sound recording software in Windows. Using this, when you do any recording, you can apply Live Noise Gate so that voice is actually recorded only when it is above a specific threshold, and no recording happens otherwise.
Noise Gate is an interesting feature that lets you open or close mic based on voice threshold. Let’s say you are doing a voice recording and there are some noises around you. Now it is not easy to get rid of the noises completely, but one thing you can do is use a Noise Gate. Using this feature, you can control that no voice should be recorded when you are not speaking. This means that the mic will be completely closed when you are not speaking, and won’t record any noise around you. However, do note that the mic will record everything (including noises around you) when you start speaking. So, Noise Gate basically turns the mic on or off based on the threshold of the voice.
Noise Gate feature is not commonly available, especially Live Noise Gate. Audacity has a Noise Gate plugin but that can only be used once you have recorded the audio. It does not provide any Live Noise Gate feature. But once you are through this tutorial, you will know how to add Live Noise Gate to Audacity or any other sound recorder. Not only sound recording, Live Noise Gate works great for voice chat and video chat software as well, like, Skype, Hangouts, Slack, etc.
How to Add Live Noise Gate to Audacity, Skype, Hangouts, Slack, and other sound recording software:
It is actually pretty easy to add a Live Noise Gate to any software. We will need two software for this:
- Noisegator: This software will take input of mic and add Live Noise gate to it. It will give output to your speakers. However, if you want to send that to another software (like, Skype), you need to route that output to another virtual mic. For this, we will use the software below.
- VB-Audio Virtual Cable: This is a virtual audio cable software that lets you connect two audio devices together. It can appear both as input as well as output device. So, we will pass output of Noisegator to it, and then use its output in any software of our choice (like, Skype, Audacity, etc.).
Using both the above software, we will be able to add a Live Noise Gate to any software. Let me show you how to add Live Noise Gate to Audacity and Skype, and then you can follow the same method for any other software.
Step 1: Start by installing both the software above. VB-Audio Virtual Cable might require Java Runtime Environment if you don’t have that already, so install that too. Once both these software have been installed, move on to the next step.
Step 2: Run Noisegator software. It does not creates any shortcut in Start Menu, so you will need to run its exe file. Once run, you will see interface as below:
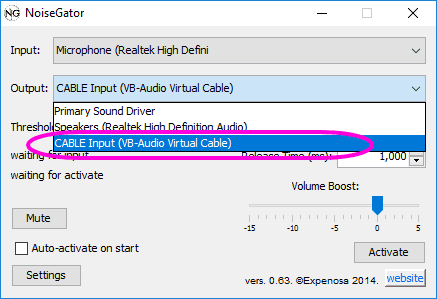
In the interface above, click on drop-down of “Output:”. Here, you should see “Cable Input (VB-Audio Virtual Cable)” as an option. This is the virtual cable software that we installed above, and we want to take output of our Noise Gate to this software. If you are not able to see this in drop-down, then the Virtual cable software has not been installed properly. Try restarting your PC. Also, right-click on the speaker icon in your Taskbar and click on “Playback Devices”. Here you should see Cable-Input as one of the listed device. If yes, right click on it to see that its not disabled. If disabled, click on Enable option. If you can’t see Cable-Input listed here, then there are still some issues with the installation, and try reinstalling.
Step 3: Once you are able to see Cable Input as an option in NoiseGator, select that. What we have done is that we have passed Output of our Noise Gate to our virtual audio cable software. This output then we will use in the software that we are interested in.
Step 4: While in the NoiseGator, you can play around with different settings. The first setting of your interest would be “Threshold”. The higher the value, the louder you’ll need to speak to record your voice. You can adjust this value depending on the loudness of noise around you. There are some other settings in “Settings” tab that you can try out.
Do note that we haven’t activated Noisegator yet, as we need to first configure the software where we will use output of Noisegator. I have explained that separately below for Audacity and Skype. Once you are done with configuring the software below, you can just re-open the Noisegator, and click on “Activate” button to start Live Noise Gate.
How to Add Live Noise Gate to Audacity:
To add Live Noise Gate to Audacity, just run Audacity. Then in the second drop-down that is for Recording Device, select “Cable Output (VB-Audio Virtual Cable)”.
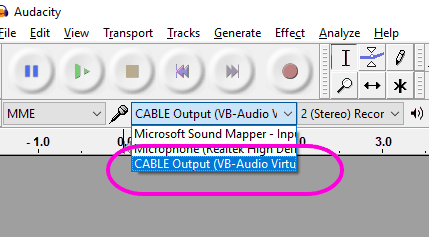
In case you are not able to see the Cable Output option here, then again right click on the speaker icon on Taskbar, but now click on “Recording Devices”. You should see “Cable Output” as one of the device listed here, and should be enabled.
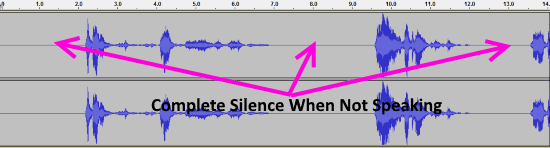
Once you have done the settings, you are all set. Just go back to Noisegator, click on Activate there. Now Noise Gator is doing Live Noise gating for you. Come back to Audacity and start Recording. If everything has been setup well, then you should see waveform in Audacity like below. Basically, during the time that you are not speaking, nothing should be captured at all, as Noise Gate would close, but when you are speaking, everything would be captured.
So, this is how you can easily add Live Noise Gate to Audacity. Of course, you might later still have to carry out Noise Reduction to reduce the noise recorded while you were speaking.
How to Add Live Noise Gate to Skype, Hangouts, Slack, etc.:
I personally believe Live Noise Gate feature is more useful for Live chat software, like, Skype, Hangouts etc. I will show how to add Live Noise Gate to Skype, and the same steps can be followed for other software as well.
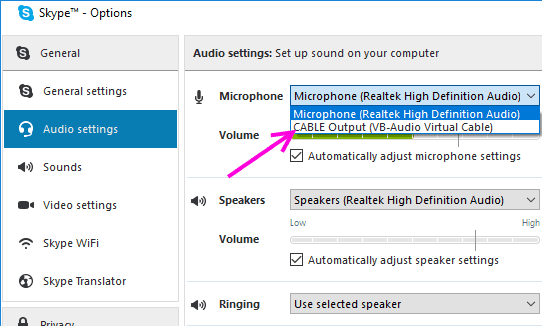
First you need to configure NoiseGator as I detailed above (Steps 1 to 4). Then, open Skype. In the menu, click on Call > Audio Settings. Under Audio Settings, you will see Microphone. Click on the drop-down for this and select “Cable Output”. Save the settings.
Now you have successfully added Live Noise Gate to Skype. Whenever you want to do an audio chat, you need to first start NoiseGator, and click on “Activate” button in that. After that, whatever you speak will be Live Noise Gated by NoiseGator, and output of that would be sent to Skype.
If you want to add Live Noise Gate to Hangouts, just start a call, and click on Settings icon (the gear icon). In that, you will see drop-down of Microphone. Just select “Cable Output” in that.
Similarly, you can add Live Noise Gate to any other software, like, Slack, OBS, etc.
My Verdict:
The above tutorial demonstrates how easy it is to add Live Noise Gate to any software. Audacity is a very popular software and people use it for tons of uses, like, sound recording, and even as an alternative to paid software like FL Studio. By following the tutorial above, you can make Audacity even more versatile by adding Live Noise Gate to it.
Personally speaking, I think Live Noise Gate is more beneficial in live audio broadcasting situations like, audio calling and video calling. So, it would make more sense to add Live Noise Gate to software like Skype, Hangouts, Slack, or any other software that you use to make audio or video calls.
Do you know of any other way to add Live Noise Gate? Let me know in comments below.