This tutorial explains how to disable shut down, restart, and sleep options in Windows 10 Start menu. By default, when you click on Power icon of Windows 10 Start menu, it shows restart, sleep, and shut down options (hibernate option also, if added). But, if you want to disable all those power options in Start menu, then you can use two native options of Windows 10.
You can disable power options from Start menu of Windows 10 using Local Group Editor (LGPO) and Registry. Both the methods are simple and all steps for both methods that will help you disable shut down, restart, and sleep options in Windows 10 Start menu are added here.
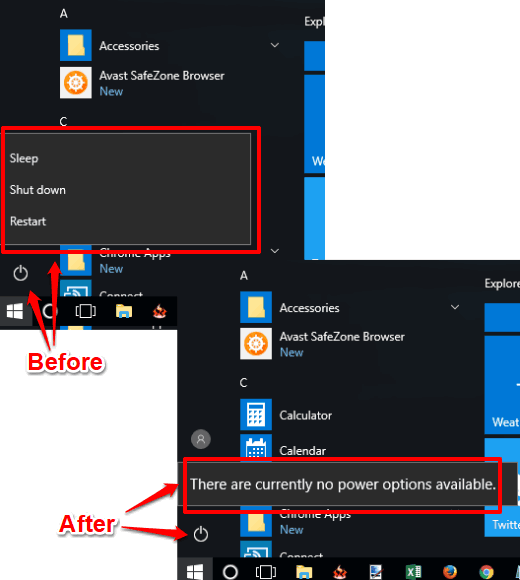
Let’s start with the first group policy method.
Method 1: Disable Shut Down, Restart, and Sleep Options in Start Menu of Windows 10 Pro, Education, and Enterprise Versions
Step 1: Start Local Group Policy Editor window. Write “gpo” or “group policy” in Search box and this will help you start Local Group Policy window.
Step 2: This is a very important step. Here, you have to expand User Configuration, then double-click the Administrative Templates folder, and after that, you will see “Start Menu and Taskbar folder“. Select it.
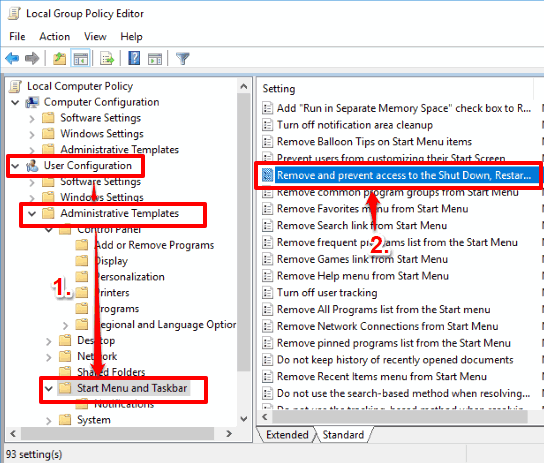
Step 3: When Start Menu and Taskbar folder is seleced, you will see a lot of options. You have to double-click the “Remove and prevent access to the Shut Down, Restart, Sleep, and Hibernate Commands” option. See the screenshot above.
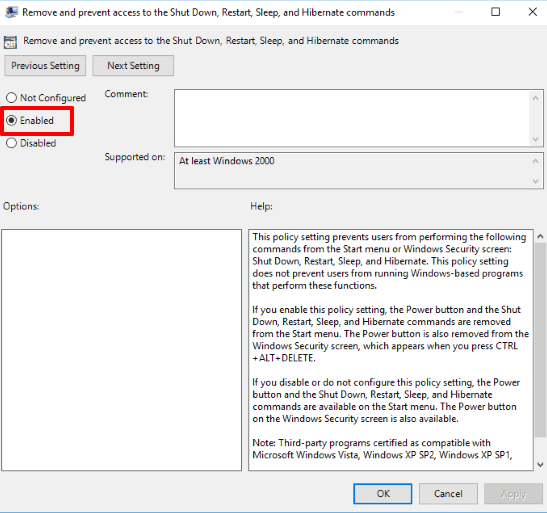
Step 4: A window related to that option will open. You will see 3 different options in that window (at the left side): Not Configured, Enabled, and Disabled. You have to click on “Enabled” and then save new settings.
Now when you click on Power icon available in Windows 10 Start menu, you will see that Power options are not visible.
To access shut down, restart, and sleep options again in Windows 10 Start menu, you can use Not Configured/Disable option and save the new settings.
Method 2: Disable Shut Down, Sleep, and Restart Options in Start Menu of Windows 10 Pro Version
Step 1: Start Registry of Windows 10. Writing “regedit” and then using Enter key will start Registry Editor.
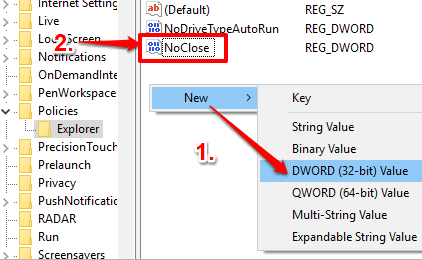
Step 2: In Registry, go to “Explorer” key. For this, explore HKEY_CURRENT_USER, then explore Software key, expand Microsoft key, Windows key, CurrentVersion key, Policies, and then Explorer key will be in front of you. Select that key.
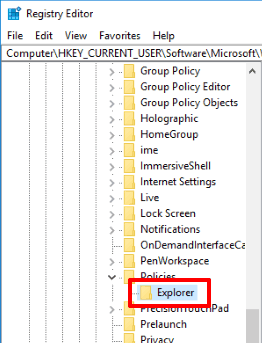
Step 3: In this key, create a “NoClose” DWORD value. See the screenshot below.
Step 4: Now this is the last step. When NoClose DWORD is created, change its value data from ‘0’ to ‘1’. As visible in screenshot below, when you will double-click NoClose DWORD, its small window to change value data will open. Add ‘1’ for value data and save it.
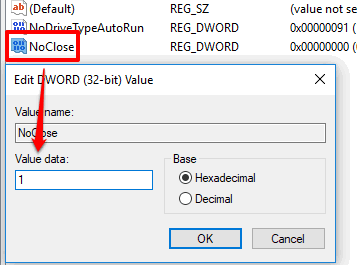
Now File Explorer or PC restart is required. After that, power options will be disabled in Windows 10 Start menu.
To access power options again in Start menu, you can set ‘0‘ in value data of NoClose DWORD value, and save new settings.
You may also check How To Add Contacts To Windows 10 Start Menu and How To Hide Apps List In Windows 10 Start Menu.
The Verdict:
These are the built-in options that will help you permanently or temporarily disable shut down, restart, and sleep options in Windows 10 Start menu. I am quite satisfied with group policy method because it is better and simpler than method 1. Those who can’t access group policy, method 1 is definitely a good choice for them.