This post demonstrates how to create a family tree in Microsoft Word. At the end of this post, you will be able to easily create your own family tree in MS Word without using any third-party genealogy software.
One of the possible ways to create a family tree in MS Word is to use a predefined template. There are many websites available which offer free Word templates. So, you can simply search for a family tree template on these websites and use it in MS Word to create your own family tree. But, if you couldn’t find an appropriate template for creating a family tree, then the method explained in this post will help you create a family tree as you desire right in MS Word.
Actually, you can use the built-in “SmartArt” feature of MS Word to create a family tree. This feature lets you choose a hierarchy graphic and then enter your family member’s information to complete the family tree, as simple as that.
How to Create a Family Tree in MS Word:
Step 1: To get started, simply open up MS Word and then select “File → New” to create a new document. After that, click on the “Insert” tab and there you will see an option named “SmartArt” under the “Illustrations” section.
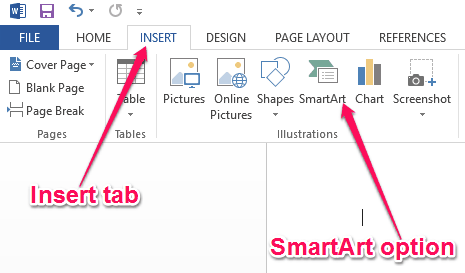
Step 2: Simply, click on the “SmartArt” option and a popup window will appear where you will see various categories for SmartArt graphics like List, Process, Cycle, Hierarchy, Matrix, etc. Now, select the “Hierarchy” category and all the associated SmartArt graphics will be visible like Circle Picture Hierarchy, Half Circle Organization Chart, Labeled Hierarchy, Lined List, and more.

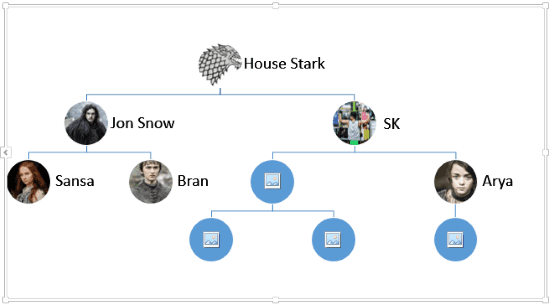
You can choose any graphic you want as all of them can be used to create a family tree. To explain how to create a family tree in MS Word, I will use the “Circle Picture Hierarchy” as an example. This graphic is pretty cool as it also lets you insert an image on each node of the family tree.
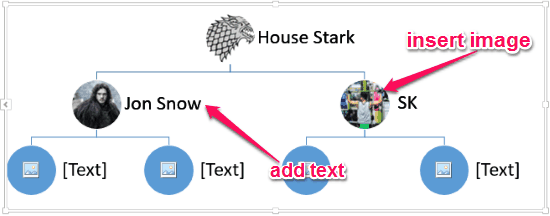
Step 3: Suppose, you have also selected the “Circle Picture Hierarchy” graphic to create a family tree in MS Word. After you’re done selecting the SmartArt graphic, it will open up in the blank page of the new document. Now, you can click on the text box associated with each node to enter the name of the family member. In addition to that, you can also add an image to all the nodes in the family tree. For this, simply click on the “Circular” icon and then choose an image from your PC or search Bing for an image.
Step 4: In the same manner, you can fill out all the nodes of the family tree. Now, if you would like to add new nodes for adding more family members, then simply right-click on any of the circular nodes and then select “Add Shape” option. After that, it will ask where would to like to add the new node. You can either choose Add Shape After, Add Shape Before, Add Shape Above, or Add Shape Below to place the new node, as shown below.

Following this process, you can create a family tree with as many family members as you want. Remember, adding new nodes will not include the text boxes. But, you can simply copy any of the text boxes and then paste it near the newly added nodes in the family tree.
Closing Words:
Using the method explained above, I was able to easily and quickly create my family tree in MS Word. If you also want to create a family tree, then instead of using complex genealogy software you can follow this method to do the same. The best part about using this method is that you can simply open up MS Word in your PC and start creating your family tree without much effort. Creating a family tree has never been easier.
I hope you find this post useful.