This tutorial explains how to create, delete, edit, GitHub Gists using Notepad++. NppGist is a free plugin for Notepad++ that you can use to do it easily. This plugin first connects to your GitHub account through an access token and then lets you manage all the Gists that you have created so far. In addition to that, you can create new Gists in a new tab of Notepad++ and then publish it on GitHub in a few clicks. It lists all the Gists from your account and if you want then you can rename them and save the changes on GitHub.
GitHub Gists are nothing but single code snippet files. And GitHub has this feature to host your code snippets just like repositories. You can manage them in the same way as you manage your projects. And since Notepad++ is most used code editor worldwide so wouldn’t it be nice that you can directly access, create, and manage GitHub Gists right from Notepad++? And that is why NppGist comes into the picture. You can easily install, configure it and then use it anytime to manage the Gists from your GitHub account.

How to Create, Delete, Edit GitHub Gists using Notepad++?
NppGist is an open source plugin for Notepad++ and if you wish you can have a look on its code base. To get it integrated in Notepad++, you will have to give it permissions to access your GitHub account. And you can do that by entering your GitHub access token in it and I will tell you later how to do that.
Here are the steps to install and use NppGist plugin in Notepad++ to manage your GitHub Gists.
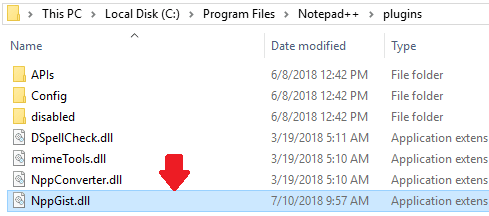
Step 1: Download the plugin file from here based on the CPU architecture of your computer. After that, extract the ZIP file and copy the “NppGist.dll” file to Notepad++ installation folder. By default, the Notepad++ installation folder is “C:\Program Files\Notepad++\plugins“.
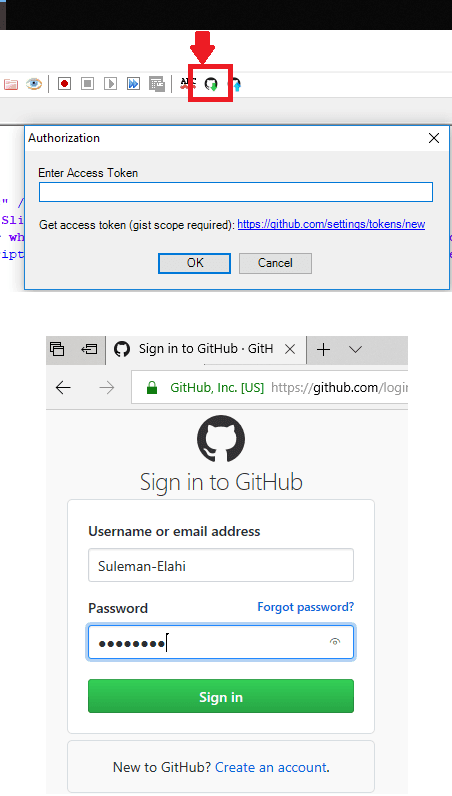
Step 2: Open Notepad++ and then you will see two GitHub icons in the toolbar. One icon is for opening a Gist from GitHub and another is for saving a Gist. So, click on the first icon to open a Gist. But in the beginning, it will ask you to enter your GitHub access token. If you already have it then enter it and then start managing your Gists. If you don’t have an access token, then create one. Click on the link that it shows in the dialog box and it will open in the browser. Simply proceed with the token creation process by specifying your GitHub password.
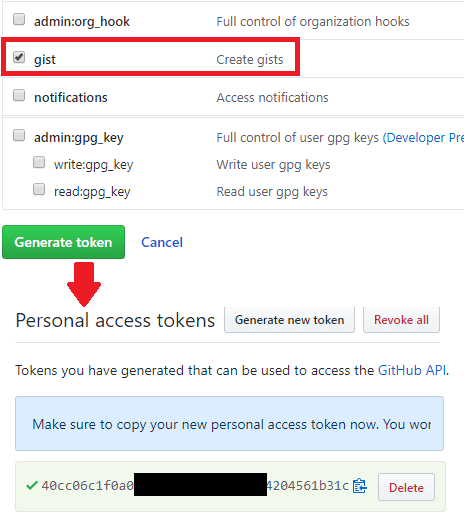
Step 3: After signing in, create token and give it a name. Next, grant it permissions to access your GitHub Gists. And finally, create it, and you will see it. Next, simply copy it and then paste it in the NppGist plugin.
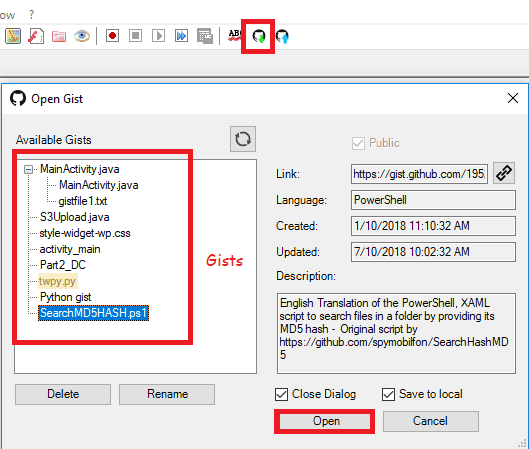
Step 4: Now, you are all ready to use the NppGist plugin. Simply click on “Open Gist” icon and it will show you the all the available Gists from your account. You can open any Gist and then do whatever you want. From the interface of the NppGist plugin, you can rename a Gist and even delete it.
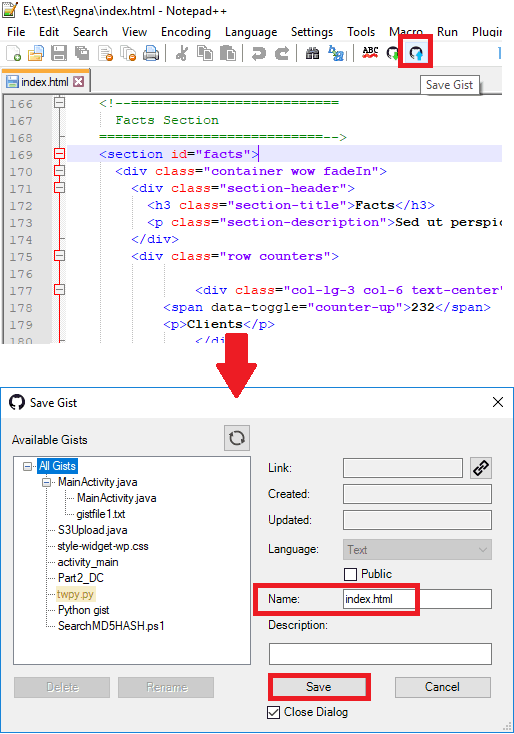
Step 5: If you want to create a new Gist then simply create it in any tab of Notepad++ and save it on your PC. Next, after saving it, simply click on the “Save Gist” GitHub icon and it will save your Gist in your account. While saving it, you will have to specify a name for it.
These steps will be enough to guide you on how to use NppGist plugin to manage your GitHub Gists. You can easily create, edit, and delete your Gists in a few clicks. And all you need is the GitHub access token for the plugin to work efficiently.
Post you also like: Free Code Snippet Manager Based on GitHub Gist with Markdown Support
Closing thoughts:
If you often work with GitHub Gists then you should try NppGist plugin for Notepad++. While using it, you will never have to open browser to get your Gists and manually copy paste them in the editor. I really liked the fact that this plugin has made it very easy to get any Gist from your account in a few clicks. So, now manage your Gists like a pro and this post will show you how.