This tutorial explains how to change the preferential order for automatic network connectivity in Windows 10. Computers of today are incredibly powerful, and are getting better with each day, thanks to the strides made in hardware development. To perfectly compliment that, the software applications that they run (both the Operating System as well the near infinite variety of applications) are also improving by leaps and bounds, making the PCs smarter by the minute. The latest and greatest Windows 10 is also one such smart and feature laden OS. It can run tasks automatically on a schedule, turn off some hardware devices on its own to conserve power, and then some more.
And pretty much like any other modern Operating System, Windows 10 can automatically connect to a variety of known networks (both Wired and Wireless). But do you know that you can also configure it to prefer one network over the another, while connecting automatically? Amazed already? Let’s head past the break and find out how you can change the preferential order for automatic network connectivity in Windows 10.
How To Change The Preferential Order For Automatic Network Connectivity In Windows 10?
It’s easy to configure which network Windows 10 automatically connects to, on discovering available networks. Read on the following illustrative walkthrough, illustrating how to get this working:
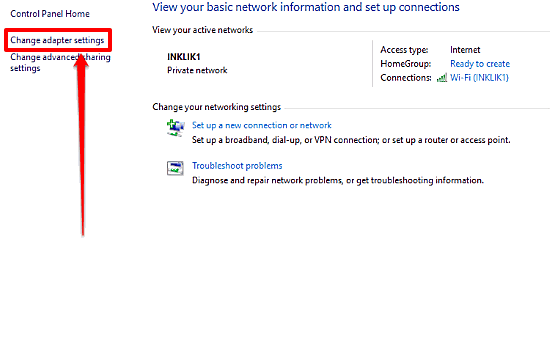
Step 1: Navigate to the Control Panel, and click on the Network and Sharing Center. Now go to the left column, and hit the Change adapter settings option.

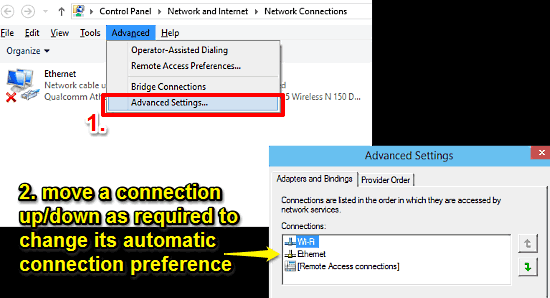
Step 2: The adapter settings window will now pop up, listing all the available network connections (as well as their connectivity status). Go to the menu bar (click Alt if it’s not showing), and select the Advanced Settings under the Advanced menu item. Another dialog box, titled Advanced Settings will pop-up. Under the Connections sub-section of the Adapters and Bindings tab, you’ll see a listing of all the connection types currently available. To change the preferential order of a connection, simply click on it, and use the up and down buttons on the right to move the connection up and down. Here’s a screenshot:

Also See: How To Backup Stored Credentials In Windows 10?
Wrap Up
Being the latest in Microsoft’s line of Operating Systems, Windows 10 is an incredibly powerful, smart, and packs in more features than you can count. Some of these are big, while others, not so much. But they’re all equally important as they contribute in unison towards a better overall user experience. The ability to change the preferential order for automatic network connectivity is also one such feature. Take it for a spin, you’ll love it.