Quick Rehost is a free watermarking and image uploading software for Windows which you can use in order to watermark images and effortlessly upload them to your site in a single click. Using this free software you can easily download images from the internet, re-upload them to a different FTP server, and you can also import your very own watermark and apply them to images and photos while the hosting is being changed and images re-uploaded to a different FTP host.
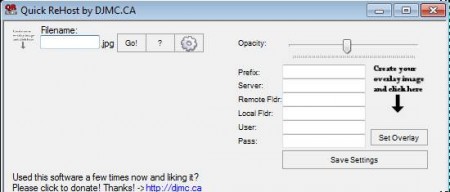
In the image above you can see the default interface of Quick Rehost. This is a portable application, which means that there’s no need for installation. Interface is not very complicated and when this free software is opened for the first time you will be offered with quick tips on how it works, which is very useful.
Key Features of Quick Rehost to Watermark Images:
- Free and simple to use interface, everything can be setup in seconds.
- Change image hosting automatically, with automatic FTP re-upload.
- Apply watermarks to images as the hosting is being changed.
- Customizable opacity for the watermark image that you add.
Changing image hosting can be, if not anything else, then definitely a time-consuming chore. This is especially true if you have a lot of them, and of course if you want to add watermark to images as they are being re-uploaded to another host. Here, are a few tips to help you get started and to switch image hosts without hassles using this free software.
How to Change Image Hosting Automatically and Add Watermarks at the Same Time with Quick Rehost?
Make sure that you have an FTP account and that you know login credentials of it because you’ll need it if you want to re-upload images with Quick Rehost. Fill out everything like, sever location, folders, FTP user and pass.
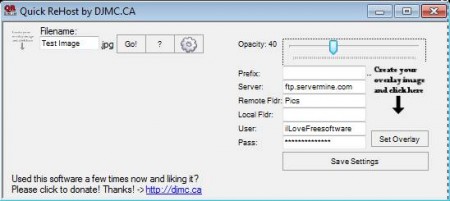
The Filename field in the top left corner of the window is where you can also change the name of the image or a photo that’s being re-uploaded. When you’re done setting everything up, click Save Settings. Now it’s time to open up a web browser to search for images that you want re-uploaded and edited.
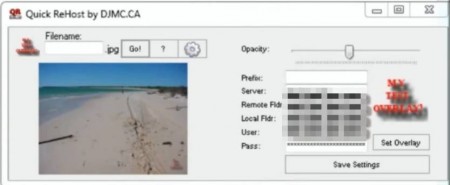
Once that you are in a web browser find the image that you want re-hosted, right-click on it, and select Copy so that the image is saved in the clipboard. After doing that enter filename and click on the GO button in Quick Rehost. Image should be re-hosted to the FTP server automatically and watermark will also be added if you selected one.
Conclusion:
Quick Rehost can be used in a number of different situations like for example when you need to convert your image collection from an online image host to your own FTP server or somebody else’s. Images are gonna be downloaded to the computer first and after that uploaded automatically, you just need to write in the name of the image file on the new host and click Go. Try it and see how useful Quick Rehost is. You may also try Easy Image Uploader, Image Uploader, and Easy Facebook Photo Uploader reviewed by us.