This tutorial explains how to enable paths longer than 260 characters limit in Windows 10. For this, we have to do a very simple tweak. After that, we can add paths longer than the default set limit. However, note that enabling the longer paths won’t be applied everywhere. It will work for Windows store applications and win32 applications.
The tweak that I have covered in this tutorial works in two different ways: using Local Group Policy Editor or Registry Editor. The option you have to choose depends on the Windows 10 edition (Pro or Home) you’re using. Also, it will work only if you have updated your Windows 10 PC with Anniversary Update (version 1607).
So, let’s find out how to enable paths longer than 260 characters limit in Windows 10.
Enable Longer Paths Beyond 260 Characters Limit In Windows 10 Using Group Policy Editor:
This option works if you have Windows 10 Pro installed on your PC. Here are the steps:
Step 1: Press Win+R to open Run command window → type gpedit.msc → and press enter. It will open Local Group Policy Editor.

Step 2: In Local Group Policy Editor window, you have to find “Enable Win32 long paths” entry which is available under Filesystem folder. Its location is: “Computer Configuration → Administrative Templates → System → Filesystem“.
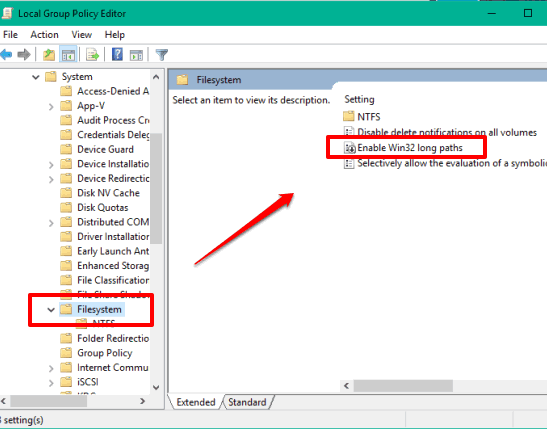
Step 3: Double-click that entry and a new window will open. Select Enabled option, Apply changes, and press OK button to save new changes.
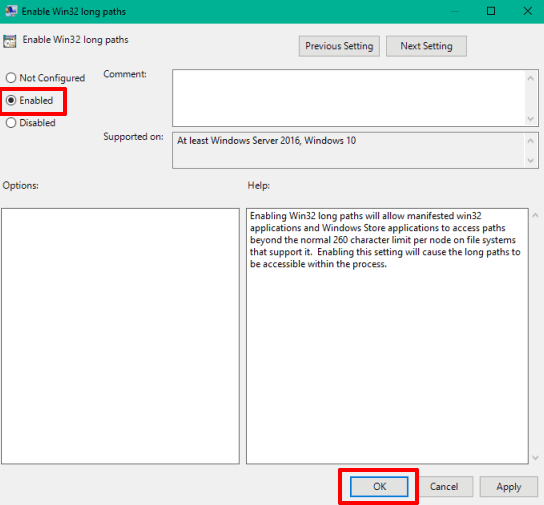
Now you can use paths longer than 260 characters limit in your Windows 10 PC.
Enable Paths Longer Than 260 Characters Limit In Windows 10 Using Registry Editor:
If you are using Windows 10 Home or other edition, you need to use this option.
Step 1: Open Registry Editor window.
Step 2: Go to HKEY_LOCAL_MACHINE\SYSTEM\CurrentControlSet\Policies.
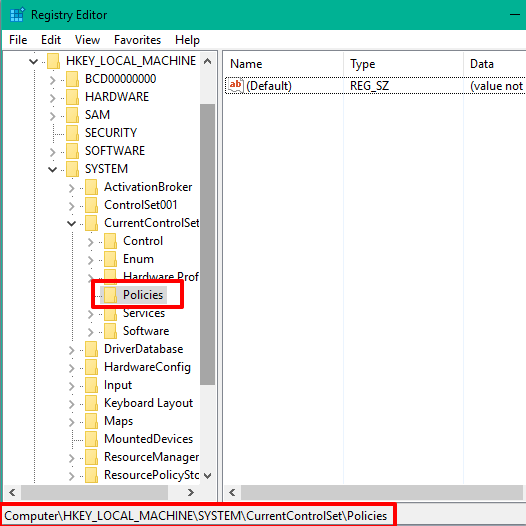
Step 3: Under Policies key, you have to create a new DWORD value.
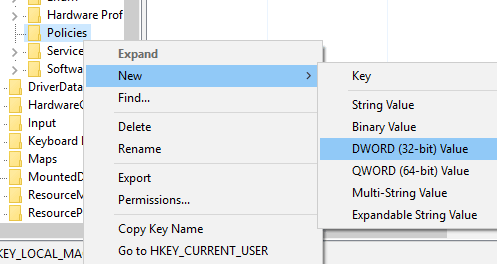
Step 4: Rename the new DWORD value to LongPathsEnabled name. After that, you need to change Value data from ‘0’ to 1. For this, double-click LongPathsEnabled value and a window will open.
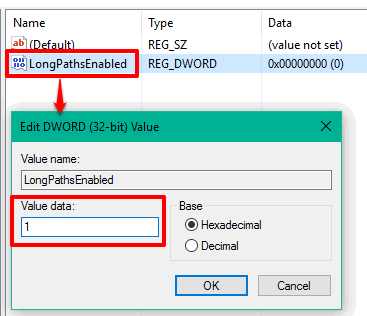
Now you can change Value data and press OK button to save changes.
You may also read:
- How To Monitor Changes In Windows 10 Registry.
- How To Clean Registry In Windows 10?.
- How To Run A Program As Another User In Windows 10 Using Group Policy Editor?.
The Verdict:
So, now you know how to enable long paths in Windows 10. Use the option that is effective for your Windows 10 edition and enable long paths that can go beyond 260 characters. Also, no PC restart is needed to apply the changes. The new changes are added immediately.