This is an easy tutorial that explains how to enable Secure Logon in Windows 8. Secure Logon adds one more layer of security in your Windows PC. In this, you need to press CTRL + ALT + DEL first to get the sign in screen, and then type the password.
When you enable the Secure Logon (CTRL+ALT+DEL), a message will be displayed on the Lock Screen saying “PRESS CTRL+ALT+DEL TO UNLOCK”. USER_NAME is signed in. It will even give you anoption to switch user.
The message is displayed on the Lock Screen only, when you lock or boot up your PC. If you chose to disable the Windows 8 Lock Screen, then pressing CTRL+ALT+DEL will redirect you to the sign in screen directly. If you have enabled the lock screen, then after pressing CTRL+ALT+DEL, you need to slide the lock screen first to get the sign-in screen.
Method 1: Enable Secure Logon In Windows 8 Using netplwiz
This is the easiest method amongst all. It works efficiently as well.
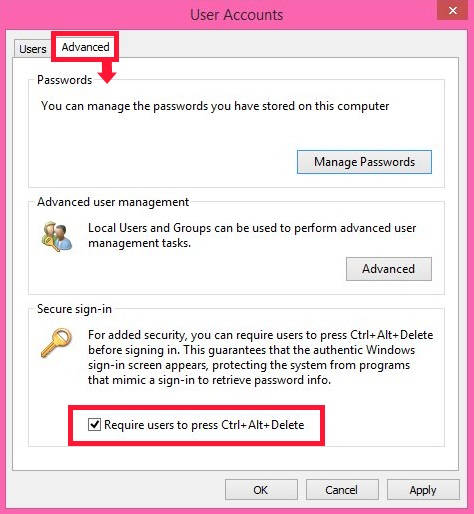
Step 1: Access Run by using Windows Key + R. Type “netplwiz” (without quotes) in the Run Box. It opens User Accounts.
Step 2: In User Accounts, click on “Advanced” tab at the top panel. In Advanced tab, click on the check box that says “Require users to press Ctrl + Alt + Delete”. Click on Apply button, and then OK.
Close User Accounts.
To check that the Secure Logon has been enabled, lock your Windows 8 PC by using Windows Key + L.
You will find that the Secure Logon has been enabled.
Method 2: Enable Secure Logon In Windows 8 Using Local Security Policy
Step 1: Access Local Security Policy Editor by using “secpol.msc” in the Run box.
Step 2: In Local Security Policy Editor, navigate to Security Options by using the below path:
Security Settings > Local Policies > Security Options
Click on Security Options.
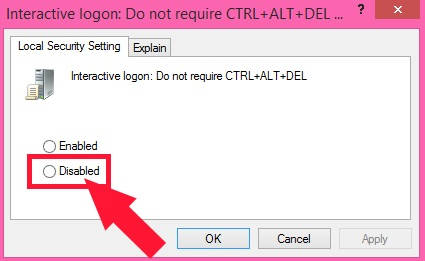
Step 3: Now, on the right panel, you will find a link that says “Interactive logon: Do not require CTRL + ALT + DEL”. Double tap on it.

Step 4: In the popped window, click on “Disabled” (To enable Secure Logon, you need to click on Disabled).
Save the changes, and then close the Local Security Policy Editor.
Method 3: Enable Secure Logon In Windows 8 Using Registry Editor
Step 1: Type regedit in the Run box, to open Registry Editor.
Step 2: In the Registry Editor, navigate to Winlogon by using the following path:
HKEY_LOCAL_MACHINE\SOFTWARE\Microsoft\Windows NT\CurrentVersion\Winlogon
Tap on Winlogon.
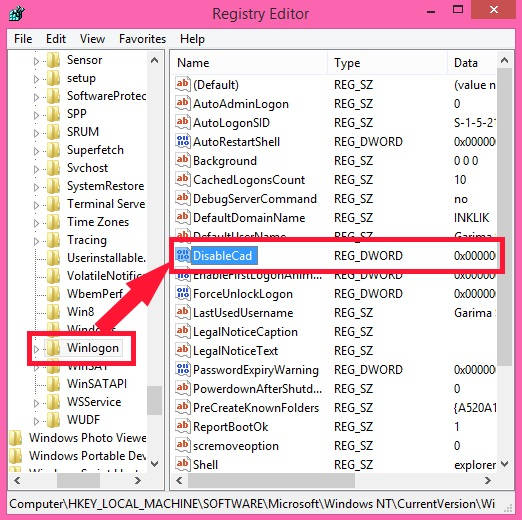
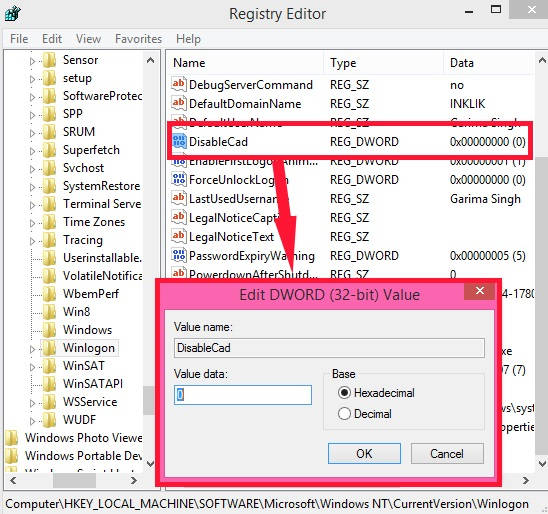
Step 3: Go to the right panel of the Editor, and double tap on the DWORD that says “DisableCad”. Change the value data to 0. Click on Ok. Then close the Editor.
That’s it.
Select any of the above method as per your preference. You will find that the Secure Logon has been successfully enabled.