In this tutorial, I will explain how to restore files with File History in Windows 8. I will also explain how to exclude libraries and folders from the backup, in Windows 8 File History.
We have already covered a tutorial that explains how to set up and add Drive for File History in Windows 8. The linked tutorial also explains how to turn ON File History, so that it keeps on saving various files in the background, without your intervention.
In this easy tutorial, it is explained how to exclude folders or libraries from the backup. For example: if you don’t want to backup Videos folder, then you can exclude Videos folder from the backup, so that File History will not backup that particular folder. I have also explained how to restore various versions of files. You can also save any version of the file to any other location, instead of restoring the file to the destination folder.
How To Exclude Folders For The Backup In Windows 8 File History?
To exclude any particular folder from the backup, follow the instructions given below:
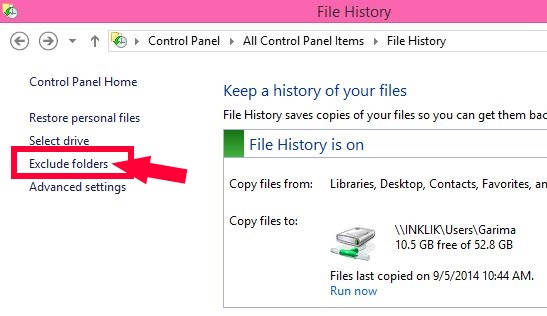
Step 1: The first thing that you need to do is access File History in Control Panel. To open, tap on the Control Panel from the WinX menu (use Windows Key + X, to open WinX menu). In the Control Panel (icon view), tap on the File History.
Step 2: In the File History, you will see a link “Exclude folders” on the left panel of the window. Tap on it.
Step 3: In the Exclude folder, you will see a box that says “Excluded folders and libraries”. If you haven’t excluded any folder yet, then it will show no item added. Below it, you will see an “Add” button. Click on Add to add any folder.
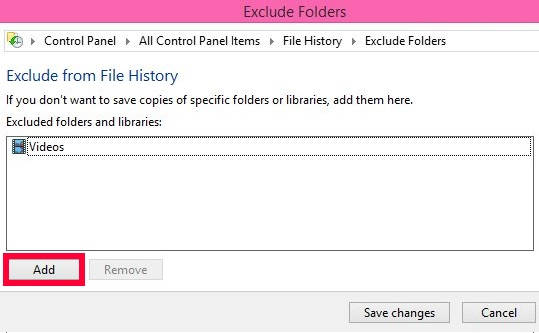
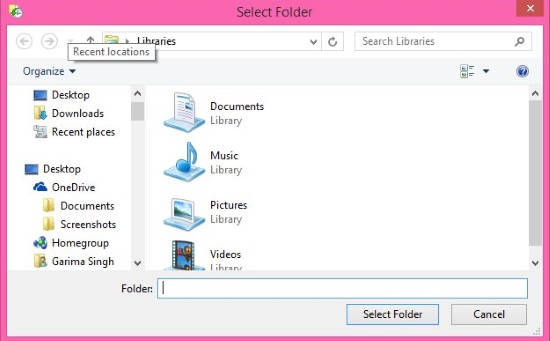
Clicking on Add will open a new window. Browse the folder, which you want to exclude.
Similarly, add more folders.
Click on “Save changes” to save the excluded folders.
How To Restore File History In Windows 8?
If you find a file that is corrupted or is having some problem, then you can restore any version of that particular file with File History.
Step 1: To restore any file, open its location. Click on the particular file, which you want to restore.
Step 2: On the top panel, you will see History option. Click on it. It will give a preview of that particular file, along with the date and time when it was backed up.
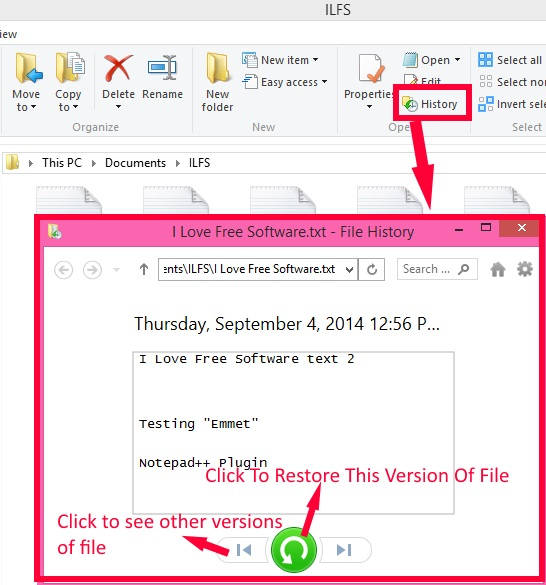
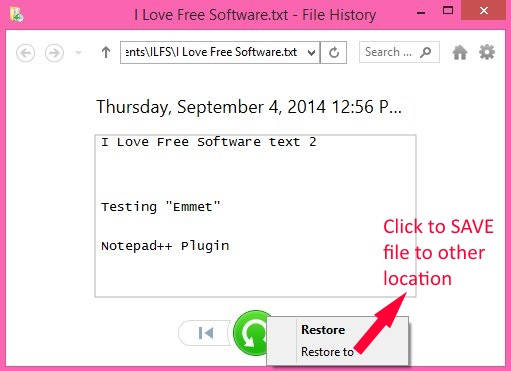
Step 3: In the same window, you will see a restoration button. Click on it to restore the file to its original destination. You can see various versions of that file, by clicking on Next or Previous button (as shown in the above screenshot).
Step 4: To save any particular version of the file, to save other location, right click on Restore button. Then click on “Restore to” option. Browse the location, where you want to save it.
That’s it.
If you will use File History quite efficiently, then you will definitely find this feature of Windows 8 to be productive.