Here is a curated list of 5 free software to add Tilt Shift effect to photos and make them look like miniature models. The tilt-shift effect lets you focus on any specific part of a photo by blurring out the remaining parts. Nowadays, all the DSLR cameras let you apply this effect while capturing a photo with “Aperture” mode. However, if you want to apply tilt-shift effect to photos which you have either downloaded or captured without using Aperture mode, then these software can help you do that.
These software are not limited to applying tilt-shift effect only, as you can also use them for editing your photos same as other photo editing tools.

How to Add Tilt-Shift Effect to Photos using Fotor:
Fotor is a free photo editing software for Windows that comes with various powerful tools and useful features like scenes, effects, etc. One of these features which I like most is that it lets you add the tilt-shift effect to your photos. It offers two different modes with markers named, Radial and Linear for applying the effect. You can also rotate the Linear mode marker to apply the effect horizontally, diagonally, and vertically. To adjust the intensity of blurred out area, it comes with different apertures like F/16, F/11, F/5.6, and so on.
Let me show you how to use Fotor for adding the tilt-shift effect to photos.-
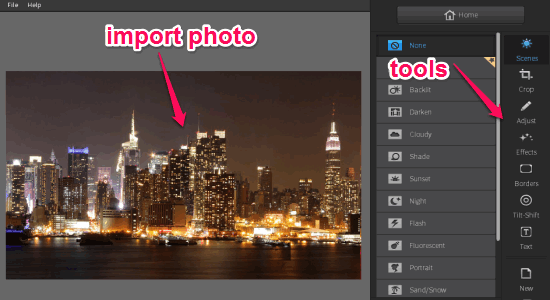
Step 1: When you launch this software, you will see three different options named, Edit, Collage, and Batch. Click the “Edit” option to proceed and start editing your photos. The editor will open up with various tools on the right such as scenes, crop, adjust, effects, borders, tilt-shift, etc. To import a photo, click on the blank canvas where it says “Click Here To Start”.
Step 2: Once you’re done with importing a photo, simply select the “Tilt-Shift” tool from the right. As soon as you do that, you will be able to see the modes option and the supported apertures on the left of the “Tilt-Shift” tool. You can toggle the Radial or Linear Mode by simply sliding the button as shown below.
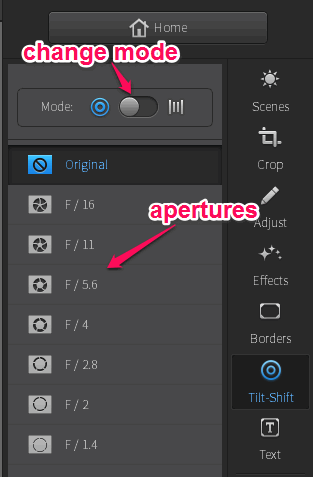
Step 3: While using either the linear or circular mode, you can choose any of the apertures like F/16, F/11, F/5.6, and more. Each aperture comes with a different intensity level of the effect. Let’s say you’ve selected the Linear mode, then you can rotate the marker to apply the effect horizontally, vertically, diagonally, or for any other angle you want.
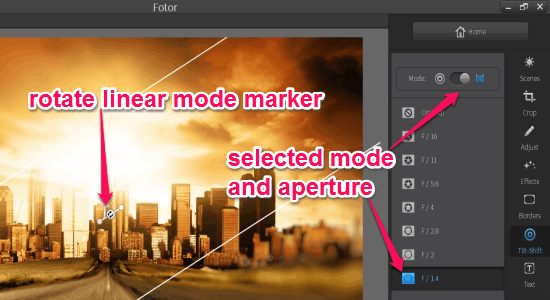
Step 4: If you want to move the marker, then simply click and press inside it and drag it across the photos. You can also click the border line of the marker to increase the open area without blur. In the same manner, you can move the marker while in Radial mode and increase the open area by dragging the border line of the circle. The area between the border lines will be the focused part of the photo and all the other parts will be blurred.
If you would like to know more about Fotor desktop client, then read the article here.
Add Tilt-Shift Effect to Images using PhotoScape:
PhotoScape is another free photo editor which lets you easily edit photos like a PRO. It offers dozens of tools like the editor, viewer, batch editor, page creator, combine photos, animated GIF, raw converter, color picker, screen capture, and more. The editor tool comes with an amazing feature to add the tilt-shift effect to your photos. The catch is that it only adds a horizontal (linear) tilt-shift effect to the photo. However, if you want to add the effect in a radial or circular area, then you can use another feature called “Region (Out of Focus)”.
Follow the steps below to add the tilt-shift effect to your photos.
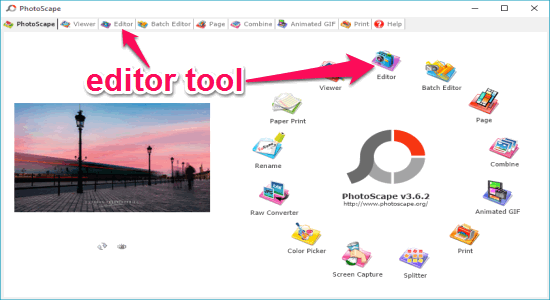
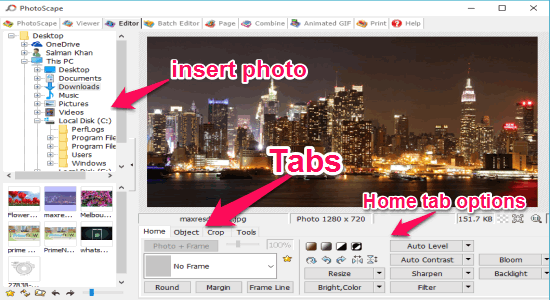
Step 1: After installing this software, simply open it and you will see various tools on the main window. To get started with editing photos, select the “Editor” tab at the top or click the editor tool as shown below.
Step 2: After that, the editor will open up with 4 different tabs at the bottom named, Home, Object, Crop, and Tools. You can insert a photo, by browsing the folders on the left of the screen. On the Home tab, you will see various options like resize, bright/color, auto level, auto contrast, sharpen, filter, and more.
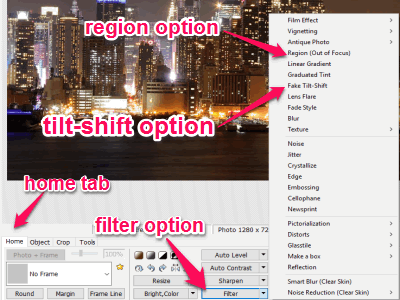
Step 3: To add the tilt-shift effect on the selected photo, click the “Filter” button on the Home tab and select the option “Fake Tilt-Shift” from the list. It only applies a linear line tilt-shift effect to the photo. If you want to focus any specific circular part of the photo, then I would recommend you to use the “Region (Out of Focus” option.
Step 4: As soon as you do that, a new window will appear with 3 different modes, option to adjust blur and contrast, and the preview of the applied (horizontal) tilt-shift effect. You can simply drag your mouse cursor to any part of the photo where you want to add the effect. The other parts of the photo will get blurred automatically.
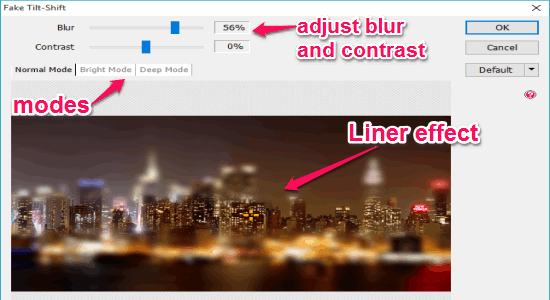
Step 5: The “Normal Mode” keeps the blurred area normal whereas the “Bright & Deep” modes can be used to brighten up or dim the blurred area. You can also adjust blur and contrast to change the intensity of the tilt-shift effect. Once you’re done click “OK” and save the photo to your PC with the applied effect.
Read the full review of PhotoScape from here.
How to Apply Tilt-Shift Effect to Photos with Easy Photo Effects:
Easy Photo Effects is one of the simplest photo editing software to apply various effects to your photos in no time. It offers effects like sepia, topaza, movie, analogica, embossed, tilt-shift, night vision, and more which can be applied to photos with just a click. Let me tell you how to use this software and apply tilt-shift effect to photos.
Step 1: Download this portable software and start using it instantly as no installation is required. The user interface is super clean and intuitive. When you open it for the first time, you will see a blank canvas with all the supported effects, along with settings at the top.

Step 2: To import a photo, click the “Open Image” button at the top corner and select the image for editing. You can adjust the focus point and the open area from the settings. Click the “Settings” button associated with the “tilt-Shift” button. A popup will appear where you can drag the pointer to adjust the focus point and open area.
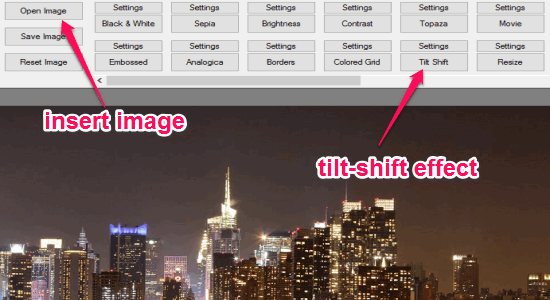
Step 3: After that, simply click the “Tilt-Shift” button at the top to apply the tilt-shift effect into the photo, as simple as that. The effect will be applied according to the focus point and open area you’ve set in the settings. You can keep clicking the “Tilt-Shift” button to increase the intensity of the effect. It also lets you undo changes using the “Undo” button.
You may also like to read the full review of Easy Photo Effects.
Apply Tilt-Shift Effect to Photos using TiltShiftEasy:
If you’re looking for photo editors which only lets you apply tilt-shift effect to your photos, then “TiltShiftEasy” is probably the best option for you. It is a simple software with the main purpose of adding the tilt-shift effect to photos. Using this software, you can add the effect in horizontal, vertical, and even radial mode. It also lets you adjust the background blur, (horizontal/vertical/radial) position, range, etc.
Simply go through the following steps to apply tilt-shift effect to your photos.
Step 1: After opening the software, click the “Load Image” button to import an image for adding the effect. Then you’ll see marker lines on the photo indicating the area where the effect will be added. If you want to hide the marker, then click the “Hide Markers” button at the bottom.

Step 2: At the right of the screen, you will see various options to change modes and adjust entities like background blur, position, range, angle, colorize image, and foreground bloom for the selected mode. It offers 3 different modes named, Horizontal, Vertical, and Radial. That means you can apply the tilt-shift effect either horizontally, vertically, and even radially (circular area).
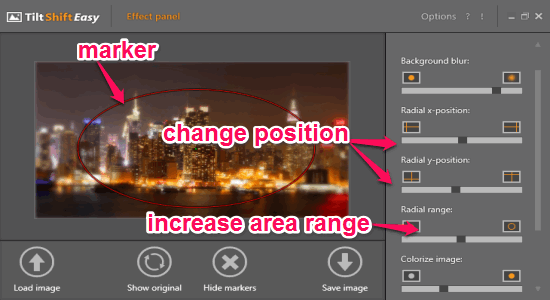
Step 3: To select any specific area where you want to keep the focus and blur the remaining parts of the photo, you can use the position and range options. Let’s say you’ve selected the radial mode, then use the radial x & y position on the right to adjust the marker on the required area of the image. If you simply want to increase the area where the effect will be applied, then you can adjust the range to do so.
Step 4: You can use the background blur option to increase and decrease the effect intensity. It also lets you change the contrast using the “Colorize Image” option and brighten up the focused area with the “Foreground Bloom” option.
Use Fhotoroom to Add Tilt-Shift Effect to Photos:
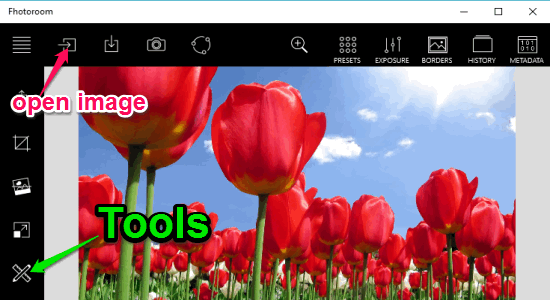
Fhotoroom is actually a free Windows 10 app which also lets you apply tilt-shift effect to your photos. It also offers some useful free tools like filter brush, denoise, and more. Similar to the other software, you can use it to apply the tilt-shift effect to any specific part of your photo. But, one of the unique features of this app is that apart from blurring out the remaining photo parts, you can also apply vignette, white point, black point, and change the RGB of the area.
Let us see how this Windows 10 app can be used to add the tilt-shift effect to photos.
Step 1: After installing this app from the Windows Store, simply open it and use the “Open Image” icon at the top to import a photo. After that, click the “Tools” button on the left as shown below. You will see various tools like filter brush, tilt-shift, HDR, tiny planets, denoise, and more. Select the “Tilt-Shift” tool to proceed.
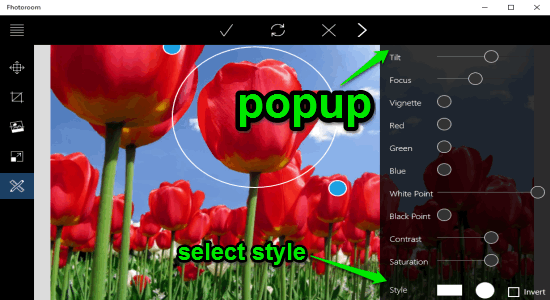
Step 2: As soon as you select the tool, a transparent popup window will appear on the right with options like tilt, focus, vignette, contrast, saturation, white point, black point, etc. You will also see a style option to select the effect style either as Radial or Linear as shown below.
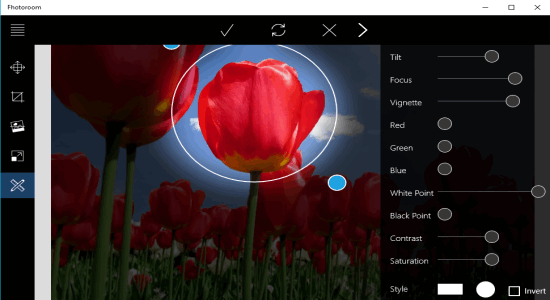
Step 3: You can select any of the styles and use the blue icons on the border line to resize the marker. To reposition the marker, you can click and drag it across the photo. When you’re done with positioning the marker, simply adjust the focus option to control the feather (fade) of the focused area. If you want to change the intensity of the blurred parts, then drag the slider of tilt option on the right.
Step 4: As mentioned, apart from blurring out the remaining parts, you can also apply stunning effects like vignette, white point, black point, and also control the contrast, saturation, and RGB of the area. To make it clear for you, I have applied the tilt-effect to a photo and used vignette instead of blur in the following screenshot.
You may also like 5 Best Image Editor Software For Windows 10.
My Final Verdict:
In this post, I have listed some of the best software which lets you apply the tilt-shift effect to your photos. You can simply import a photo from your PC and apply the tilt-shift effect to it with ease. If you don’t own a DSLR camera, then try these software to apply the tilt-shift effect to your photos instead of using the “Aperture” mode of a camera. Personally, I like “Fotor” as it comes with an intuitive interface and lets you apply the effect to any angle of the photo.
Let me know which software you found better in the comment box below.