This tutorial explains how to have only one processor core active at startup in Windows 10. Modern day Operating Systems are immensely powerful and can run a ton of varied applications, at the same time. In addition to that, they can also make efficient use of the equally impressive hardware at their disposal. In fact, one of the primary reasons that ultra powerful hardware devices (e.g. multi-core processors) exist is because the software (i.e. the OS) can utilize them to their maximum potential. And the best part is that they can take care of most of the complex tasks completely on their own, so that the end user can actually focus on productivity, without having to spend time tweaking a hundred different settings. But a little tweaking never hurt anyone, right?
In one of my recent write-ups, I explained how you can specify the processor core on which a program can run in Windows 10. But doing this for every running process can be a little cumbersome, don’t you think?
Not anymore, as Windows 10 makes it possible to have only a single processor core active while starting up. Sounds interesting, doesn’t it? Jump over to the flip side of the break to find out how you can have only one processor core active at startup in Windows 10.

How To Have Only One Processor Core Active At Startup In Windows 10?
Tweaking Windows 10 so that it starts up with only processor active is easier than you think, and takes nothing more than a few seconds. Here’s the customary step by step tutorial, explaining how to get things rolling:
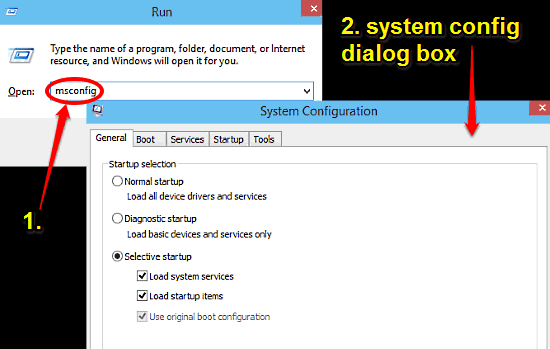
Step 1: Open up the Run prompt (with administrator level privileges), type in msconfig, and hit Enter to launch the Windows System Configuration utility. Once there, click the Boot tab.

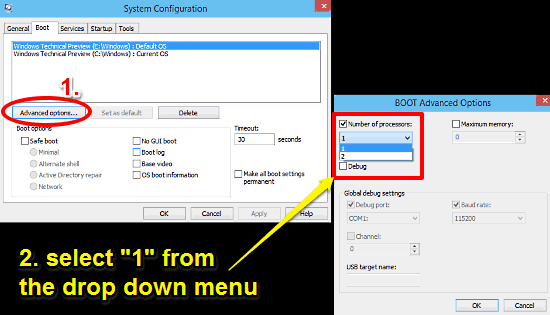
Step 2: The Boot tab lets you tweak pretty much every aspect of the system boot-up behavior. Click on the Advanced options button, and the BOOT Advanced Options dialog box will come up. Enable the Number of processors option, and using the now available drop-down menu, select 1 from the options presented. Here’s a screenshot:

That’s it people. Going forward, Windows 10 will always use one processor core, every time it boots up. To revert to the original setting and have the OS use both the cores, either select 2, or uncheck the Number of processors option (the default setting). Pretty simple, right?
See Also: Enable USB Selective Suspend In Windows 10
Closing Thoughts
Windows 10 is an extremely powerful and capable Operating System, and as such, it can handle all the intricacies of process management, processor allocation, and things like that on its own. However, there might be times when you want the OS to only utilize a single processor core at a time (Say, for troubleshooting purposes). And thanks to the simple process outlined above, you know that’s not going to be a problem, at all. Take it for a spin, and let your voice be heard in the comments section.