This tutorial explains how to enable USB selective suspend in Windows 10. In a number of recent Windows 10 based articles, I’ve talked about the impressive arsenal of features that Microsoft’s newest Operating System boasts of, which take care of everything from resource allocation to power management. Windows 10 lets you create custom power plans, specify the idle time for triggering sleep mode, and stuff like that. Heck, you can even have the computer automatically turn off certain hardware devices to conserve power. Seems like Windows 10 focuses a lot of attention towards saving power, right?
Indeed it does, and probably that’s why its list of power saving features isn’t over yet. Enter USB selective suspend, that makes it possible to conserve even more power. I see that you’re already getting impatient to know more, so let’s cut to the chase, and find out more about USB selective suspend, and how you can enable USB selective suspend in Windows 10.

What Is USB Selective Suspend?
USB selective suspend is a nifty power-saving feature of Windows 10, that has been present in previous major versions of Windows as well. As the name suggests, USB selective suspend allows the USB hub (the central hardware-driver combo responsible for managing all the USB ports of a computer) to suspend (or disable) a particular USB port, without affecting other USB ports. Quite naturally, this also suspends the operation of any device(s) that might be connected to the disabled USB port. This certainly helps in power consumption, especially in case of USB devices that don’t need power on a continuous basis.
How To Enable USB Selective Suspend In Windows 10?
USB selective suspend can be individually enabled for any of the power plans that you have on your computer. Here’s a detailed tutorial, explaining how to get things working:
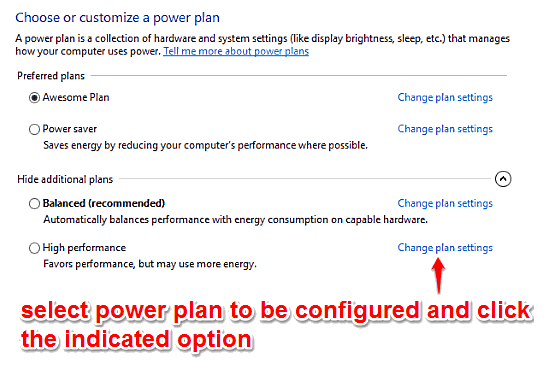
Step 1: Navigate to the Power Options via the Windows Control Panel to access the different power plans active on the PC. Select the power plan for which you want to enable USB selective suspend, and click the Change plan settings link against it.

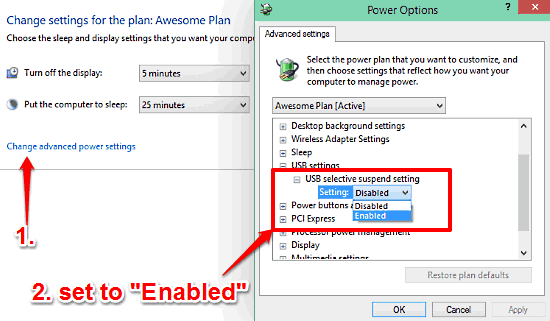
Step 2: On the next screen, click on Change advanced power settings option, and the advanced Power Options configuration dialog box should pop-up. Here, you can see a detailed listing of all the power management settings available. Go to USB settings > USB selective suspend setting and set it to Enabled. When done, click Apply > OK. Here’s a screengrab:

That’s all you have to do. Going forward, Windows 10 will automatically take care of temporarily suspending inactive USB ports, without affecting the operation of other USB ports. You can use the same method to configure USB selective suspend for all the other power plans as well.
See Also: Selectively Enable Or Disable Features In Windows 10
Wrap Up
USB selective suspend is an extremely important power saving feature, that helps you make your PC a bit more energy efficient. It is especially helpful for notebook computers, which have battery based limited power supply. Try it out, you’ll be glad you did.