This tutorial demonstrates how to add annotation to video in Windows Movie Maker. By default, there is no native option in Windows Movie Maker which to annotate videos. But today, I have found a simple method using which you can easily annotate videos in Windows Movie Maker. This can actually be achieved using the built-in “Caption” feature and some symbolic text fonts like Wingdings, Symbol Signs, etc. The best part about this method is that you can add different annotation symbols to individual frames of the video.
The “Caption” feature allows you to add text to the video frames. So, instead of normal text font, you can use these symbolic fonts to add bold arrows, thin arrows, curved arrows, hand symbols, and many other shapes like a circle, square, rectangle, etc. to your videos. Doing so, you will be able to highlight or point to any specific area or content of the video. Although, this is not a typical annotation procedure, but it can still help you annotate videos.
The below video shows some simple annotations which I have made with Windows Movie Maker.
Not only Windows Movie Maker lacks the annotation feature, but some of the advanced video editors (like HitFilm Express) also don’t allow you to annotate videos. However, there is also a simple trick which can help you add annotation to video in HitFilm Express.
How to Add Annotation to Video in Windows Movie Maker:
Before you get started, make sure you have the symbolic text fonts like “Wingdings” or “Symbol Signs” installed on your PC. The Wingdings font is normally pre-installed in Windows, so you don’t need to re-install it.
Now, let me walk you through the steps required to add annotation to video in Windows Movie Maker.
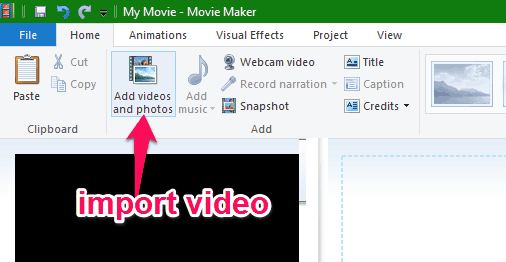
Step 1: First, open up Window Movie Maker and then click on the “Add Videos and Photos” button under the “Home” tab. After that, you can simply import the video from your PC to which you want to add annotation. It supports almost all the standard video file formats like AVI, MP4, WMV, MPEG, and so on.
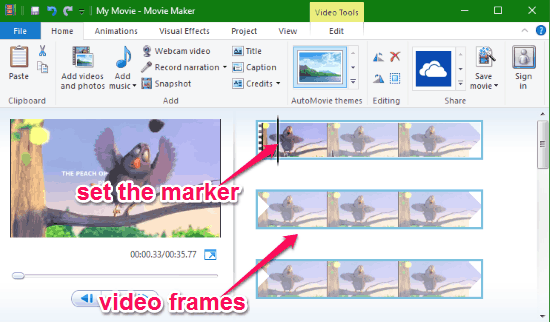
Step 2: When you’re done importing a video, you will be able to see all the frames of the video on the right panel. Now, what you need to do is drag and set the marker on the starting point of the video where you want to add the annotation.
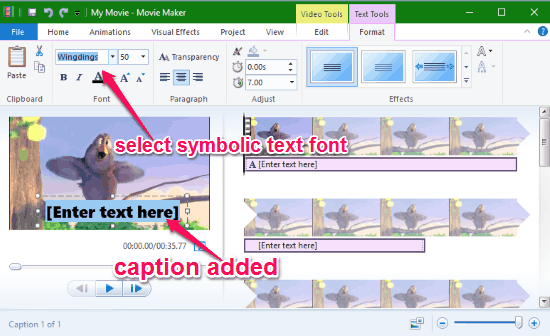
Step 3: Once you have set the marker, go to the “Home” tab and then click on the “Caption” button. This will add a text box on the video where you have set the marker. After that, you have to click on the font drop-down menu and then select the symbolic text font among Wingdings and Symbol Signs. As an example, I will use the “Wingdings” font for annotating my video.
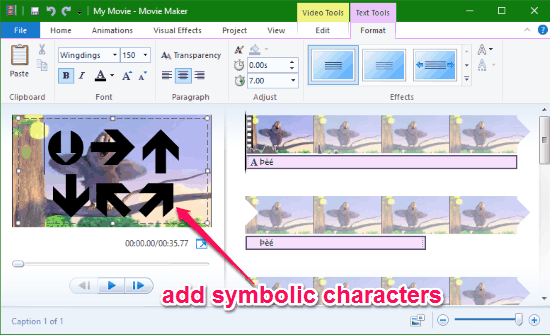
Step 4: Suppose, you have also selected the “Wingdings” font for annotating your video in Windows Movie Maker. Then after selecting the symbolic font, you can go ahead and use the character map of the font to add arrows, hand symbols, shapes, etc. For example, if you want to add a simple arrow to the video then all you got to do is hold down the “Alt” key and then use your num pad to enter the map key of the arrow. For Wingdings, the map key of a normal arrow is “224”. For other symbolic fonts, the map keys for adding characters are not the same. To know all the map keys for both the symbolic fonts which I have mentioned in this post, simply browse the links below:
Step 5: As soon as you’re done adding an annotation to the video, you can set the time duration of the annotation for how long it will be visible on the video. To do this, you can click on the “Text Time” option under the “Adjust” section at the top. Whatever time you set, the annotation will be visible on the video for that duration only.
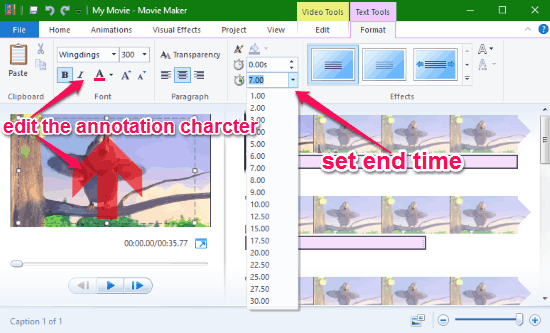
Apart from that, you can also change the size of the added character, move it to any area on the video, change it to bold/italic, change color of the character, adjust the overlay opacity, and more. You can even add animated transitions to the added annotations. Whatever caption you add to the video will overlay during playback for the time interval assigned by you.
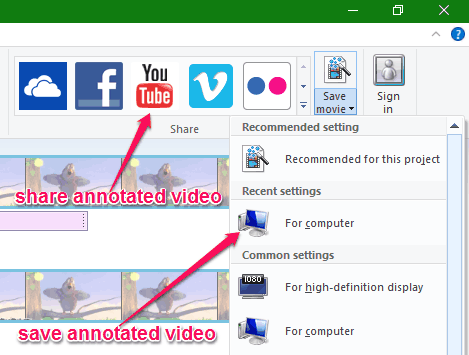
Step 6: When you’re done annotating videos using this method, you can simply go to the Home tab and then click on the “Save Movie” option to export the resulting video. You can also directly share the annotated video via Facebook, YouTube, Vimeo, etc.
Closing Words:
So, if you have been looking for a way to add annotation to video in Windows Movie Maker, then the method explained in this post will be the best option for you to do that. After following the above steps, I was able to easily add annotation items like arrows, hand symbols, shapes, and more to my video. All you need is a symbolic text font (Wingdings or Symbol Signs recommended), and you can start annotating videos in Windows Movie Maker right away.
I hope you find this tutorial useful.