This tutorial is all about how to auto sync Android folders with Google Drive. After going through this tutorial, you will be able to sync all the folders on Android phone storage with your Google Drive account automatically.
Nowadays, all the Android phones come with built-in Google Drive app using which you can upload files from your phone storage to Google Drive with ease. However, it doesn’t have any option to automatically sync or upload files from phone storage. That means whenever you want to upload some files to Google Drive, you have to do it manually. So today, I will tell you a method which can help you auto sync Android folders to Google Drive, which means you don’t have to manually upload local folders to Google Drive anymore.
Actually, there is a free Android app called “Autosync Google Drive” which helps you create a folder pair between a local Android folder and a remote folder in Google Drive. Doing so, it connects both the local and remote folder in order to keep the files inside the local folder on Android auto synced with Google Drive.
If you prefer OneDrive over Google Drive for auto-syncing your Android folders, then you can check out our post on how to auto sync local folders with OneDrive on Android.
How to Auto Sync Android Folders with Google Drive:
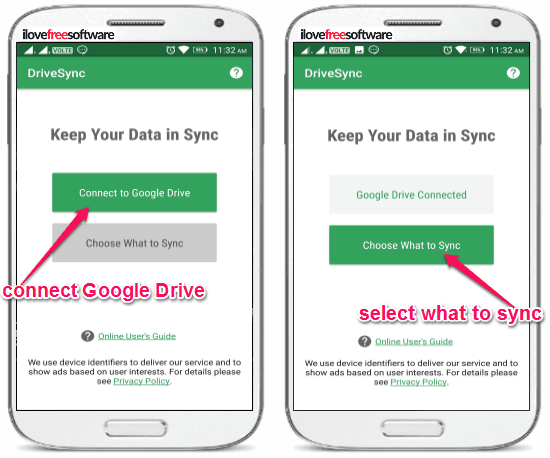
Step 1: To get started, simply install and open the “AutoSync Google Drive” app on your Android phone. After that, you need to tap on the “Connect Google Drive” button on the main screen and then connect your Google Drive account. When you do that, simply tap on the “Choose What to Sync” button to proceed to the next step.
Step 2: In this step, you have to create a folder pair by connecting any of the local Android folder and a remote folder in Google Drive. To create a folder pair, simply click on the “Create my own folder pair” option. Once you do that, it will prompt you to select a local folder on your phone storage and then a destination folder in Google Drive.
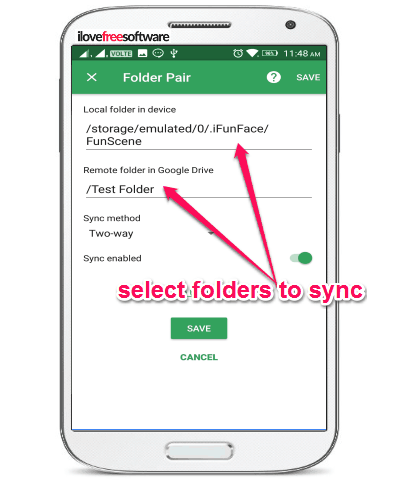
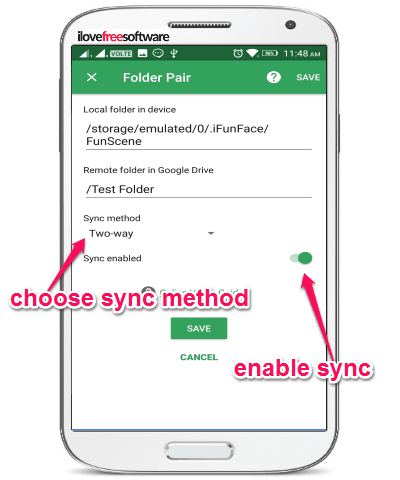
Step 3: When you have selected a local Android folder and a remote folder in Google Drive, simply tap on the “Sync Method” drop-down menu and select the “Two-Way” option. After that, you need to enable the “Sync Enabled” option at the bottom. Now, you can go ahead and save the folder pair.
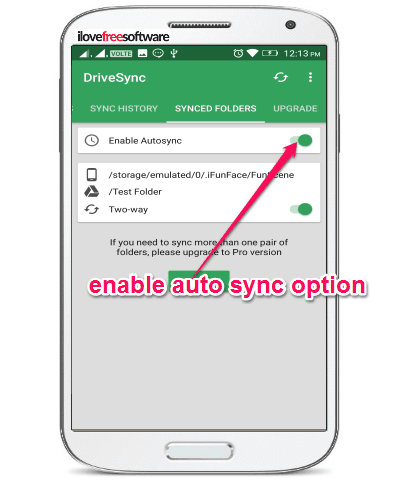
Step 4: After saving the folder pair, this app will start syncing the selected Android folder with your Google Drive remote folder. Now, to automate the syncing of the folder pair simply go to the “Synced Folders” tab and then toggle ON the slider button on the right of the “Enable Autosync” option.
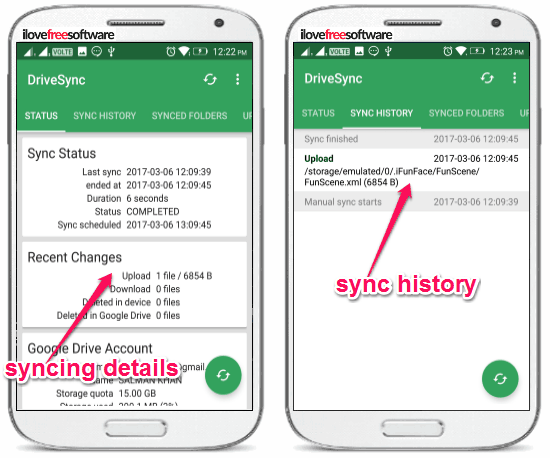
As soon as you do that, the source folder on your phone storage and the destination folder in Google Drive will be kept in sync with each other. That means whatever you do in the local Android folder (like add files, delete files, etc.) will be synced automatically with the remote folder, and vice versa. All the auto syncing details will be visible under the “Status” tab such as the total number of files uploaded, the last syncing date, the last syncing time, etc. To know which files on the local folder are synced with the remote folder in Google Drive, you can check out the sync history.
Closing Words:
The “Autosync Google Drive” app for Android is a very useful app which makes syncing Android folders with Google Drive a cakewalk. No more spending hours on uploading files manually from phone storage to Google Drive, as this app simply lets you create a folder pair to keep the local Android folder auto sync with the remote folder in Google Drive. I hope you find this tutorial useful.