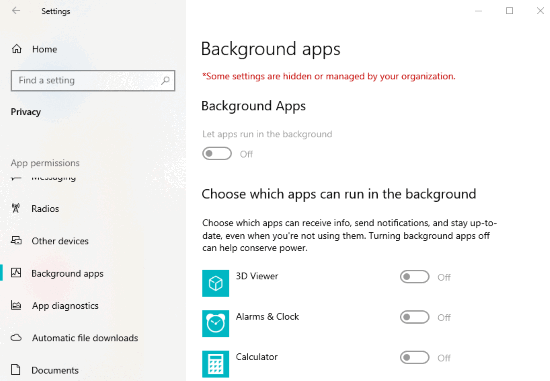
This article covers how to permanently disable Windows 10 apps from running in the background. The settings app in Windows 10 comes with the feature to see the list of background apps as well as turn off background apps (all or individual apps). If you want to permanently disable those apps from running in the background, then the two tricks covered on this article will be very helpful to you. Once you’ve used any of these tricks, then option to let the background apps run in the background in Settings app will remain inactive and no one can activate that button. Don’t worry, you can change the settings anytime you want.
To permanently disable Windows 10 apps from running in the background, I am going to use Local Group Policy and Registry Editor. Both of these tricks or options are natively supported in Windows 10. While Local Group Policy comes with Pro, Education, and Enterprise editions, Registry Editor is supported in all editions of Windows 10. Based on the Windows 10 edition you’re using, you can go with Local Group Policy or Registry Editor.

Let’s check these options.
Option 1: How to Permanently Disable Windows 10 Apps from Running in The Background with The Help of Local Group Policy
Step 1: You need to launch this group policy window using the search box. By typing gpedit.msc and using Enter key will open that window.
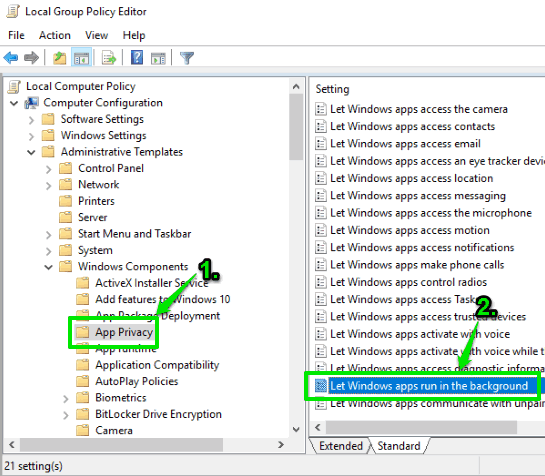
Step 2: Jump to App Privacy folder in that window. The path for that folder is here:Computer Configuration → then double-click on Administrative Templates → do the same for Windows Components folder → and App Privacy folder will be there. Select that folder and on the right-hand side, double-click the “Let Windows apps run in the background” option.

Step 3: A big window is opened. Use the Enabled option, select “Force deny” from the drop-down menu, then save the settings.

You might need to restart the Windows File Explorer to see the changes.
To enable the option to let apps run in the background again, just repeat the steps added above, and set the Not Configured in step number 3.
Option 2: Permanently Disable Windows 10 Apps from Running in The Background with The Help of Registry
Registry Editor method is also very easy to apply.
Step 1: Open Regedit (or Registry Editor) by typing registry editor in the search box and then using the Enter.
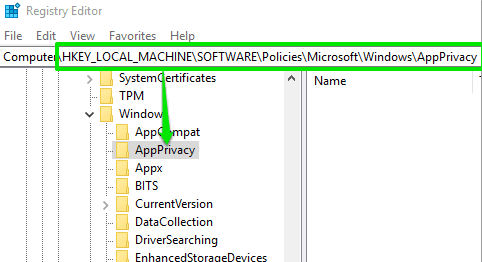
Step 2: Jump to AppPrivacy key in Registry Editor. This is the path to access that key: HKEY_LOCAL_MACHINE → then expand SOFTWARE → continue the path and expand Policies → expand Microsoft key → Windows → and you will get AppPrivacy

If AppPrivacy key is not there, then you can create it using right-click menu in Windows key.
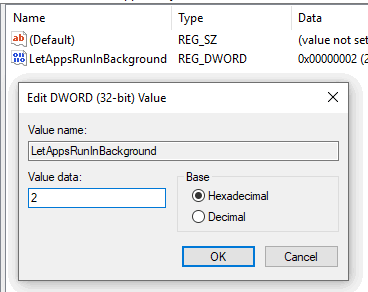
Step 3: Create a DWORD value under the AppPrivacy key on the right-hand side and name it “LetAppsRunInBackground“. The screenshot below will help you in that.

Step 4: This is the final step where you need to set the value data of the DWORD value that you created. Open the Value Data box by double-clicking that DWORD and add “2” in value data.

You have disabled apps from running in the background.
To allow the apps again, simply delete AppPrivacy key.
The Conclusion:
So, this is how you can permanently disable Windows 10 apps from running in the background. I prefer the Registry Editor method because I like to tweak Windows Registry. Still, I must say both the options are pretty easy to use.