This tutorial covers how to enable or disable numeric sorting in Windows 10 File Explorer. By default, numeric sorting remains turned on in Windows 10. Therefore, when you have files with numbers like 1, 3, 22, 7, 56, 111, 57, etc., then files are sorted as 1, 3, 7, 22, 56, 57, 111, etc. But, when you disable numeric sorting, then files are sorted as 1, 111, 22, 3, 56, 57, 7, etc. It is sorted by digit and not by numbers.
To enable or disable numeric sorting in your Windows 10 PC, there are two built-in options present. These are: GPO (or Group Policy Editor) and Regedit (Registry Editor). Both the options are pretty easy to use. Still, you should create a system restore point or take system backup, just in case.
In the screenshot below, you can see that numerical sorting is disabled and files are arranged in that manner.

Now you can see the screenshot added below. As you can see, the files are sorted based on the digits. So, if some file is numbered as ‘111’ and another file is numbered as ’22’, then file with number ‘111’ is added first, and not the file with the number ’22’.

Method 1: Enable or Disable Numerical Sorting in Windows 10 File Explorer Using Group Policy
This method is useful for Windows 10 Pro users because GPO is not present in Home edition of Windows 10. Though GPO can be installed manually in Home editions, such an option might not be available there.
Step 1: Use Run Command (hotkey is Windows logo key + r), type ‘gpedit.msc‘, and then use Enter key or OK button. This will open the GPO window.

Step 2: In the Group Policy window, expand the Computer Configuration → Administrative Templates → Windows Components → and File Explorer folder.
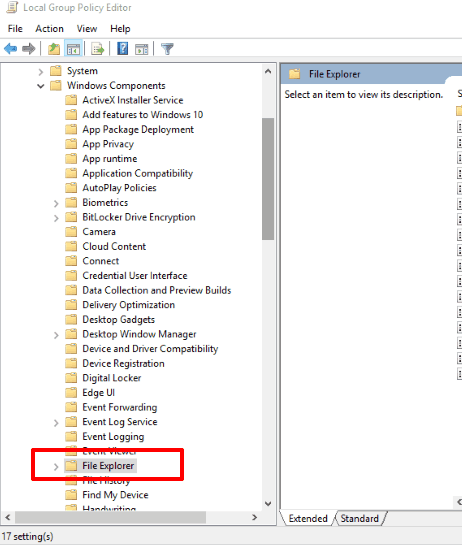
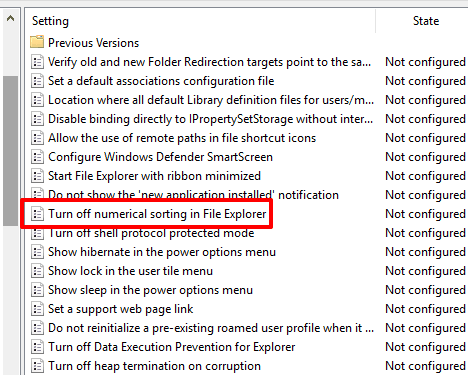
Step 3: On the right side of File Explorer folder, a “Turn off numerical sorting in File Explorer” option is present. Double click on that option.
Step 4: When a new window is opened, you need to use the Enabled option and then save this change.
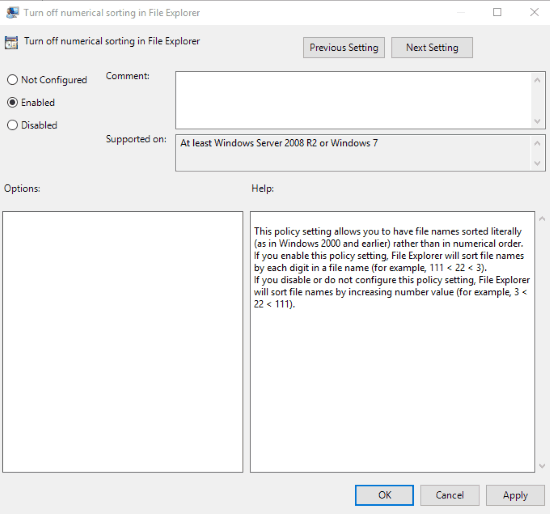
Now you might need to restart your PC or the File Explorer. After that, numerical sorting will be disabled.
To turn on numerical sorting again, simply use the Not Configured option in step 4 and save your applied change.
Method 2: Enable or Disable Numeric Sorting in Windows 10 File Explorer Using Registry Editor
Whether you’re a Home or Pro edition user of Windows 10, this method is available in both the editions.
Step 1: Use Run Command (the same Windows logo key + r hotkey), type ‘regedit‘, and then use OK button or Enter key.

Step 2: When Regedit is opened, you need to click on the Explorer key. This key is present under the main key which is HKEY_LOCAL_MACHINE. The path for that Explorer key is: HKEY_LOCAL_MACHINE → SOFTWARE → Microsoft → Windows → CurrentVersion → Policies → Explorer.
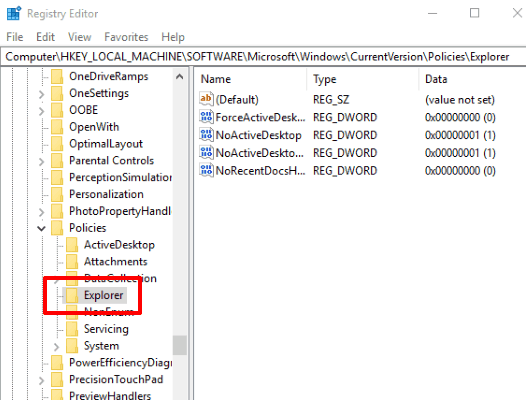
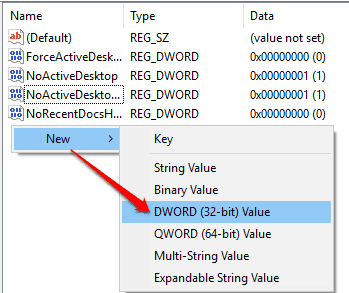
Step 3: On the empty area, do a right-click, then access New option, and click on DWORD (32-bit) Value option. When DWORD value is created, rename it to “NoStrCmpLogical“.
Step 4: Open NoStrCmpLogical value using double-click. When a small window is opened, add ‘1‘ in the value data field, and save it.
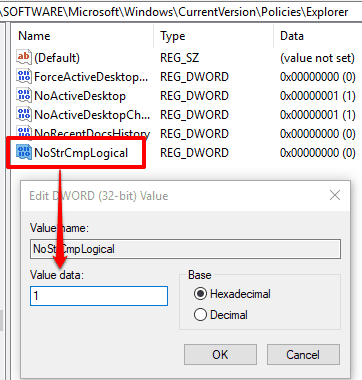
The changes should be applied immediately. If not, restart the PC or File Explorer.
To enable numerical sorting again, you can set ‘0’ as value data and save it.
The Conclusion:
Numerical sorting is good and most of the users are happy to have it enabled by default. But, there might be cases when some users want to disable numeric sorting in Windows 10 File Explorer. For such cases, these two effective methods are handy. For me, method 2 is good because I like tweaking Windows 10 registry.