This tutorial aims to explain how to host WordPress website on Netlify. Here I will talk about two different methods to host a WordPress site on Netlify with step by step guide. If you have a local or hosted WordPress site and you want to host it on Netlify then you can do that and for free. Basically, here I will tell you how you can convert your existing WordPress site to a static site so that you can host it with all of its content on hosting provider like Netlify which even has an amazing free plan. This option is very good for developers, programmers, and writers to run a blog which is fast, mobile friendly and easy to maintain than WordPress.
In terms of performance and accessibility, static sites are ahead of dynamic sites and there is no doubt. For stability and speed, a lot of people are migrating their sites and there are some CMSs are being released that use static site approach. If you are in web development like field then you must have heard about static site generators such as Jekyll, Gatsby, Hugo, etc., and some of these I will use here to explain the whole process of hosting a WordPress site by converting it to a static site.
To host the static site, I have chosen Netlify due to a lot of reasons which I will list later. In the following post, I have listed two different methods and you can use them based on your understanding of technical aspects of web development. If you have never touched programming before then don’t worry because one of the methods in below post uses a local CMS where you have to configure the site using an intuitive and interactive user graphical user interface. Before diving deep in this topic, lets see what are the advantages of hosting WordPress on Netlify.
Why Convert WordPress Site to Static and host on Netlify?
WordPress is one of the best content management system out there right now. But its major disadvantage is that it is overkill. If you are not using most of the features of WordPress then it is not probably for you. Because you have to pay for the hosting as it depends on MySQL and PHP, you have to pay for SSL and you have to frequently maintain it by keeping it up to date, keeping plug-ins, themes updated, and there are other things that make handling it a pain. Also, most people don’t know much about HTML/CSS which is why it’s best to move to Netfly for these reasons.
- Decent Free Plan: Without paying any penny, you can get your website up and running by importing content from existing WordPress site. In the free plan, it permits 100GB of bandwidth per month.
- Free SSL: Netlify offers you free SSL donated by Let’s Encrypt. And the best part is that it is configured there by default. You just have to point name server of your domain to Netlify.
- Blazing Fast Speed: Because of the fact that they are currently allowing static site hosting, the speed of website is being served faster as compare to a dynamic WordPress site. Also, there not even 1 minute of downtime as I am keeping record of my own website using Pingdom.
- Custom Domain: By default, it assigns a random custom domain to your site. But if you already have a registered domain with you then you can use that here with minimal configuration.
- Git as a source to Serve Files: Netlify can create a site from a Git repository hosted on any Git service out there such as BitBucket, GitHub, etc. This removes the need of a VPS or a hosting provider.
- Build Hooks: After hosting a site on Netlify, you can configure build hooks. With the help of build hooks, you can trigger the build command on your site from a remote location.
These are the main advantages of using Netlify to migrate your WordPress. One other use case that I can think of this service is that here you can turn your WordPress site as staging site and use Netlify as the production site or vice versa. Of course there are some downsides of Netlify as well but as long as they don’t bother you, you are good to go. The main drawbacks of Netlify are unavailability of server-side scripts, database connections, and you can’t host a website for free that gets more visits such as shopping sites.
How to Host WordPress Website on Netlify Free?
Publii
The very first method to move your WordPress site to Netlify is through Publii. This is basically a free and open source static site builder that you can run on your desktop. It lets you create stylish websites right from desktop and then you can push that site to number of destinations including Netlify. And luckily, apart from creating site content from scratch, you can import that from WordPress through WordPress export file. Using this software on Windows, you fetch content from WordPress, customize the website themes and will eventually sync all site content to Netlify.
While using this software, you can customize a lot of parameters for the final site. You can choose a static site theme, preview site before publishing, customize author, permalinks, images, and thumbnails. To push site to Netlify, you will only need Netlify token which you can easily generate. After you have deployed the site to Netlify, you can easily create new posts and push changes in a few clicks. The step by step guide to convert WordPress to Netlify is below.
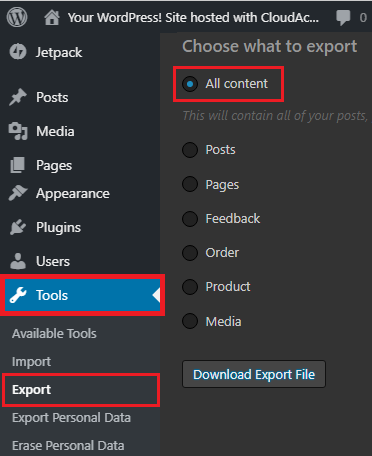
Step 1: The first step is to get the WordPress XML file with all posts content. To do it, log in to your WordPress site from the Tools section and choose “Export” option. Check “All content” option and then hit the “Download Export File”. It will give you an XML file that will be used.
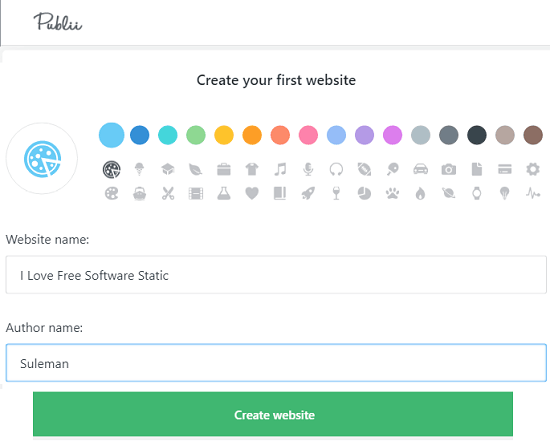
Step 2: Since, we are using this software to host WordPress to Netlify so just skip the getting started part. Specify your site and author name and save changes.
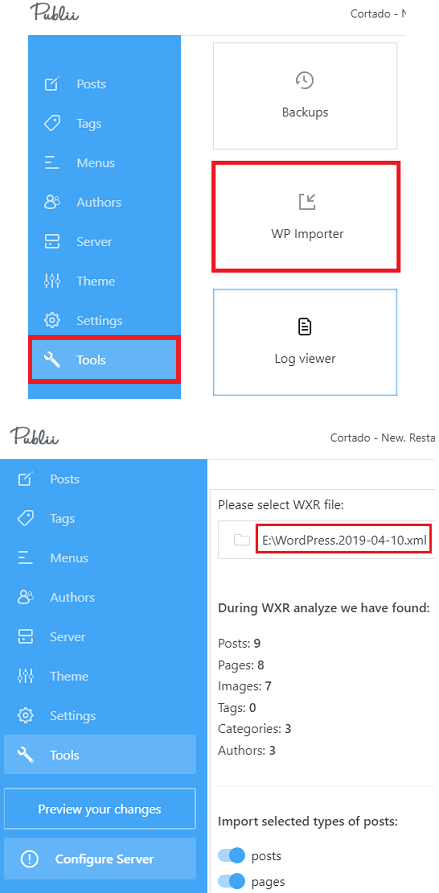
Step 3: Now, use the Tools section and there is a WordPress import (WP Importer). Use this and then specify the XML file that you downloaded earlier in Step 1. It will read the contents and will show that to you To import the data in CMS, hit the Import Data button. You will see, it will start converting posts and will download all the media and will create posts in the Posts section.
Step 4: Now, you have imported the content from WordPress, so all you have to do is specify the structure of the static site that will be hosted to Netlify. Using the settings section in this software. Select a theme for your website and specify header and footer settings if you want to. Integration for Disqus and Google Analytics can be configured there as well.
Step 5: Create a blank HTML file and pack it inside a ZIP file. Next, drag this ZIP file on the interface of Netlify and create a site from it. It will create a site with random name for you and you have to copy its URL. Also, you have to get the app ID as well.
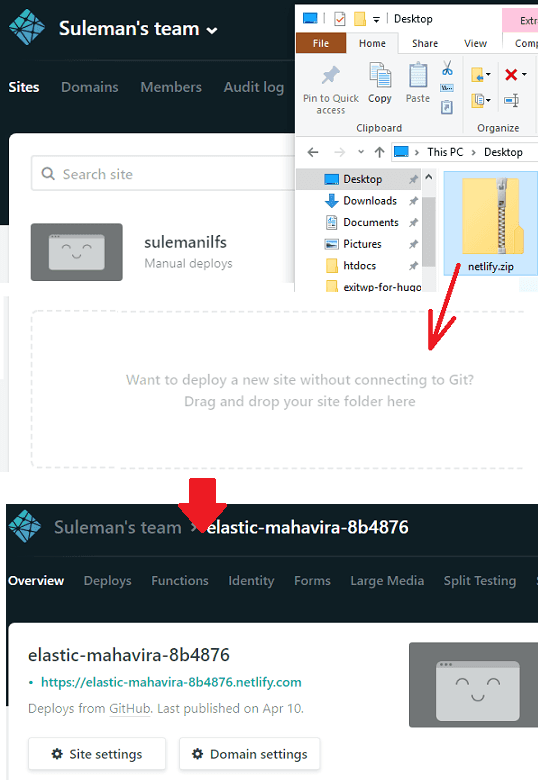
Step 6: Now in the settings of your Netlify, create an access token. Copy the token and then simply specify the URL of the Netlify website you created in last step, ID and token in Server section. And then simply save the settings and sync website files to the Netlify server. It will take some time depending on number of posts are there.

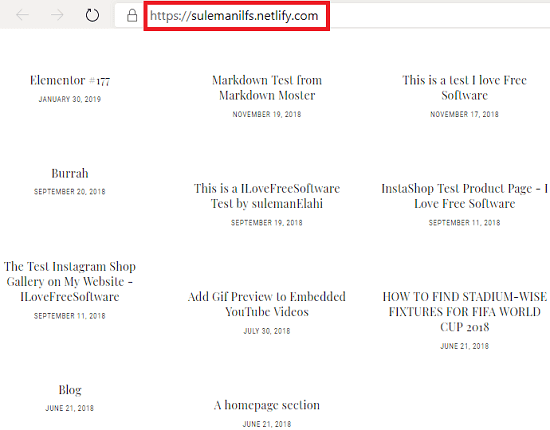
Step 7: After it has pushed all the posts, you can check your website. If after deploying, some things are not configured correctly then you can always customize the site from the desktop and push changes to the Netlify again. However, for WordPress you will have to export the post manually as there is no automatic option.
This way, you have to use this CMS to convert your WordPress site to a static site and then you can simply host it using Netlify. You can keep adding new posts in the CMS on desktop and then sync them with Netlify. The software is simple and powerful and the best part is that you don’t have to write any single line of code. Also, there is no explicit registration or sign up is there. The tool is cross-platform so you just get the Publii binary for your platform and start using it.
Migrate WordPress to Netlify using Hugo:
Hugo is one of the popular static site generators out there. This works with Node.js and you have to run a few commands to use this to generate a static site out of a given WordPress site and then host that to Netlify. Hugo is a simple and fast cross-platform tool which you can use to generate a static site. After generating a static site, we will have to save files somewhere online such as GitHub or BitBucket repository. So, to sue tisd tool, you will be required some knowledge of Git and some other basic stuff.
Since, Hugo is not like Publii that I have mentioned before so there are not many features in this to talk about. So, simply cut to the chase and lets see how to use it to generate a static site. To get started with Hugo, you will have to download it for your platform and then place it somewhere in PATH for universal access. I am using Windows so, I have saved “Hugo.exe” file in C:/Windows folder. Now, just follow these steps.
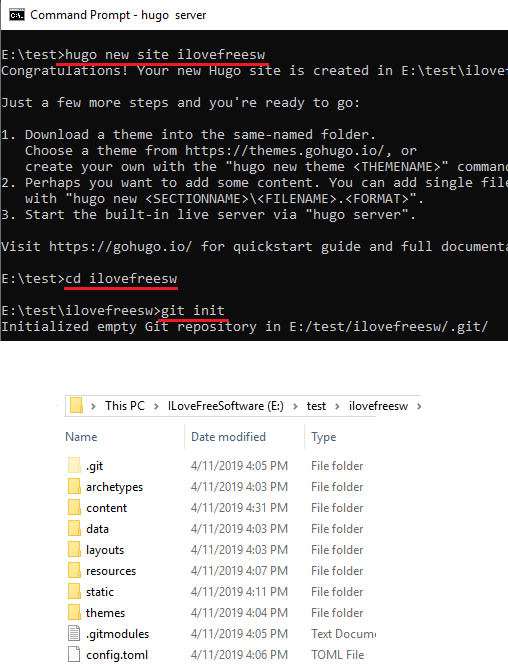
Step 1: Open command prompt and then create a hugo project, a site that will be uploaded to Netlify. Execute the commands one after another and then you will have a static site layout that we will use.
hugo new site ilovefreesw

cd ilovefreesw

git init
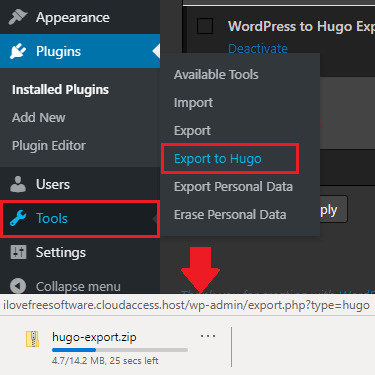
Step 2: Here we have to feed the WordPress content in the form of markdown. So, for that, you will have to use “WordPress to Hugo Exporter” plugin on your WP site. You can install this plugin form here and in just one click, download WordPress data in markdown using “Tools > Export to Hugo” option.
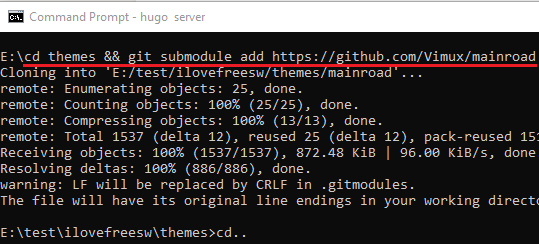
Step 3: Now, install a theme in the Hugo site you created. There are various themes are available at Hugo Themes and you can download and use any theme. Save the downloaded themes at your_site/themes folder. I like mainroad theme so I will install that using the following command in the site’s root. You can change the GitHub URL of the theme with the one you like.
cd themes && git submodule add https://github.com/Vimux/mainroad
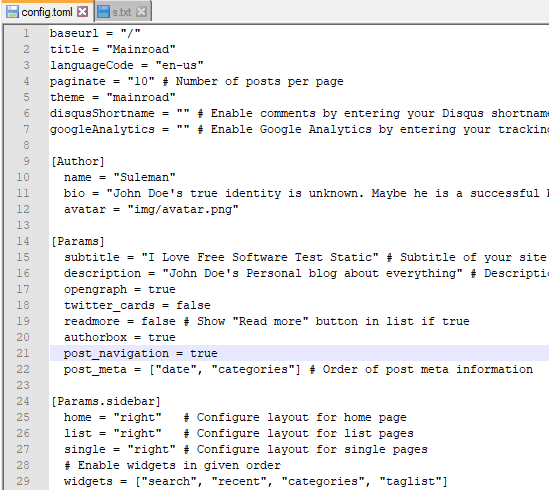
Step 4: Now, in the site root, there is a “config.toml” file that you have to edit. If its is not there then create one there. Copy all text and then paste this in that “config.toml” file. Next, customize certain parameters based on your site such as title, author, website title, subtitle, etc.
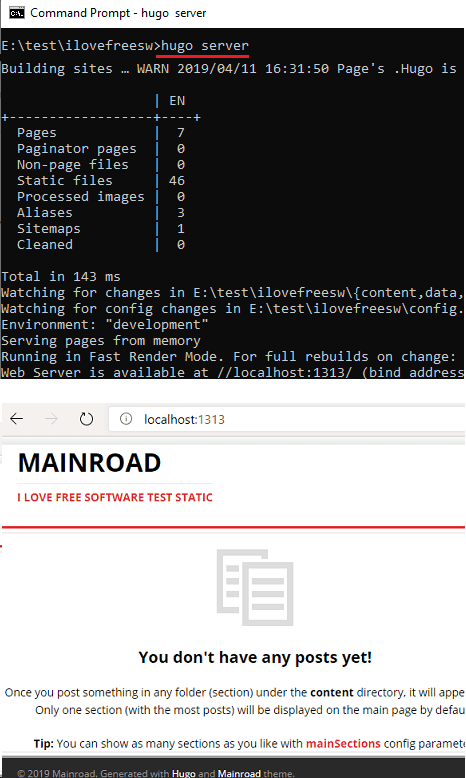
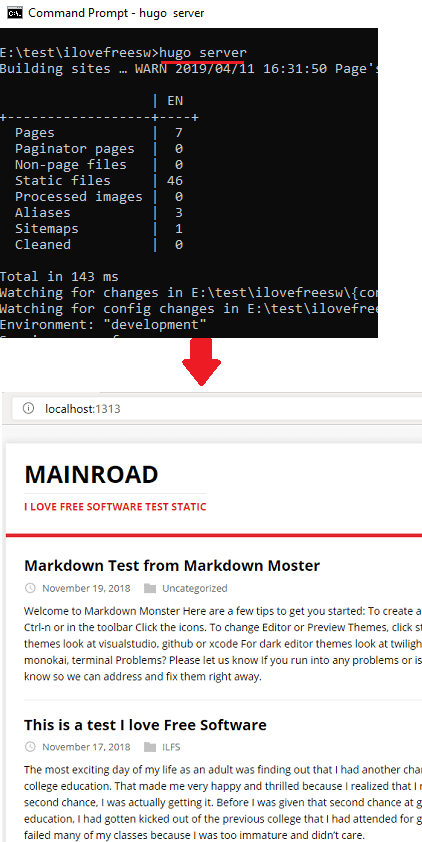
Step 5: At this moment, the static websites layout is ready and you can see its is looking right. Simply run the following command and go to “http://localhost:1313/” and see your site. Currently, there are no posts; only site structure and theme will be there. You can see screenshot below.
hugo server
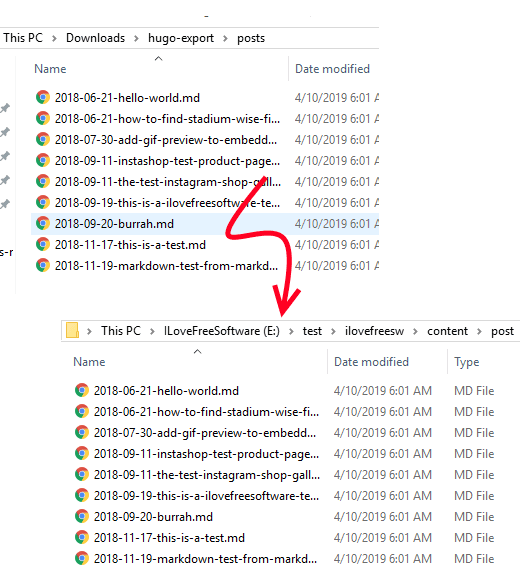
Step 6: Now, start adding content in the site from a target WordPress site. Use the ZIP file that you have already downloaded in step 2. Extract the ZIP file and copy all the markdown files from the Posts folder to your_site/content/post folder. Also, copy the “wp-contents” folder from Hugo export and then paste it in the your_site/static folder.
Step 7: You can now once again run the hugo server command see the output. Your posts will be there on the main interface of the site. You can see this screenshot.
Step 8: Now, you have created the static site from your existing WordPress site. It’s time to push it to Netlify. To do that, first you will have to put all the files in a GitHub repository. So, create a blank GitHub repository and then push changes by running these commands. At the end of this command, you will have a GitHub repository with site files.
git add .

git commit -m “text “

git remote add origin <GitHub Repository Link>

git push -u origin master
Step 9: Log in to Netlify and then create a site from Git. After that, simply select repository where you have pushed all the static site files. It will automatically detect the build command. Additionally, you only have to specify a environment variable to indicate the version of Hugo. You can see that below how to do that.

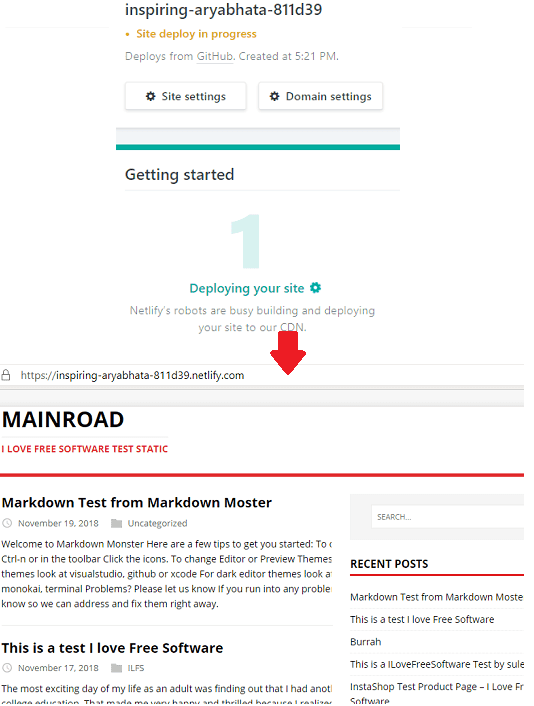
That is it. In this way, you can get your static WordPress site up and running on Netlify. You just have to run a above commands and follow the steps carefully. If you can get the static site running locally then there will be no problem in running and pushing the site on Netlify. By default, it will assign some random domain to your site. But you can change that. Or, if you have a registered domain then you can simply configure that in your site’s settings. To add new posts, simply create them locally in the site folder and push changes to GitHub. Netlify will automatically detect changes in the Git repository and will update the site content accordingly.
Wrap up…
If you are not using WordPress to its full potential then you probably shouldn’t use it. If you just want to run a small site or a blog then you can simply convert your site to static and above two methods explain that in more details. So, you can use the method that you think will be easy for you. If you have good technical knowledge then you can use any method but if you don’t want to get involve in CLI and other source code files then simply use Publii. Also, there are some other static generators out there such as Gatsby but I couldn’t find any working example of that on GitHub. If you are looking for ways to migrate your website from WordPress or want to convert existing site to static one then this post will help you.