Do you want to install some cool and visually appealing themes for Windows 10 to make your PC look stunning? Then you are reading the perfect article, as it shows how to download, install, and apply third-party custom themes to Windows 10 PC step-by-step.
As we all know, the themes that are supported directly by Microsoft don’t change the entire appearance (like title bar, scroll bar, Window buttons, folder icons, etc) of your PC. But there are tons of themes that allow us to change almost everything on our PC’s interface, like file Explorer, ribbon menu, title bar, scroll bar, window buttons, folder icons, and much more.
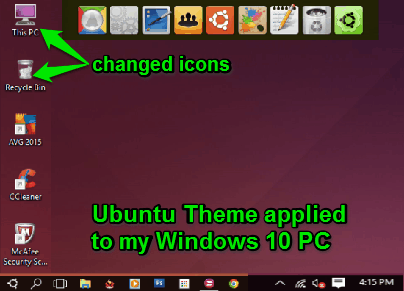
This tutorial shows the steps that you have to follow or what extra programs you have to install before installing and applying different custom themes to your PC. The following screenshot shows that I have applied “Ubuntu Theme” for Windows 10 on my PC.
Disclaimer: In the steps below, you will install some software that can effect the way Windows 10 works. So, do this at your own risk. If you end up messing up your PC, I am not liable for that ;)
How to Install and Apply Third-Party Custom Themes to your Windows 10 PC:
The whole procedure of installing additional programs for applying different custom themes includes only five simple steps:
Step 1: Download and install “UltraUXThemePatcher” from the link here. It works for Windows 10, Windows 8, and other older versions of Windows. It makes some changes and patch your system files allowing the installation of custom themes.
Step 2: Install new “Personalization Panel” for Windows 10 from the link here. Using this panel you can apply different themes to your PC. It exactly looks like the default “Personalization Panel” of Windows 10, making it easier to navigate.
Step 3: In order to make the third-party themes change the whole appearance of your file explorer, you have to install Ribbon/Title/Icon Remover (Metro UI Tweaker) from the link here. It allows the custom themes to change the ribbon menu, title bar, scroll bar, folder icons, etc. in your file explorer.
Step 4: After completing the above tasks, download any theme that you like and copy all files from the “Theme” folder to “%windir%\Resources\Themes\” folder. The easiest way to open the “%windir%\Resources\Themes\” folder is to press Window + R key and enter the above directory.
Now you can either apply any of your new themes from the “%windir%\Resources\Themes\” folder or from the new “Personalization Panel” that you have downloaded.
We have also reviewed Patch Windows And Allow Custom Themes To Install: UxStyle.
My Final Verdict:
In order to install custom themes to your Windows 10 PC, you need to install some additional programs that I have mentioned above in this post. The procedure might look quite messy or lengthy, but do not worry as I have described all the steps one-by-one for installing custom themes and applying them on your PC. Honestly, I love using third-party custom themes on my PC as it makes my PC’s interface look stunning and cool. Follow the above steps to install and apply custom themes with ease.