In this article, you will read about how you can create Whiteboard videos using Seesaw, online teaching web application.
During these times of Coronavirus virus pandemic, all the learning and work is being done from home. People across the world are teaching online, students are learning online and many of us are working from home using online services and collaboration tools.
For teachers, professors, school organizations, and students, there are various tools that are available on the internet that help them learning and online classes, such as Zoom, Microsoft Teams, etc. However, one web application is there that brings the learning structure online, Seesaw.
How to Create Whiteboard Videos using Seesaw?
Seesaw is a free online web application services, that helps teachers, students and family members to keep a track of the learning services and activities, such as tasks and work assigned to students. One of the features of Seesaw is that it provides a whiteboard tool that can help teachers to convey the ideas just like it was used to be in classrooms. Students can access these whiteboard recorded lessons from their profile which shows up on their profile feed. Let us see how you can create these videos using a whiteboard in Seesaw.
For this, you first have to log in to your Seesaw account using your teacher email ID. You can use Gmail id for this part.
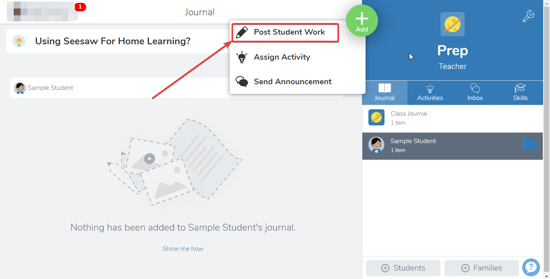
Next, When you have logged in, you will be redirected to dashboard where you will see the icon of “add”. Click on the icon to choose the first option, “Post student work”.
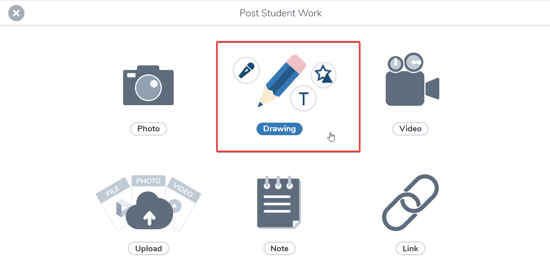
Then you will be redirected to the page where you will choose which type of work you want to post to the student. For using the whiteboard, select the “Drawing” option.
After clicking on drawing option, you will be provided with the space to use the whiteboard however you like. On the left side, there will be an option to record the screen along with spoken instructions using the device’s microphone. Once the microphone is enabled, you can record the whole session of using the whiteboard along with the spoken instructions.
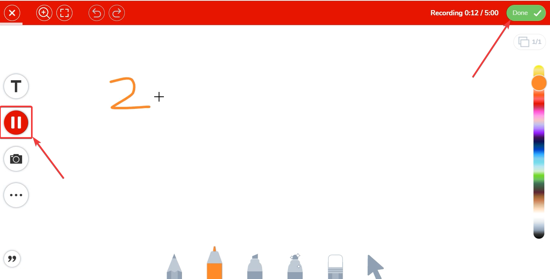
Click on the “Done” tab given on the top right corner and then select the students batch you want to share the video with.

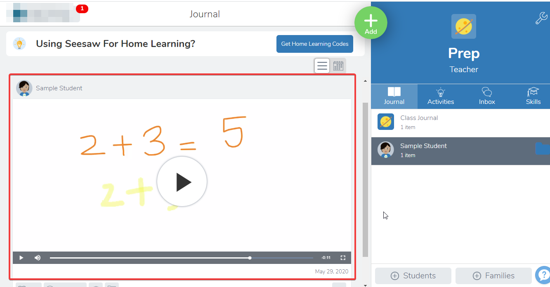
Then, click in the tick mark tab on the top right corner and the video will then be uploaded to the server and the students will be able to see it on their profile feed.
There you have it, it is that simple to create the whiteboard videos using Seesaw.
In brief
Seesaw is a great online collaborative tool for teachers and students to learn just like in the classroom. Using whiteboard videos in this application is a simple way to assign the work as well as clear concepts using your cursor just like chalk on the board.