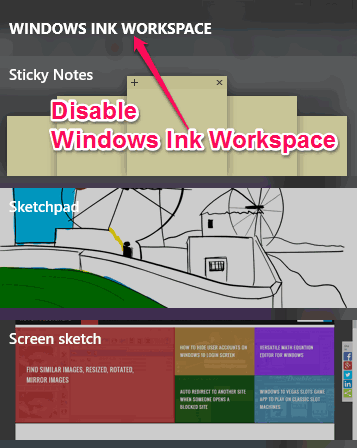
This tutorial demonstrates how to disable Windows Ink Workspace in Windows 10 PC. One of the major tools added by Microsoft in its anniversary update is the Windows Ink Workspace, which provides a seamless pen experience for all the Windows 10 users who love drawing and also happens to have a touchscreen device. It offers an amazing platform for using the following new features of Windows 10: Renovated Sticky Notes, Sketchpad, and Screen Sketch. However, if you don’t own a touchscreen device or not interested much in drawing, then there are ways using which you can disable the Windows Ink Workspace completely in your Windows 10 PC.
In this tutorial, I will explain two different methods to disable Windows Ink Workspace on your PC. Actually, you can do the same by tweaking some settings in the Group Policy Editor and Registry Editor (when using Windows 10 Home on PC). So, I will explain both the methods separately for you in this post.
How to Disable Windows Ink Workspace with Group Policy Editor:
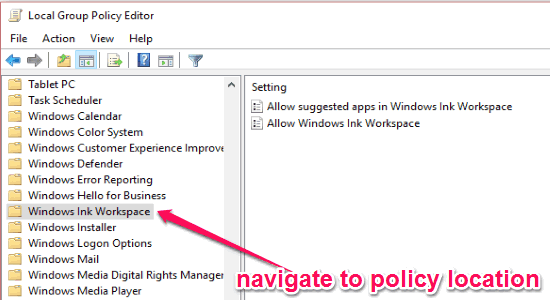
Step 1: To get started, simply press “Windows Key + R” and then type “gpedit.msc” in the input field to open up the Group Policy Editor. After the editor opens up, simply navigate to the following policy location:
"Computer Configuration >Administrative Templates >Windows Components >Windows Ink Workspace"
Step 2: Now, on the right panel double-click on the “Allow Windows Ink Workspace” option under the “Setting” section. It will open up the properties window, where you need to click on the “Enabled” option to enable it and then select “Disabled” in the drop-down menu under the section named, “Options”, as shown below.
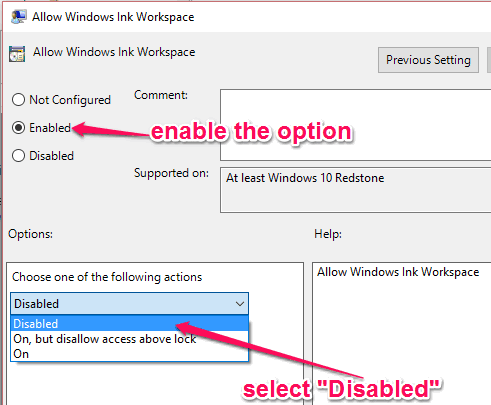
Step 3: After that, click “OK” and then hit the “Apply” button at the bottom of the properties window. Then simply restart your PC to apply the changes. Once your PC restarts, the Windows Ink Workspace will be completely disabled and you’ll not to able to use it from the Windows taskbar anymore.
How to Disable Windows Ink Workspace with Registry Editor:
Suppose, you’ve installed Windows 10 Home on your PC, then you’ll not be able to access “Group Policy Editor”. That means the above method will not work for disabling the Windows Ink Workspace. But you don’t have to worry about it, as this second method can be used to disable Windows Ink Workspace on PC running Windows 10 Home.
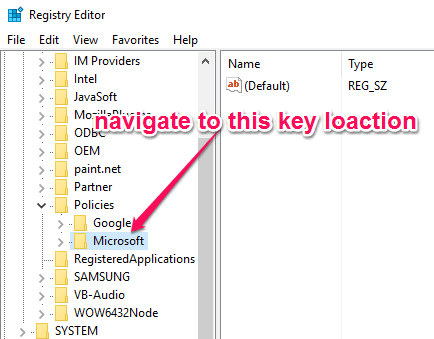
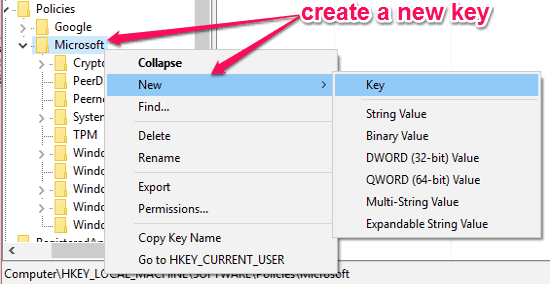
Step 1: First, you need to open up the “Run” program by pressing “Windows Key + R” and type “regedit” in the input field. After that simply hit Enter to launch the registry editor. Now, you need to browse the following key location:
"HKEY_LOCAL_MACHINE\SOFTWARE\Policies\Microsoft"
Step 2: After that, right-click on the “Microsoft” key folder and select New →Key to create a new key. After the new key is created, you need to rename it as “WindowsInkWorkspace“.
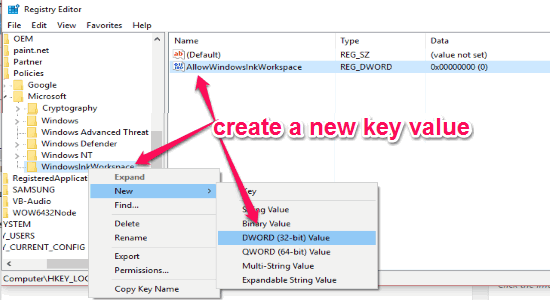
Step 3: When you’re done renaming the key, simply right-click on the new key and then select New →DWORD (32-bit) Value to create a new key value with respect to the key “WindowsInkWorkspace”. Name the new key value as “AllowWindowsInkWorkspace” and click “OK” to save it.
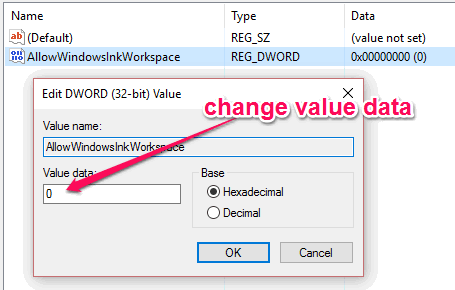
Step 4: After that, double-click on the key value “AllowWindowsInkWorkspace” to open the key value editor and then enter “0” in the “Value Data” field. Then click “OK” and close the registry editor. Now, restart your PC to apply the registry hack and you’ll see that the Windows Ink Workspace is disabled on your PC.
My Final Verdict:
If you want to get rid of Windows Ink Workspace in your Windows 10 PC, then go through both the methods and you’ll be able to do the same in a flash and with ease. The first method is for the users who are not using Windows 10 Home, whereas, the second method can help the Windows 10 Home users to disable Windows Ink Workspace.
I hope you find this post useful.